
Using Advanced Mode to scan with the MX340 (Windows)
| Article ID: ART106386 | | | Date published: 05/11/2015 | | | Date last updated: 11/04/2015 |
Description
Solution
Scanning in Advanced Mode
In Advanced Mode, you can specify the color mode, output resolution, image brightness, color tone, etc. when scanning.
This section explains how to scan a single document from the Platen.
-
The following types of documents may not be cropped correctly. In that case, click
 (Thumbnail) on the Toolbar to switch to whole image view and scan.
- Photos that have a whitish border
- Documents printed on white paper, hand-written text, business cards, etc.
- Thin documents
- Thick documents
-
The following types of documents cannot be cropped correctly.
- Documents smaller than 1.18 inches (3 cm) square
- Photos that have been cut to various shapes
-
Place the document on the Platen, then start ScanGear (scanner driver).
 Starting ScanGear (Scanner Driver)
 Important
-
Place the document face-down on the Platen and align an upper corner of the document with the corner at the arrow (alignment mark) of the Platen.
-
-
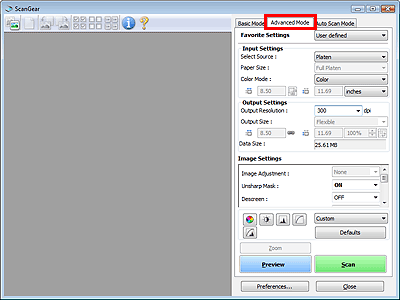
Click Advanced Mode.
The Advanced Mode tab appears.
 Note
Note-
Settings are not retained when you switch between modes.
-
-
Set Input Settings.
-
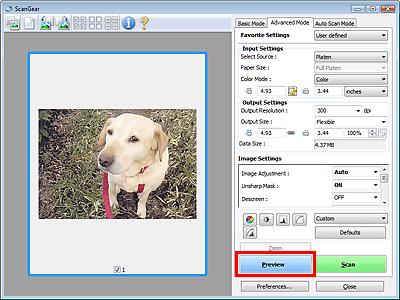
Click Preview.
Preview images appear in the Preview area.
 Note
Note-
If you scan without preview, the show-through reduction function will be active. This function is useful when scanning magazines. However, when scanning photos, the color tone of the scanned image may differ from the source due to the show-through reduction function. In that case, use preview first.
-
-
Set Output Settings.
-
Adjust the cropping frame (scan area), correct image and adjust colors as required.
-
Click Scan.
Starts scanning.
-
Click
 (Information) to open a dialog box in which you can check the current scan settings (document type, etc.).
 -
ScanGear's response after scanning can be specified in Status of ScanGear dialog after scanning on the Scan tab of the Preferences dialog box.
Input Settings
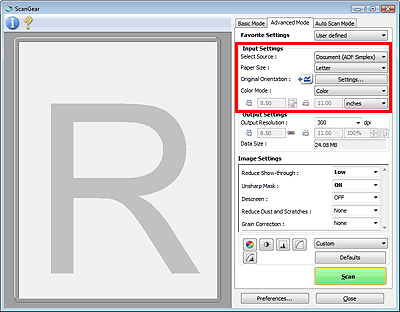
Input Settings allows you to set the following items:
-
Select Source
The type of document to be scanned is displayed. To scan from the Platen, select Platen. To scan from the ADF (Auto Document Feeder), select Document (ADF Simplex)
Important-
Even if you select to scan from the ADF (Auto Document Feeder), some applications do not support continuous scanning. For details, refer to the application's manual.
-
-
Paper Size
Select the size of the document to be scanned. This setting is available in whole film image view only.
When scanning sides of the documents automatically from the ADF (Auto Document Feeder), select A4 or Letter.
When you select a size, the Preview area size changes accordingly.
Important-
Some applications have a limit to the amount of scan data they can receive. ScanGear (scanner driver) can scan data that is of:
- 21000 pixels x 30000 pixels or less
-
If you change Paper Size after previewing, the preview image will be deleted.
Note-
If you are not sure which size you should select for Paper Size, set Paper Size to Full Platen, then measure the size of the document and enter the values into
 (Width) and
  (Height).
-
-
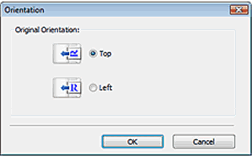
Original Orientation
Set the orientation and stapling side of the documents to scan from the ADF (Auto Document Feeder).
Click Settings... to open the Orientation dialog box.
 Important
-
The Orientation dialog box can only be opened when Select Source is Document (ADF Simplex).
-
-
Color Mode
Select how to scan the document.
-
Color
Select this mode to scan color documents or to create color images. This mode renders the image in 256 levels (8 bit) of R(ed), G(reen), and B(lue).
-
Grayscale
Select this mode to scan black and white photos, or to create black and white images. This mode renders the image in 256 levels (8 bit) of black and white.
-
Black and White
Select this mode to scan photos and documents in black and white. This mode renders the image in black and white. The contrast in the image is divided at certain levels (threshold level) into black and white and is rendered in two colors. The threshold level can be set with
 (Threshold).
-
-
Input Size
In thumbnail view, the cropped document size is displayed after preview.
In whole image view, the Paper Size is displayed before preview, and the cropping frame (scan area) size is displayed after preview.
You can adjust the cropping frame size by entering the values into
(Width) and (Height).Click
 (Keep Aspect Ratio) and change it to
  (Locked) to maintain the aspect ratio when you specify the cropping frame size.Important
-
Input size settings are available only when Output Size in Output Settings is Flexible. If you select a size other than Flexible, a cropping frame calculated from Output Size and Output Resolution is displayed, and its aspect ratio is fixed.
Note-
The values you can enter will be within the range of the selected document size. The minimum size is 96 pixels x 96 pixels when Output Resolution is 600 dpi, scaled at 100%.
-
When Auto Crop is performed in whole image view, the aspect ratio will not be maintained since the size will be prioritized.
-
Output Settings
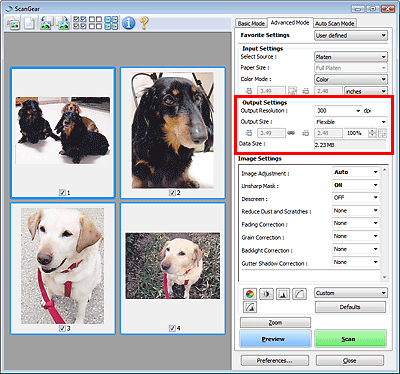
Output Settings allows you to set the following items:
-
Output Resolution
Select the resolution to scan at.
The higher the resolution (value), the more detail in your image.
Select a resolution from the options displayed by clicking the button, or enter a value in 1 dpi increments.
-
When Select Source is Platen
You can enter a value within the range of 25 dpi to 19200 dpi.
-
When Select Source is Document (ADF Simplex)
You can enter a value within the range of 25 dpi to 600 dpi.
-
-
Output Size
Select an output size.
Select Flexible to set custom sizes or select a size for printing or displaying. Select Add/Delete... to set custom size and save it as a new output size option.
-
Flexible
You can specify the output resolution and scale, and adjust the cropping frame.
In thumbnail view
Drag the mouse over a thumbnail to display a cropping frame. When a cropping frame is displayed, the portion within the cropping frame will be scanned. When no cropping frame is displayed, each frame is scanned individually.
In whole image view
When no cropping frame is displayed, the entire Preview area will be scanned. When a cropping frame is displayed, the portion within the cropping frame will be scanned.
Note-
To enlarge/reduce the scanned image, enter values into
(Width) and (Height) in Output Settings or specify a value (by 1%) for %. The maximum value available for % depends on the Output Resolution. % can be specified for up to 19200 dpi (the maximum available output resolution).
-
-
Paper Size (L, etc.) & Monitor Size (1024 x 768 pixels, etc.)
(Width), (Height) and scale cannot be specified. The preview image will be cropped according to the selected output size and resolution. The portion within the cropping frame will be scanned at the size of the selected paper/monitor size. You can drag the cropping frame to enlarge, reduce or move it while maintaining the aspect ratio. -
Add/Delete...
Opens the Add/Delete the Output Size dialog box, in which you can specify custom output sizes.
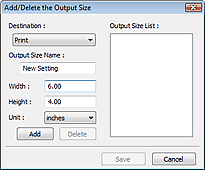
In the Add/Delete the Output Size dialog box, you can specify multiple output sizes and save them at one time. Saved items will be registered to the Output Size list and can be selected, along with the predefined items.
Add
To add a size, select Print or Image display for Destination, then enter Output Size Name, Width, and Height then click Add. The name of the added size appears in Output Size List.
Click Save to save the items listed in Output Size List.
Delete
To delete an item, select it in Output Size List and click Delete. Click Save to save the items listed in Output Size List.
Important-
You cannot delete predefined output sizes such as A4 and 1024 x 768 pixels.
Note- Save up to 10 items for each destination.
- An error message appears when you enter a value outside the setting range. Enter a value within the range displayed in the message.
- Unit varies by Destination. For Print, select mm or inches. For Image display, the unit is pixels.
-
 (Switch Aspect Ratio)
This button is available when Output Size is set to anything but Flexible.
Click this button to rotate the cropping frame. Click again to return it to the original orientation.
-
-
Data Size
An image file is created when the preview image is scanned. Its size when saved in BMP format is displayed.
Note- When the file size exceeds a certain size, the value appears in red. In that case, a warning message appears when you click Scan. It is recommended that you adjust the settings to reduce Data Size. To continue, scan in whole image view.
Starting ScanGear (Scanner Driver)
Use ScanGear (scanner driver) to make image corrections and color adjustments when scanning. ScanGear can be started from MP Navigator EX or an application.
-
To scan via a network connection, start ScanGear and set up the network environment before scanning.
Starting from MP Navigator EX
Navigation Mode Screen
Follow these steps to start ScanGear from the Navigation Mode screen of MP Navigator EX.
-
Start MP Navigator EX and open the Navigation Mode screen.
-
Point to Scan/Import and click Photos/Documents (Platen).
The Scan/Import window opens.
-
Select the Use the scanner driver checkbox, then click Open Scanner Driver.
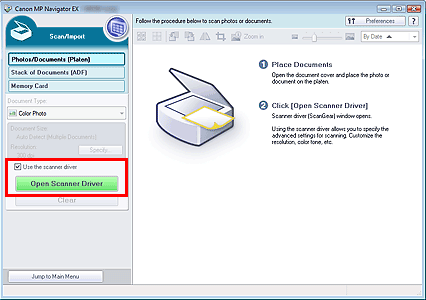
The ScanGear screen appears.
One-click Mode Screen
Follow these steps to start ScanGear from the One-click Mode screen of MP Navigator EX.
-
Start MP Navigator EX and open the One-click Mode screen.
-
Click the corresponding icon.
The corresponding dialog box opens.
-
Select the Use the scanner driver checkbox in Scan Settings, then click Scan.
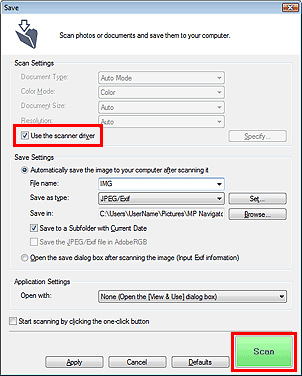
The ScanGear screen appears.
Important-
Use the scanner driver is not displayed in the PDF dialog box or Auto Scan dialog box.
-
Starting from an Application
Follow these steps (example) to start ScanGear from an application.
The procedure varies depending on the application. For details, refer to the application's manual.
-
Start the application.
-
On the File menu of the application, select Select Source and select the machine.
Important-
For network connection, the MAC address is displayed after the product name
-
-
Select the command to scan a document (Scan/Import, Acquire image, etc.).
The ScanGear screen appears.