
Orange Light Lit or Flashing on a PIXMA MG2220
| Article ID: ART137855 | | | Date published: 05/13/2015 | | | Date last updated: 04/30/2020 |
Description
Learn what causes the orange alarm lamp to light up or flash on your MG2220 printer.
Solution
When a machine error occurs, the alarm lamp on your printer is either lit orange or flashing orange. An Error Code also displays on your printer screen.
Check the Error Code and refer to the table below for the action steps you can take to clear the error.
-
If the alarm lamp is lit orange, refer to Table 1.
-
If the alarm lamp is flashing orange, refer to Table 2.
Alarm Lamp Is Lit Orange*
 *Depending on the error occurred, the alarm lamp may not light.

The term Support Code on the table below means the error number. It appears on the computer screen with a message when an error occurs.
Table 1
|
Support Code |
Error Code |
Cause |
Action |
|---|---|---|---|
|
1003 |
E, 0, 2  |
The machine is out of paper, |
|
|
1300 1303 |
E, 0, 3  |
Paper jam. |
|
|
1687 |
E, 0, 4  |
The ink cartridge isn't installed properly. |
Install the ink cartridges properly:
|
|
1401 1403 |
E, 0, 5  |
The ink cartridge isn't installed properly. |
Remove and replace or reinstall the ink cartridges. |
|
1485 |
E, 0, 5 |
The appropriate ink cartridge isn't installed. |
The ink cartridge isn't installed or it's not compatible with your printer. |
|
1202 |
E, 0, 6  |
The paper output cover is open. |
Close the paper output cover. |
|
1486 1487 |
E, 0, 7  |
The ink cartridge isn't installed in the correct position. |
|
|
1702 1704 1712 1714 |
E, 0, 8  |
Ink absorber is almost full. |
Press the machine's Black or Color button to continue printing. |
|
4100 |
E, 1, 2  |
Cannot print the contents on CREATIVE PARK PREMIUM. |
When you print the contents on CREATIVE PARK PREMIUM, confirm the message on the computer screen, make sure that correct cartridges are installed, then restart the print task. |
|
1686 |
E, 1, 3  |
The remaining ink level cannot be detected. |
The ink may have run out. The function for detecting the remaining ink level may be disabled since the ink level can't be correctly detected. To continue printing without this function, press the Stop/Reset button for at least 5 seconds. Please be advised that Canon shall not be liable for any malfunction or trouble caused by continuation of printing under the ink out condition. |
|
1684 |
E, 1, 4  |
Ink cartridge cannot be recognized. |
The ink cartridge may not be installed properly or may not be compatible with the printer. |
|
1682 |
E, 1, 5  |
The ink cartridge cannot be recognized. |
If your product issue was not resolved after following the steps above, or if you require additional help, please create or log in to your Canon Account to see your technical support options.
|
|
1688 |
E, 1, 6  |
The ink has run out. |
Replace the ink cartridge and close the paper output cover. If printing is in progress and you want to continue printing, press the printer's Stop/Reset button for at least 5 seconds with the ink cartridge installed. Then printing can continue under the ink out condition. The function for detecting the remaining ink level may be disabled. Replace the empty ink cartridge immediately after the printing. |
|
1250 |
E, 1, 7  |
The front tray is closed. |
Open the front tray to resume printing. |
|
- |
E, 3, 0  |
The size of the original cannot be correctly detected. |
Make sure the original is correctly loaded on the glass surface. |
|
- |
E, 3, 1  |
The machine is not connected with the computer. |
Connect the machine and the computer with a USB cable. |
|
1890 |
E, 4, 0  |
The protective material for the ink cartridge or the tape remains attached. |
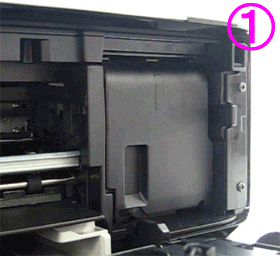
Check the inside of the printer and remove the protective material or tape. |
|
- |
E, 5, 0  |
Scanning the print head alignment sheet has failed. |
Press the Stop / Reset button to clear the error, then check the following:
If the error isn't resolved, align the print head for Windows or align the print head for Mac®. |
 When you load the paper, insert the paper stack until the leading edge touches the far end of the front tray.
 Be careful not to touch the other inner parts of the printer.

Alarm Lamp Flashes Orange
If the alarm lamp flashes orange (as shown below), refer to the table for help.
(These errors represent unrecoverable hardware issues that may require service if the steps below are unsucessful.)

Table 2
|
Support Code |
Error Code |
Action |
|---|---|---|
|
5100 |
P, 0, 2  |
Check the following:
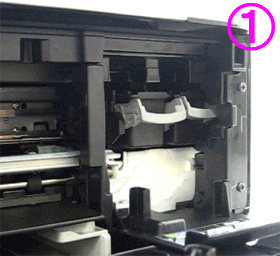
*The printer detects the position of the ink cartridge holder by the encoder film. If the film is smeared, the holder position can't be detected.  Be careful not to touch the components inside the printer or it may not print properly. Be careful not to touch the components inside the printer or it may not print properly. |
|
5B02 5B04 5B12 5B14 |
P, 0, 7  |
A printer error has occurred.
|
|
P, 1, 0  |
You may be able to recover from this error by replacing the ink cartridges. |
|
|
5011 5012 5200 5400 6000 6800 6801 6930 6931 6932 6933 6936 6937 6938 6940 6941 6942 6943 6944 6945 6946 |
Other cases than above: |
If your product issue was not resolved after following the steps above, or if you require additional help, please create or log in to your Canon Account to see your technical support options.
|