Cleaning the Inside of the Printer
Cleaning the Fixing Roller (Cleaning 1)
If the printed paper has smudge marks, clean the fixing roller using the following procedure.
important:
Have Letter size plain paper ready.
- The fixing roller cannot be cleaned with any plain paper other than Letter. Be sure to load Letter size plain paper when cleaning the fixing roller.
1. Load Letter-size plain paper in the multi-purpose tray or paper cassette.
For details on the procedures for loading paper, see "User's Guide" (HTML manual) in the CD-ROM supplied with the printer.
2. Display the Printer Status Window.
Click [  ] in the Windows taskbar, and then select the printer name.

note:
When displaying the Printer Status Window from the printer driver
- Click [
 ] (Display Printer Status Window) in locations such as in the [Page Setup] sheet.
3. From the [Options] menu, select [Utility] m² [Cleaning 1].
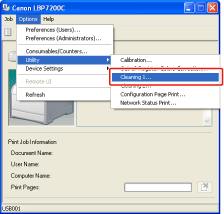
4. Click [OK].

m² The paper is fed into the printer, and the printer starts cleaning the fixing roller.
The cleaning is finished when the paper is output completely.
* Cleaning the fixing roller cannot be canceled. Please wait until it is completed.
important:
Do not touch the paper until it is output completely while cleaning the fixing roller.
- The paper is once output partially after the front side is printed, and then it is fed again to clean the fixing roller.
note:
Cleaning time for the fixing roller
- It takes approximately 70 seconds.
Cleaning the Transfer Belt (Cleaning 2)
If the transfer belt of the ITB unit has dirt, this may result in deterioration in print quality. In this case, clean the transfer belt using the following procedure.
1. Display the Printer Status Window.
Click [ ] in the Windows taskbar, and then select the printer name.
note:
When displaying the Printer Status Window from the printer driver
- Click [ ] (Display Printer Status Window) in locations such as in the [Page Setup] sheet.
2. From the [Options] menu, select [Utility] m² [Cleaning 2].
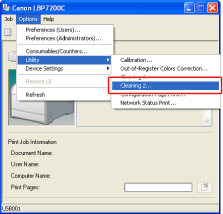
3. Click [OK].
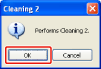
m² The message <Cleaning> appears in the Printer Status Window, and the printer starts cleaning the transfer belt.
The cleaning is finished after the preceding message disappears.
* Cleaning the transfer belt cannot be canceled. Please wait until it is completed.
note:
Cleaning time for the transfer belt
- It takes approximately 50 seconds.
