Previewing and Printing with Easy-WebPrint EX for Mac
Article ID: ART131602
|
Date published: 05/12/2015
|
Date last updated: 08/17/2015
Description
You can preview and print the web page displayed in Safari.
Solution
Previewing and Printing
Previewing and Printing
You can preview and print the web page displayed in Safari.
Open the web page you want to print in Safari.
From the Go menu of Finder, select Applications, then double-click the Canon Utilities folder, Easy-WebPrint EX folder, then Easy-WebPrint EX icon. A Safari screen containing the Easy-WebPrint EX menu bar appears in a new window.
Note: Alternatively, when the Easy-WebPrint EX icon is added to the Dock, click it to display a Safari screen containing the Easy-WebPrint EX menu bar.
Click the Preview button.
The Preview screen appears.
Note: You can also display the Preview screen by clicking the Preview/Print button in the Clip Mode screen or Auto Clip Mode screen.
In this screen, you can see how a printed web page will look like, and make various print settings such as print size and the number of columns, then start printing.
To display the Preview screen, click the Preview button.
Alternatively, click the Preview/Print button in the Clip Mode screen or Auto Clip Mode screen.
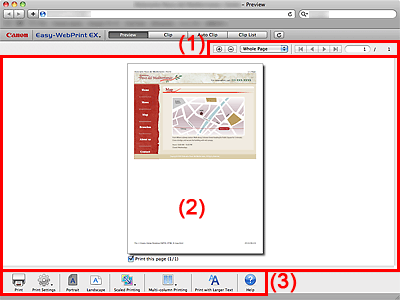
(1)View Toolbar
(Zoom In/Zoom Out) Button Zooms in/out on a page.
You can zoom at 25%, 50%, 75%, 100%, 150% or 200%.
Note: Alternatively, click (Change Display Scale) to select Page Width, Whole Page, 2 Page View or Thumbnail View from the pull-down menu.
(Move Page) Button
Click to specify preview pages.
Alternatively, enter the page number directly.
(2)Preview Area
Preview
Displays the print preview.
Note: If text or an image is located over a page break position, it will automatically be placed on the latter page to reduce text/image truncation. However, the text/image may be truncated depending on the displayed web page.
Print this page
Only the pages with the checkbox selected will be printed.
(3)Print Toolbar
Print Button
Displays the Print dialog in which you can select the printer, check the print settings and start printing.
The Preview screen closes after the print job is sent to the printer.
Print Settings Button
Click to open the pull-down menu.
Page Setup... Displays the Page Setup dialog in which you can set the paper size, print orientation, etc.
Option Settings... Displays the Option Settings dialog in which you can select optional items to print (header, footer, etc.).
Portrait/Landscape Button
Select portrait or landscape orientation.
Scaled Printing Button
Click to display the scale slider.
Move the slider up to reduce and down to enlarge.
You can adjust within the range of 10% to 200%.
(Zoom In/Zoom Out) Button
You can adjust the scale in 1% increments.
The scale is displayed under the button.
(Defaults) Button
Restores the default scale.
Note: The default scale is 100%. However, if the page is wider than the paper at 100%, the page is reduced to fit the paper width.
Multi-column Printing Button
Click to open the pull-down menu.
Select 1 Column, 2 Columns or 3 Columns.
Print with Larger Text Button
You can enlarge the text for printing.
Note:
Text may not be enlarged depending on the font setting of the web page.
The text layout may break depending on the web page.
This button is not displayed when the Preview screen is opened from the Clip Mode screen or Auto Clip Mode screen.
Select Frame Button
Click to open the pull-down menu.
Select As laid out on screen or All frames individually.
Note:
This button is displayed only when a framed page is displayed.
A "framed page" consists of multiple frames, each displaying a different document.
Help Button
Displays this document.
Return Button
Closes the Preview screen and returns to the Clip Mode screen or Auto Clip Mode screen.
Note: This button is displayed only when the Preview screen is opened from the Clip Mode screen or Auto Clip Mode screen.


 (Zoom In/Zoom Out) Button
 (Move Page) Button
 Print Settings Button
 Portrait/Landscape Button
 Scaled Printing Button
 (Zoom In/Zoom Out) Button
 (Defaults) Button
 Multi-column Printing Button
 Print with Larger Text Button
 Select Frame Button
 Help Button