It is not possible to use the camera to crop or perform angular adjustments on images saved to the camera.However, you can use the [Cropping] setting on the print setting screen to crop the image and print only an enlarged version of the cropped portion, as if the image had been recomposed. REFERENCE - Set the cropping right before printing. If you change the print settings after setting the cropping, you may have to set the cropping again before printing.
- While cropping the image, look at the cameras LCD monitor. If you look at the image on a TV screen, the cropping frame may not be displayed accurately.
NOTE Icons used on this page: <  >: Main Dial / <  >: Quick Control Dial / <  >: Multi-controller / <  >:Magnify button / <   >: Index/Reduce button *The icons and markings indicating the cameras buttons, dials, and settings correspond to the icons and markings on the camera and on the LCD monitor.
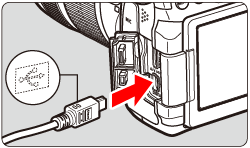
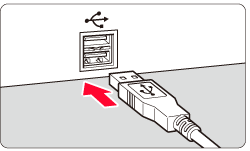
1. Set the cameras power switch to <OFF>.  2. Set up the printer. For details, refer to the printers instruction manual. 3. Connect the camera to the printer. - Use the interface cable provided with the camera.
- Connect the cable to the cameras < DIGITAL > terminal with the cable plugs <
 > icon facing the front of the camera. > icon facing the front of the camera. - To connect to the printer, refer to the printers instruction manual.
  4. Turn on the printer. 5. Set the cameras power switch to <ON>. Some printers may make a beeping sound. 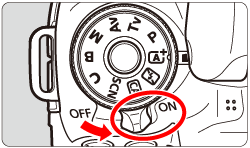 6. Play back the image. - Press the <
 > button. > button.
The image will appear, with the [  ] icon on the upper left of the screen to indicate that the camera is connected to a printer.  7. Turn the < > dial to select the image to be printed. 8. Press <  >. The print setting screen will appear. 9. On the print setting screen, select [Cropping], then press < >.  10. Set the cropping frame size, position, and aspect ratio. NOTE The image area within the cropping frame will be printed. The cropping frames aspect ratio can be changed with [Paper settings].

 . Changing the Cropping Frame Size When you press the < > or < / > button, the size of the cropping frame will change. The smaller the cropping frame, the larger the image magnification will be for printing. 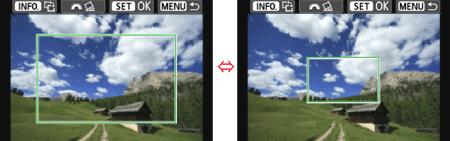 IMPORTANT The smaller you make the cropping frame, the grainier the picture will look in the print.
 . Moving the Cropping Frame Use < > to move the frame over the image vertically or horizontally. Move the cropping frame until it covers the desired image area.   . Rotating the Frame Pressing the <  > button will toggle the cropping frame between the vertical and horizontal orientations. This enables you to create a vertically oriented print from a horizontal image.   . Image Tilt Correction By turning the < > dial, you can adjust the image tilt angle up to 10 degrees in 0.5-degree increments. When you adjust the image tilt, the <  > icon on the screen will turn blue.  11. Press < > to exit the cropping. The print setting screen will reappear. - You can check the cropped image area on the upper left of the print setting screen.
 IMPORTANT - Depending on the printer, the cropped image area may not be printed as you specified.
| 
