
DPOF printing options PowerShot A630 and A640
| Article ID: ART127187 | | | Date published: 05/12/2015 | | | Date last updated: 08/14/2015 |
Description
Solution
Print Settings (DPOF Print Settings) - PowerShot A630 & A640
You can select images on a SD card for printing and specify the number of print copies in advance using the camera. This is extremely convenient for sending the images to a photo developing service or for printing on a direct print function compatible printer (CP Series) or a direct print function compatible BJ printer.
|
Selecting Single Images for Printing
Selecting All the Images for Printing
Printing with DPOF Print Settings
Selecting Single Images for Printing
| 1. Turn the camera on, and set the mode switch to |
 |
| 2. Press the <MENU> button, and in the |
 |
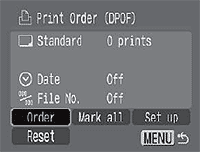
3. Select [Order] using the left or right button and press the <FUNC./SET> button.
|
 |
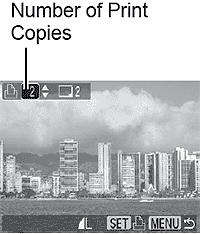
4. Select images for printing.
|
 |
|
 |
| 5. Press the <MENU> button to exit. |
 (Standard) /
  ()
()Selecting All the Images on a SD Card
| 1. Turn the camera on, and set the mode switch to |
|
| 2. Press the <MENU> button, and in the |
|
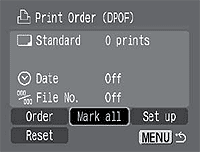
3. Select [Mark all] and press <FUNC./SET>.
|
 |
| 4. Select [OK] and press <FUNC./SET> | |
| 5. Press the <MENU> button to exit. |

|
Setting the Print Style
Set the print style after selecting the image to print. The following print settings can be selected.
|
|
Prints one image per page | |
|
|
Prints the selected images together at a reduced size in an index format. | |
|
|
Prints the images in the standard and index formats | |
|
|
Adds the date to the print | |
|
|
Adds the file number to the print | |
 Date
Date File No.
| 1. Make sure the camera is on and still set to the |
|
| 2. Press the <MENU> button, and in the |
|
| 3. Select [Set up] and press <FUNC./SET>. | 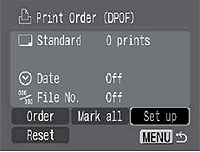 |
|
4. Select [ |
|
| 5. Select a setting using the |
|
| 6. Press the <MENU> button to exit. | |
|
Resetting the Print Settings
The print settings can all be removed at once. The print type is reset to [Standard] and the date and file number options are set to [Off].
- In the [
 (Replay)] menu, select [
 (Print Order)] and press the <FUNC./SET> button.
 - Select [Reset] using the left or right button and press the <FUNC./SET> button.
- Select [OK] using the left or right button and press the <FUNC./SET> button.
- If you decide you don't want to reset the settings, select [Cancel] and press the <FUNC./SET> button.
Printing with DPOF Print Settings
You can use the DPOF print settings to print with an optional direct print function compatible printer (Canon CP Series), PictBridge printer or with a Direct Print function-compatible Canon BJ printer.
- After setting the DPOF print settings as explained in the above sections, turn off the camera and connect it to the photo printer.
- Turn the camera on, and set the mode switch to
 mode.
mode. - Press the <MENU> button, and in the [ (Replay)] menu, select [ Print Order], then press the <FUNC./SET> button.
- Select [Print] using the omni selector buttons, and press the <FUNC./SET> button.
- Set the print style settings as required.
- NOTE: A print style cannot be set if the print type is set to [Index] in the DPOF print setting. (You can also select the type of paper when printing with a BJ printer.) - Select [Print] using the
 or
or  button and press the <FUNC./SET> button.
|
|
Restarting Printing
In the Print Order menu, select [Resume] using the left and right buttons and press the <FUNC./SET> button. The remaining images can be printed.
Printing cannot be restarted under the following circumstances:
- If the print settings have been changed before restarting.
- If the image for which the print settings were set has been deleted before restarting.
- If there was very little free space on the SD card when the printing was cancelled. If these circumstances apply, you can select [OK] in the Print Order menu and reprint starting from the first image.
- If printing was cancelled because the camera battery became discharged, it is recommended to power the camera with the AC Adapter Kit ACK600 (sold separately), use AA-size fully-charged nickel metal hydride (NiMH) or unused alkaline batteries. After replacing the spent batteries, turn the camera power on again.