You can perform the following tasks. - Registering group addresses - Adding destinations to a group - Deleting destination from a group - Changing the group name - Deleting group(s) IMPORTANT Before registering group addresses - Register group addresses in unused one-touch keys or coded dial codes. Leave some one-touch keys or coded dials unused for group dialing.
- Destinations must be registered in one-touch keys or coded dial codes before they are added to a group.
Registering and Editing a Destination Group from the Operation Panel 1. Press [  ] or [  ]. 2. Press [  ] (Address Book).
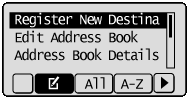
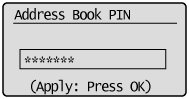
  To register new group addresses (1) Press [  ]. (2) Select <Register New Destination to Address Book> using [  ] or [  ] and press [OK].  When the address book PIN is selected Use the numeric keys to enter the PIN and press [OK].
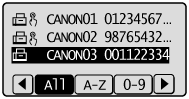
 (3) Select <One-Touch> or <Coded Dial> using [ ] or [ ] and press [OK].
 (4) Select <Group> using [ ] or [ ] and press [OK].
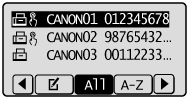
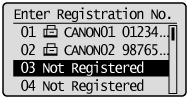
 (5) If you selected <One-Touch> in Step (3), select the number to be registered using [ ] or [ ] and press [OK].
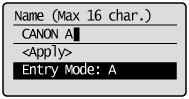
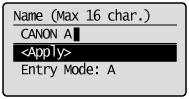
 (6) Select <Name> using [ ] or [ ] and press [OK].
 (7) Use the numeric keys to specify <Name>.
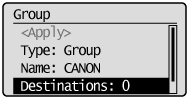
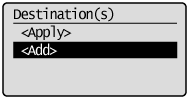
 (8) Select <Apply> using [ ] or [ ] and press [OK].
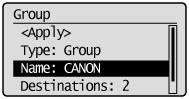
 (9) Select <Destinations: > using [ ] or [ ] and press [OK].
 (10) Select <Add> using [ ] or [ ] and press [OK].
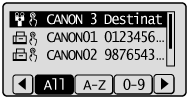
 (11) Select the destination that you want to add using [ ] or [ ] and press [OK].
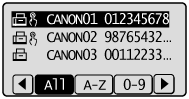 (12) Repeat Steps (10) and (11) to select the destinations to be added. (13) Select <Apply> using [ ] or [ ] and press [OK].
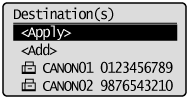 (14) Select <Apply> using [ ] or [ ] and press [OK].
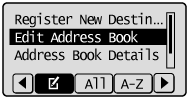
 To add destination(s) to a group (1) Press [ ]. (2) Select <Edit Address Book> using [ ] or [ ] and press [OK]. When the address book PIN is selected Use the numeric keys to enter the PIN and press [OK].
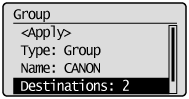
 (3) Select the group to be edited using [ ] or [ ] and press [OK].
 (4) Select <Destinations: > using [ ] or [ ] and press [OK].
 (5) Select <Add> using [ ] or [ ] and press [OK].
 (6) Select the destination to be added using [ ] or [ ] and press [OK].
 (7) Select <Apply> using [ ] or [ ] press [OK].
 (8) Select <Apply> using [ ] or [ ] and press [OK].
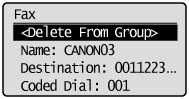
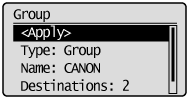
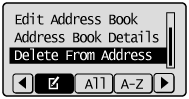
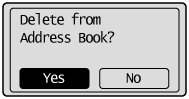
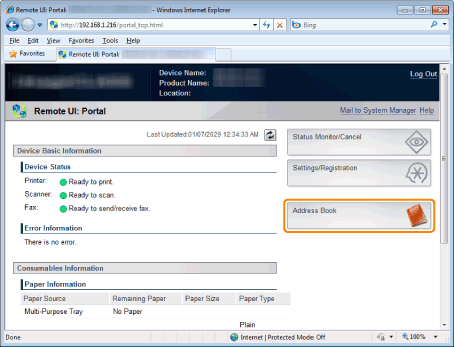
 To delete destination(s) from a group (1) Press [ ]. (2) Select <Edit Address Book> using [ ] or [ ] and press [OK]. When the address book PIN is selected Use the numeric keys to enter the PIN and press [OK]. (3) Select the group to be edited using [ ] or [ ] and press [OK]. (4) Select <Destinations: > using [ ] or [ ] and press [OK]. (5) Select the destination to be deleted using [ ] or [ ] and press [OK]. (6) Select <Delete From Group> using [ ] or [ ] and press [OK]. (7) Select <Yes> using [ ] and press [OK]. (8) Select <Apply> using [ ] or [ ] and press [OK]. (9) Select <Apply> using [ ] or [ ] and press [OK]. To change the name of a group (1) Press [ ]. (2) Select <Edit Address Book> using [ ] or [ ] and press [OK]. When the address book PIN is selected Use the numeric keys to enter the PIN and press [OK]. (3) Select the group of which name will be changed using [ ] or [ ] and press [OK]. (4) Select <Name> using [ ] or [ ] and press [OK]. (5) Change <Name>. (6) Select <Apply> using [ ] or [ ] press [OK]. (7) Select <Apply> using [ ] or [ ] and press [OK]. To delete group(s) (1) Press [ ]. (2) Select <Delete From Address Book> using [ ] or [ ] and press [OK]. When the address book PIN is selected Use the numeric keys to enter the PIN and press [OK]. (3) Select the group that you want to delete using [ ] or [ ] and press [OK]. (4) Select <Yes> using [ ] and press [OK]. 3. Press [  ] (Back) to close the menu screen. Registering and Editing a Destination Group Using the Remote UI 1. Start the Remote UI and log on to the system manager mode. For details on the procedures for starting the Remote UI, see the "e-Manual" (HTML manual) in the CD-ROM supplied with the machine. 2. Click [Address Book].
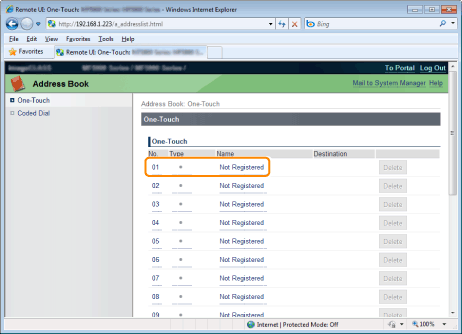
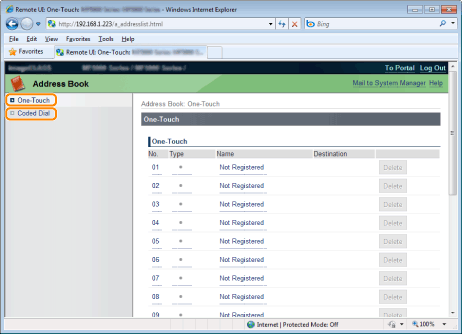
 3. Click [One-Touch] or [Coded Dial].
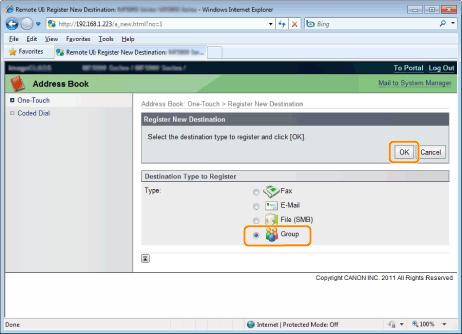
 To register a group dial Proceed to Step 4. To add destination(s) to the registered group dial (1) Click [No.], [Type] or [Name]. (2) Click [Edit]. (3) Click [Select from Address Book]. (4) Click [One-Touch] or [Coded Dial] from the drop-down list and click [Display]. (5) Select the check box of the destination which you want to add to the group and click [OK]. (6) Make sure the destination you registered is displayed in [Members List] and click [OK]. To delete destination(s) from the registered group dial (1) Click [No.], [Type] or [Name]. (2) Click [Edit]. (3) Select the destination to be deleted from [Members List] and click [Delete]. (4) Click [OK]. To change the name of the registered group dial (1) Click [No.], [Type] or [Name]. (2) Click [Edit]. (3) Change the name of [Group Name] and click [OK]. To delete the registered group dial Click [Delete] of the group dial which you want to delete. 4. Click the unregistered [No.], [Type] or [Name]. 5. Select [Group] in [Destination Type to Register] and click [OK]. 6. Enter the group name in [Group Name] and click [Select from Address Book].
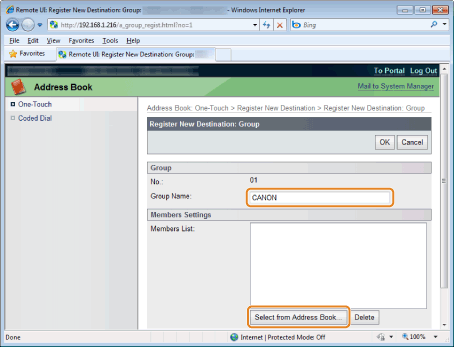 7. Select the destination(s) to be registered in this group. (1) Select [One-Touch] or [Coded Dial] from the drop-down list and click [Display]. (2) Select the check box of the destination which you want to register in the group. (3) Click [OK].
 8. Make sure that the destination you registered is displayed in [Members List] and click [OK].

|