Follow the steps below to install / replace an ink cartridge.
Remove ink cartridges
-
Turn the printer ON, and open the paper output tray.
-
Lift the scanning unit cover, then hold it open with the scanning unit support (C). The cartridge holder moves to the replacement position.
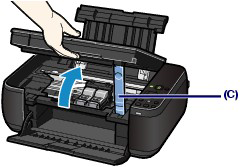
 The inside of the machine may be stained with ink. Be careful not to stain your hands or clothes when you replace the cartridges. You can easily wipe off the ink from the inside of the machine with a dry cloth.
-
Make sure the scanning unit cover and the document cover are together when you lift the scanning unit cover.
-
Don't try and stop of forcibly move the cartridge holder.
-
Don't touch the print head until it stops completely.
-
Don't touch the metallic parts or other parts inside the machine.
 If the scanning unit cover is left open for more than 10 minutes, the cartridge holder moves to the right. If this happens, close, then reopen the scanning unit cover.
-
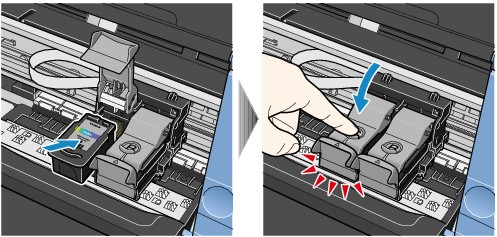
Remove the empty cartridge (see slide images below).
-
Pinch the tabs and open the ink cartridge locking cover.
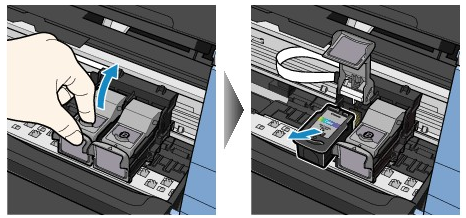
Handle the cartridges carefully to avoid stains on your clothes and work area. Discard empty cartridges based on your local laws and regulations.
Install the ink cartridges
-
Take a new cartridge out of its package (1).
-
Gently remove the orange protective tape (2).
If you shake the cartridge, ink may spill out and stain your hands and your work area. Handle the cartridge carefully.
-
Put a new cartridge in the cartridge holder. The color cartridge goes on the left and the black cartridge goes on the right.
-
Close the ink cartridge locking cover to lock the cartridge into place.
-
Push down the ink cartridge locking cover until it clicks.
-
Confirm that the ink cartridge locking cover is closed correctly (E), if not, push down the ink cartridge locking cover until it clicks.
(F) Not closed correctly (the cover is tilted).

The machine can't print unless the color and black cartridges are both installed.
-
Lift the scanning unit cover slightly to set the scanning unit support back to its original position. Gently close the scanning unit cover.
Good to know
-
Don't touch the electrical contacts or print head nozzles on the cartridge. The machine may not print properly.
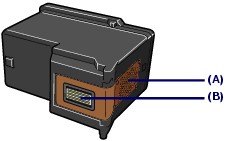
(A) Electrical contacts.
(B) Print head nozzles.
-
To maintain optimal print quality, we recommend the use of Canon brand FINE Cartridges. Ink tank refills aren't recommended.
-
If you remove a cartridge, replace it immediately. Don't leave the machine without a cartridge installed.
-
Use new cartridges for replacement. Used cartridges may cause the nozzles to clog and you won't be able to receive the cartridge replacement warning from the machine.
-
To maintain optimal print quality, install the cartridges in the machine within the date indicated on the package box.
-
Use the cartridges within 6 months after installation. Write down the date when you installed them.
-
When you start printing after you replace a cartridge, the machine starts print head cleaning automatically. Don't perform any other operations until the machine completes print head cleaning. The power lamp will flash in process.
-
If printed ruled lines or the print head position is misaligned, adjust the print head position.
-
If an error message appears on the LCD after the scanning unit (cover) is closed, please write the error message down. Perform a search for the error in our Knowledge Base
When setting the scanning unit support back to its original position, be sure to hold the scanning unit cover firmly. Be careful not to get your fingers caught.
If your product issue was not resolved after following the steps above, or if you require additional help, please create or log in to your Canon Account to see your technical support options.
Or if you still need help, visit our Canon Community by clicking the button below to get answers:

____________________________________________________________________________________________
