Checking or Changing the Receive Mode Settings
If you want to check or change the receive mode settings on your MAXIFY MB2020 / MB2120, follow the steps below to access the Receive mode settings menu.
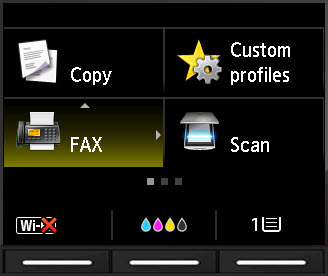
- Make sure that the machine is turned on.
- From the HOME screen, use the arrow keys to select FAX and press OK.
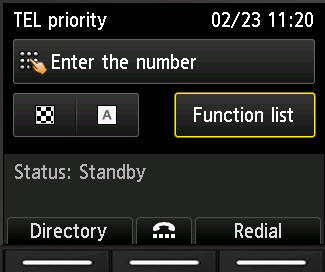
- Use the arrow keys to select Function list and press the OK button.
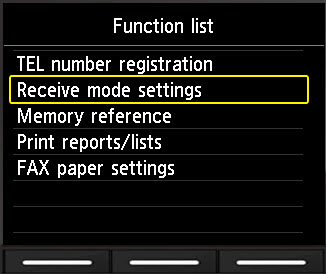
- Use the arrow keys to select Receive mode settings and press the OK button.
In the
Receive mode settings menu, you can use the arrow keys to select the following modes. Press
OK after highlighting the mode you want to use:
- FAX only mode
- DRPD
- TEL priority mode
Fax only mode
- With FAX only mode highlighted, press the right Function key under Advanced.

- Press OK on Incoming ring.

- Use the up and down arrow keys to specify the number of rings needed before the printer answers the phone. When you have reached the specified number of rings, press OK.

- The printer will acknowledge that you have specified the desired number of incoming rings.

- You will be back at the Advanced menu. Press the Back
 button until you return to the Fax screen.

DRPD
- With DRPD highlighted, press the right Function key under Advanced.

- To specify the ring pattern your phone line uses, press OK when DRPD: FAX ring pattern is highlighted.

- Use the up and down arrows to highlight the ring pattern for your phone line and press OK.

- The printer will then confirm your selection.

- You will be returned to the Advanced menu. Use the down arrow to highlight Incoming ring. Then, press OK.

- Use the up and down arrow keys to specify the number of rings needed before the printer answers the phone. When you have reached the specified number of rings, press OK.
- The printer will acknowledge that you have specified the desired number of incoming rings.
- You will be back at the Advanced menu. Press the Back button until you return to the Fax screen.

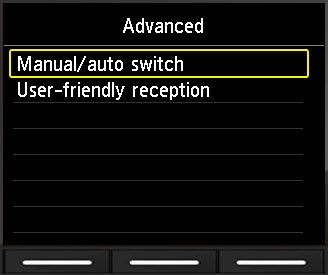
TEL priority mode
- By default, the receive mode is set to Tel priority mode. With this option highlighted, press the right Function key below the screen to access the Advanced options.

- Use the arrow keys to select Manual/auto switch, and press the OK button.
- Use the arrow keys to choose OFF or ON, and press the OK button.
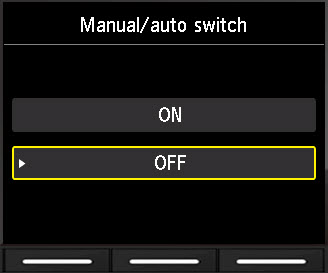
OFF: Is the default setting and the printer will not answer as a fax.
- OFF: The machine will not answer as a fax.
- ON: The machine will automatically answer as a fax based on the RX start time.
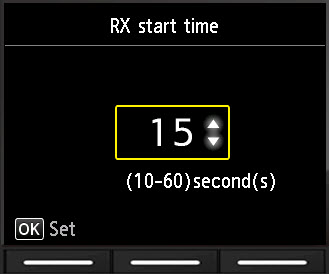
- Use the up or down arrows to specify the RX start time (the length of time until automatic reception is started (10 - 60 seconds)).
- Press the OK button.
- The printer will confirm that Manual/auto switch is ON.

- You will be taken back to the Advanced menu. Use the down arrow to highlight User-friendly reception and press OK.

- Use the up or down arrows to specify if you want User-friendly reception to be ON or OFF. Then, press OK.

- The printer will indicate whether User-friendly reception is ON or OFF.

- You will be back at the Advanced menu. Press the Back button until you return to the Fax screen.
MAXIFY Printers Support
