|
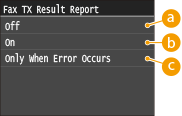
TX Result Report You can check the fax or e-mail/I-Fax logs of sent documents as well as documents scanned to a shared folder or FTP server by printing a TX Result Report. The report can be printed either every time a transmission is completed or only when a sending error occurs.
 <Off>
Select if you do not want to print TX Result Reports.
 <On>
Select to print a TX Result Report every time you send a document.
 <Only When Error Occurs>
Select to print a TX Result Report only when a sending error occurs.
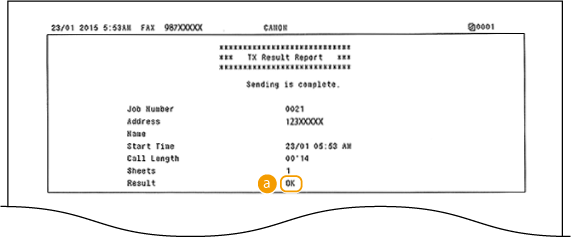
 Example: Fax sending (D1550)
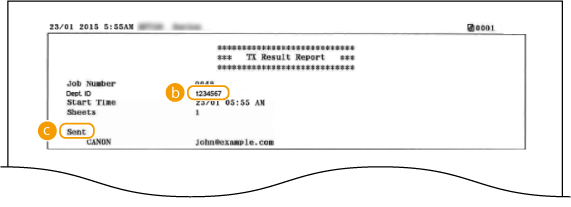
Example: Scanning to e-mail/I-Fax/shared folder/FTP Server
Result
"OK" indicates that the transmission was completed successfully while "NG" and three digits (an error code) indicates that the transmission failed (see the "e-Manual" (HTML manual) in the DVD-ROM supplied with the machine).
Department ID
The Department ID is shown when Department ID Management is enabled.
Sent/Error
For e-mail, TX Result Reports indicate the transmission result between the machine and the mail server, not between the machine and the destination address. Even if the transmission fails, a three-digit error code will not be printed. To check the error code, print a Communication Management Report.
NOTE
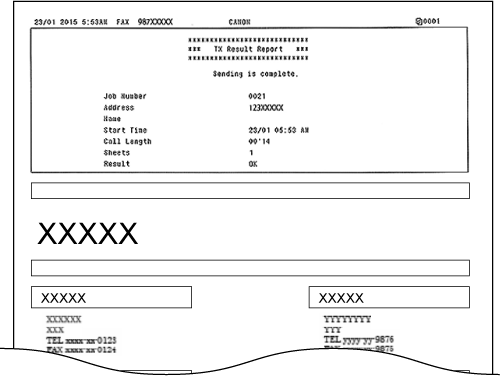
To print a part of a fax document on the report
- When you select <On> or <Only When Error Occurs>, a part of a fax document can be included in the report. Set <Include TX Image> to <On>.
 Example:
|