Follow the steps below to perform a Deep Print Head Cleaning (Mac OS X):
Note: If the printer is not being used with a computer, perform a standard print head cleaning by holding down the <Resume> button on the printer until the <Power> light flashes one time. Since standard print head cleaning is not as powerful as deep print head cleaning, you may need to perform more than one or attach the printer to a computer for deep print head cleaning.
After confirming that the cable is connected and the printer is powered on, perform the following.
Note: In versions of Mac OS X older than 10.4, open the IJ / BJ Printer Utility from the Library>Printers>Canon>BJPrinter>Utilities folder.
- In the Apple menu select System Preferences
- Open Print & Fax.
- Make sure the correct printer is selected and, depending on OS version, click 'Open Print Queue...' or 'Print Queue...'.
- Click the Utility icon.
- Select the printer, then click 'Maintenance'.
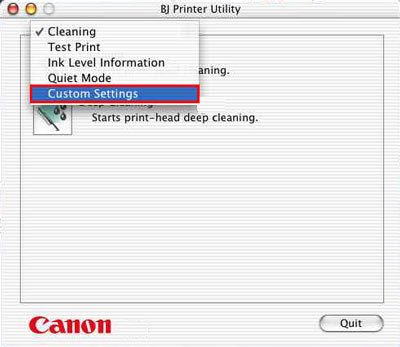
- From the pop-up menu, select 'Cleaning'.
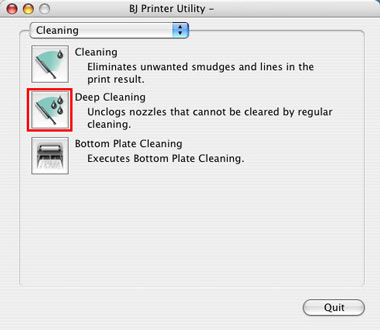
- Click the Deep Cleaning icon.
- Select the ink tank color(s) for Deep Cleaning (All Colors, Black, or Color).

- Confirm the message, and then click the 'OK' button.
- The Power lamp will blink and print head Deep Cleaning will start. Deep Cleaning completes when the Power lamp stops blinking and lights. (It will take about a minute for the Power lamp to stop blinking and light solid.)
- If the Nozzle Check Pattern does not print correctly, execute up to three Deep Print Head Cleanings.
