Using the Flash
Red-Eye Reduction
Slow Sync Flash
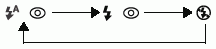
| Flash is open |

|
The flash fires with every shot. |
| Flash is open |

|
The flash will fire automatically. |
| Flash is closed |

|
The flash will not fire. |
Use the flash according to the guidelines below.
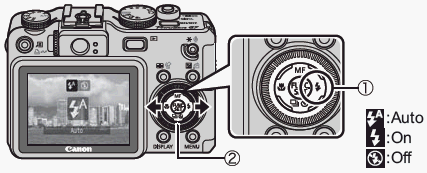
1. Press the ( ) button and then use the
  or
or  buttons to select the flash settings (
 ).
).
 A flashing red in the LCD monitor (or viewfinder) indicates insufficient light level. In this case, raise the flash before shooting. However, when shooting with the Tv , Av , or M or mode there is no indication. A flashing red in the LCD monitor (or viewfinder) indicates insufficient light level. In this case, raise the flash before shooting. However, when shooting with the Tv , Av , or M or mode there is no indication. |
2. Shoot the image and the flash will fire in accordance to the flash setting.
- The selected flash mode appears on the LCD monitor.
- You can switch between settings by pressing the button.
- It may take longer for the camera to autofocus while the flash is charging.
When the red-eye reduction function is on:
When the red-eye reduction function is off:

3. Shoot the image.
- Shooting procedures are the same as for the
 mode.
mode.
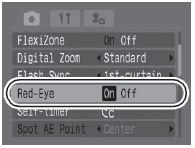
Setting the Red-eye Reduction Function
The red-eye reduction lamp fires when the flash is used in dark areas. This prevents light from reflecting back from the eyes and making them appear red.
1. In the [  ] menu, set [Red-Eye] to [On].
Setting the Slow Synchro Flash mode
You can shoot images using the flash with a slow shutter speed. This helps brighten up dark backgrounds when shooting night scenes or with indoors lighting conditions.
- This function is not available in the Auto mode.
- When shooting with [Slow Synchro] set to [On], camera shake may become a factor. We recommend the use of a tripod.
1. Power the camera in  (Shooting) mode and press the <MENU> button.
2. Select [Slow Synchro] using the  or
or  arrow on the omni selector.
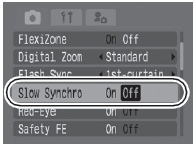
3. Select [On] using the or arrow on the omni selector and press the <MENU> button.

Red-Eye Reduction
When shooting with the red-eye reduction function, the subjects must look right at the red-eye reduction lamp for this mode to be effective. Try asking them to look directly at the lamp. Even better results can be obtained by shooting with the lens set to a wide angle, increasing the lighting in indoor settings or approaching closer to the subject.
 When shooting with a high ISO sensitivity and using the flash, there is more of a chance of overexposure the closer you are to the subject.
- Some settings are not available with certain Shooting modes.
- The flash fires with automatic adjustments when [Flash Adjust] is set to [Auto] in the Rec. menu. When shooting M in mode, or with [Flash Adjust] set to [Manual], the flash fires with the manually set adjustments.
- When [Flash Adjust] is set to [Auto], the flash fires twice. A pre-flash will fire and will be followed by the main flash. The pre-flash is used by the camera to obtain the subject's exposure data so that the main flash can be set to the optimal intensity for the shot. However, the pre-flash does not fire when shooting with FE Lock enabled.
- The fastest shutter speed for flash synchronization is 1/500 second. The camera automatically resets the shutter speed to 1/500 second if a faster speed is selected.
- Shots cannot be taken while the flash is charging.
- The flash may take up to approximately 10 seconds to charge in some cases. Actual times will vary according to usage and the battery charge.
- The flash setting is saved when the camera is turned off in the P, Tv, Av and M Shooting modes.
