
How to print directly from the EOS Digital Rebel and EOS Digital Rebel XT.
| Article ID: ART160325 | | | Date published: 06/09/2015 | | | Date last updated: 02/05/2016 |
Description
Solution
You can specify the printing style (borders on/off, date on/off, etc.), print quantity, and image trimming.
You can set all the printing operations with the camera.
Images in the  format cannot be printed directly from the camera.
 |
1. Select the image to be printed.
|
2. Press <
|
 > keys to select the image to be printed.
| - |
3. Select [Style].
|
 |
4. Print the image.
|
 > keys to select [PRINT], then press <
Setting the Printing Style
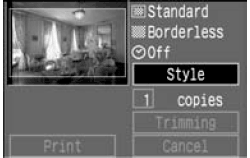 |
1. Select [Style].
|
| - |
2. Select the style option.
|
| Style setting screen | |
| BJ Printer | Card Photo Printer |
 |
 |
- With BJ printers, [Paper] must be set to the paper size used.
- With card photo printers, [Image] will appear instead of [Paper]. With the [Image] setting, you can print one image on one sheet or eight identical, smaller images on one sheet. This can be selected when postcard-size paper is used.
- [Borders] and [Date] can be set in the same way with all printers.
| [Paper] (BJ Printer) |
[Image] (Card Photo Printer) |
 |
 |
| [Borders] | [Date] |
 |
 |
| - |
3. Select the desired setting.
|
If you set 'Bordered,' certain printers may print the date on the border. The date may be hard to see on a light background or on the border. |
|
Setting the Quantity
 |
Set the number of copies.
|
Trimming an Image
You can trim the image and print only the trimmed portion. Before starting, you must first set the [Style] settings. If you change the [Style]/[Borders] after setting the trimming, the trimming setting will be lost.
 |
1. Select [Trimming].
|
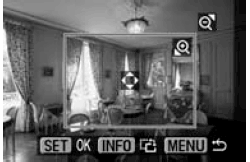 |
2. Trim the image.
|
Changing the trimming frame size
Press the <
> or <
> button to change the size of the trimming frame.
Moving the trimming frame
Press the cross keys to move the trimming frame in the respective direction.
Rotating the trimming frame
Press the <INFO.> button to rotate the trimming frame. The button toggles between the vertical and horizontal image orientation. For example, a horizontal shot can be printed as a vertical shot.
 |
3. Exit the trimming.
|
|
The [Trimming] setting will be canceled after the printing is completed or if you execute [Cancel]. |
Stopping the Printing
 |
While [Stop] is displayed on the LCD monitor, press < >. >.
|
When Stopping the Printing
Resolving Printing Errors If an error occurs during printing, an error message will appear on the LCD monitor.
|
Note:
|