INTRODUCTION
This guide will review your control options for the 61-point auto-focus system in the Canon EOS-1D X and 5D Mark III. Although this is one of the fastest, most sophisticated, and most accurate AF systems ever developed, it is not as difficult to master as one might think. All it takes is knowing how to apply the following three basic parameters to your subject and style of shooting:
1. AF Point Size
2. AF Point Location
3. AF Point Number and Type We will review each one in the order listed.
AF POINT SIZE: SELECTING AN AF AREA MODE
Single-point AF
This is the default setting; the one the camera is set to when you first take it out of the box. This mode allows you to manually select any one of the 61 available AF points.
Once selected, this AF point will remain the only active point for autofocus, until you either shift it to a different location within the 61-point array, or switch to a different AF area mode. A single square-shaped “box” on the focus screen indicates the location of the active AF point.
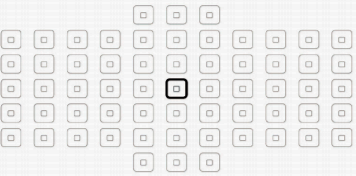
Spot AF

Think of this as a more narrow-angle version of Single Point AF. As with Single-point AF, you can select any one of the 61 AF points and shift it to any location within the 61-point array. A single square-shaped “box” with a dot in the center indicates the location of the active AF point.
Spot AF is ideal for focusing on subjects that are small in relationship to the full frame and that may have larger subjects in the foreground. Because of the need for precision placement, spot AF is better suited to stationary subjects than fast-moving subjects. Spot AF may also take longer to achieve focus than other AF area selection modes, especially if you place the Spot AF point on an area that lacks detail or is low in contrast.
AF point expansion
(4 points surrounding the primary AF point in the center)

AF point expansion / surround
(8 points surrounding the primary AF point in the center)
With either expansion mode, several secondary AF points are clustered around one primary AF point. You can freely move the primary AF point anywhere within the 61-point AF area. The camera will automatically activate the secondary focus points any time the central primary AF point can’t detect enough detail or contrast to focus on. Working with an expanded area of active AF points can thereby make it easier to keep the AF system locked on a moving subject, especially if the subject movement is erratic. AF point expansion also provides back-up AF points when you’re shooting subjects with large areas that lack texture and detail.
Zone AF

Although Zone AF may look like a larger, 9-12 point cluster version of AF point expansion, there is an important difference: With Zone AF the camera will always attempt to focus on the nearest subject it detects within the active zone of AF points. Zone AF is also the only way to have the AF system focus on the nearest subject when focus tracking a moving subject in AI Servo AF. You can move the AF zone to any one of nine pre-set locations within the 61-point array.
61-point automatic selection
In this mode, all 61 AF points are active. As long as your subject is within the 61-point array, the camera will automatically select whatever AF point is necessary to maintain focus. How it does this will depend on your focus mode:
• When the camera is in One-Shot AF mode, it will automatically select as many AF points as necessary to focus on the nearest subject within the 61-point array. The AF points the camera selects will briefly flash red to indicate where the camera has focused.
• When the camera is in AI Servo AF mode, you must select the starting AF point and start focus-tracking on your subject. The camera will then automatically change AF points as necessary to keep your subject in focus, even if your subject moves elsewhere within the 61-point array.
Tip: In general, the AF point should not be so small that it is difficult to keep aimed at an area with enough image detail to focus on. You should also be careful not to use an AF area so large that it tends to lock focus on large foreground objects, especially when you wish to focus smaller objects that are further away.
To Access the AF Area Selection Mode Menu
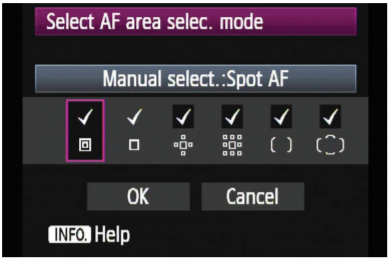
The AF Area selection mode menu lists all available options for AF point size. Active areas are indicated by a checkmark. You can increase or reduce the number of available AF area modes to suit your shooting style and preference. Having fewer modes active makes scrolling through the available options faster. To access this menu:
1. Press the Menu Button on your camera.
2. Use the Main Dial to scroll to the 4th AF Menu.
3. Use the Quick Control Dial to scroll down to Select AF area selection mode
4. Press the Set Button
5. Use the Quick Control Dial to select an AF area mode. Press Set to add or delete a checkmark. Adding a checkmark activates the selection.
6. Select OK to register the setting.
AF POINT LOCATION:
Moving AF Points Manually
Any time you select an AF Area mode other than Automatic AF point selection, you can move the active AF point(s) wherever you like within the 61-point array. The advantage of moving the AF point is that it allows you to focus and compose off-center subjects in one step. If your primary AF point is always in the center, you will often be forced to focus and re-compose which is slower and may introduce significant focusing errors at close distances and large apertures.
• Default method - Press the AF Point Select Button (back of camera), turn the Main Dial (near shutter release) to move horizontally within the 61-point AF area, and/or the Quick Control Dial (back of camera) to move vertically to the desired location.
• Shortcut 1: Multi-Controller Direct This option allows you to move the active AF point or zone simply by pressing the Multi-Controller with your right thumb, even with camera at your eye. To enable it, navigate to the menu, then select the Custom Controls Multi-Controller icon. Highlight the AF point icon and press the Set Button.
• Shortcut 2: Memorizing an AF point and instantly returning to it This option allows you to move to any AF point location, select and memorize it, then instantly jump back to it by pressing a pre-selected button you’ve customized. To enable it:
1. Navigate to the point you want to memorize, press and hold the AF Point Select Button on the rear of camera, and then simultaneously press the top LCD Panel Illuminator Button. AF-HP will appear on the top LCD panel to indicate the camera has memorized the setting.
2. In the Custom Functions Custom Controls menu, pick one of the rear buttons, depth-of-field button, or lens AF stop button, and highlight the AF-HP icon. When you then press whatever button you’ve selected, the camera will instantly switch to the memorized point.
• Shortcut 3: Orientation Linked AF This option enables the camera to instantly change from one AF point to another when you turn the camera from horizontal to vertical orientation. To enable it:
1. Select in Orientation Linked AF.
2. Select the AF Area mode and AF point you want with the camera horizontal.
3. Repeat the process—even with a different AF Area—for vertical orientation.
AF POINT NUMBER AND TYPE You can further speed-up the process of moving quickly from a center to off-center AF point by limiting the number of manually selectable AF points. Your options include:
1. 61 points
2. Cross-type only (total number varies depending on lens)
3. 15 points only
4. 9 points only
