
Change the paper size to print faxes from memory (MX350)
| Article ID: ART107171 | | | Date published: 05/11/2015 | | | Date last updated: 08/15/2015 |
Description
If faxes are stored in memory because the paper size did not match the paper source setting, change the paper size, print the fax(es) and then delete them.
Solution
Changing the Paper Size
You can change the page size on the printer. The available options will vary based on the mode, COPY and FAX.
Important:
- Load Legal-sized paper on the Rear Tray. Only A4 or Letter-sized paper can be fed from the Cassette (MX870 only).
- If paper other than A4, Letter-, or Legal-sized paper is loaded, the received faxes are stored in memory and Check the page size and press OK. is displayed on the LCD. In this case, replace the loaded paper with A4, Letter-, or Legal-sized* paper, then press the <OK> button.
You can also press the <Stop> button to close the message and print the stored documents in memory later.
* Legal may not be available depending on the country or region of purchase. - If no paper is loaded in the paper source, or paper has run out while printing is in progress, the received faxes are stored in memory and There is no paper. Load paper and press OK. is displayed on the LCD. In this case, load paper in the paper source and press the <OK> button.
You can also press the <Stop> button to close the message and print the stored documents in memory later.
Note: If the sender sends a document that is larger than Letter-size or Legal-size, such as 11" x 17", the sender's machine may send the fax automatically reduced in size or divided, or send only a part of the original.
-
Press the <Stop> button to clear the error.
- Although the error message indicates to press the <OK> button, doing so would only cause the machine to attempt to print the received fax. If you are sure of the paper size in the machine (Rear tray or cassette) and have inserted the correct size, press <OK> to print the fax from memory.
- In order to change the paper size on the FAX paper settings screen to match the paper size loaded, press <Stop>.
You will be returned to the Fax standby screen.
- Although the error message indicates to press the <OK> button, doing so would only cause the machine to attempt to print the received fax. If you are sure of the paper size in the machine (Rear tray or cassette) and have inserted the correct size, press <OK> to print the fax from memory.
- Press the left Function button.
The FAX menu screen is displayed.
Note: The Function buttons are located below the display. In the below illustration, the Copy menu shows three available Function buttons.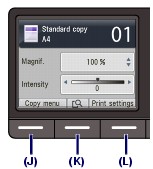
- Use the

 button to select
  FAX paper settings.
 - Press the <OK> button.
The fax paper setting screen is displayed. -
FAX Paper Settings
- Use the

 button to highlight Page size (1).
 - Use the button to select [8.5"x11"(LTR) or 8.5"x14"(Legal)] paper size.
- Press the <OK> button after the setting changes have been made.
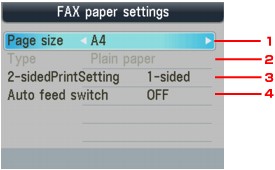
Available FAX paper setting options.
- Page size
Select the page size from A4, 8.5"x11"(LTR), or 8.5"x14"(Legal). - Type
MX870 series: The paper type is set to Plain paper.
MX350 series: Select Plain paper. - 2-sidedPrintSetting (MX870 series)
Select two-sided printing or single-sided printing.
Two sided printing is available for black & white faxes. Color faxes are printed on the single-side of paper regardless of this setting.
Note:
* When 8.5"x14"(Legal) is selected as the page size, you cannot select a paper source other than the Rear Tray.
* 2-sidedPrintSetting is available when Page size is set to A4 or 8.5"x11"(LTR).
* After 2-sided is selected for 2-sidedPrintSetting, press the right Function button to specify the stapling side. - Auto feed switch (MX870 series)
Select whether to switch the paper source automatically.
Note: When ON is selected for Auto feed switch and there is no paper in the paper source where you performed printing last, the machine automatically switches to the other paper source.
- Use the
- Press the <FAX> button and the document(s) in memory will print automatically.
Printing a Document in Memory
If the machine did not automatically print the document from memory, you can print a list of stored documents (the memory list) or print a specified document.
Note: The memory list shows the transaction number of the unsent or unprinted fax (TX/RX NO.), transaction mode, recipient's number, and the date and time of the transaction.
Printing a Memory List or Specified Document in Memory
- Load paper.
- Press the <FAX> button, then press the right <Function> button.
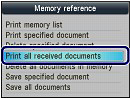
The memory reference screen is displayed.
Note: The Function buttons are located below the display. In the below illustration, the Copy menu shows three available Function buttons. -
Print a specified document or memory list.

To print a memory list:
(1) Use the
 button to select [Print memory list], then press the <OK> button.
(2) Use the button to select [Yes], then press the <OK> button.
(3) The memory list stored in memory is printed.
To print a specified document:
(1) Use the button to select [Print specified document], then press the <OK> button.
(2) Use the button to select the transaction number of the document you want to print, then press the <OK> button.
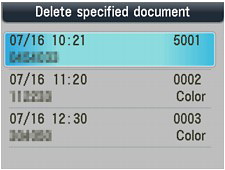
The date and time of transaction and fax/telephone number, the transaction number, and the color information are displayed on a list screen of documents stored in memory.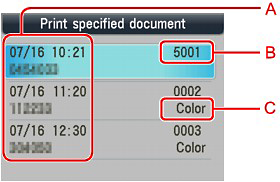
A. Date and time of transaction and fax/telephone number
B. Transaction number (TX/RX NO.)
A transaction number from 0001 to 4999 indicates a document being sent.
A transaction number from 5001 to 9999 indicates a document being received.
C. Color information
(3) Use the button to select [Yes] or [No], then press the <OK> button.
If you select Yes, only the first page of the document will be printed. If you select No, all pages of the document will be printed.
To print other documents, repeat the procedure from steps (2) and (3).
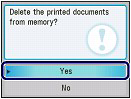
Note:- If you select No to print all the pages of the document, and all the pages in memory have been printed, Delete the printed documents from memory is displayed on the LCD. If you select [Yes], printed pages in memory are deleted.
- If there are no documents stored in memory, There is no document in memory is displayed. Press the <OK> button to return to the previous screen.
Printing All the Documents in Memory
- Load paper.
- Press the <FAX> button, then press the right <Function> button.
The memory reference screen is displayed.
Note: The Function buttons are located below the display. In the below illustration, the Copy menu shows three available Function buttons. - Use the button to select [Print all received documents], then press the <OK> button.
-
Use the button to select [Yes], then press the OK button.

Note:- Delete the printed documents from memory is displayed on the LCD each time a document is printed. If you select [Yes], the document is deleted from memory.
- If there are no documents stored in memory, There is no document in memory is displayed. Press the <OK> button to return to the previous screen.
- Delete the printed documents from memory is displayed on the LCD each time a document is printed. If you select [Yes], the document is deleted from memory.
Deleting a Document in Memory
- Deleting a Specified Document in Memory
- Press the <FAX> button, then press the right <Function> button.
The memory reference screen is displayed.
Note: The Function buttons are located below the display. In the below illustration, the Copy menu shows three available Function buttons. - Use the button to select [Delete specified document], then press the <OK> button.

- Use the button to select the transaction number (TX/RX no.) of the document you want to delete, then press the <OK> button.
- Use the button to select [Yes], then press the <OK> button.
- To delete other documents, repeat the procedure from steps 3 and 4.
- Deleting All the Documents in Memory
- Press the <FAX> button, then press the right <Function> button.
The memory reference screen is displayed. - Use the button to select [Delete all documents in memory], then press the <OK> button.
- Use the button to select [Yes], then press the <OK> button.
Note: This function is not available while the machine is receiving a fax.
SIMS Doc Id
0