BJ Print Direct
Connecting to a digital camera
IMPORTANT: When printing photos from your camera on your Bubble Jet printer, using the camera?s optional AC adapter to power the camera is preferred. If you choose to use the battery pack, always make sure it is fully charged, or the printing may stop when the charge on the camera battery diminishes.
-
Turn on the printer.
-
Make sure the digital camera is turned off.
|
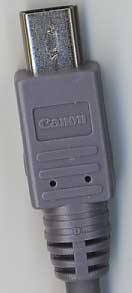
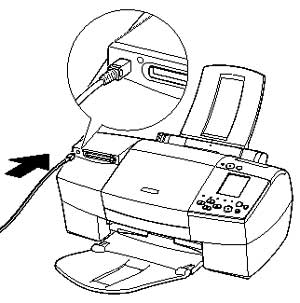
- Open the protective terminal cover on the side of the camera to locate the cable jack. Then connect the camera to the printer as shown, making sure the "Canon" logo on the cable faces the front of the camera (lens side).
|

|
|
|
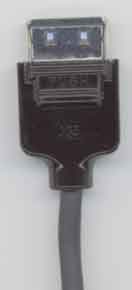
When connecting the PowerShot S30/S40 camera to a Bubble Jet printer: Use the DIF-B100 direct interface cable provided with the printer. When you insert the cable, make sure the  symbol on the cable connector faces the rear of the camera. symbol on the cable connector faces the rear of the camera. |
|
When connecting the PowerShot S200/S330/G2 camera: Use the DIF-B250 direct interface cable provided with the printer. When you insert the cable, make sure the  symbol on the cable connector faces the front of the camera. symbol on the cable connector faces the front of the camera. |
|
-
S200/S330/G2 Users Only: Set the camera?s Mode dial to  . .
-
Turn on the digital camera.
|
- The
 symbol appears on the camera LCD monitor, and the power/mode indicator is lit (green) when the printer is properly connected to the camera. symbol appears on the camera LCD monitor, and the power/mode indicator is lit (green) when the printer is properly connected to the camera.
|

|
Top of Page
Setting the Print Style
Step One - Enter the Style Menu
In the print setting menu, choose [Style] using the up or down arrows and press SET.
The Style menu will appear providing the opportunity to select [Paper], [Borders], or [Date] using the up or down arrows.

Step Two - Selecting the Paper Type
Provides the following options
Card #1 - Photo Paper Pro for Borderless Printing (4" x 6")
Card #2 - Glossy Photo Cards Perforated (4" x 6") when using an S820D or Photo Paper Plus Glossy
(4" x 6") when using an upgraded S820D, S830D, or S530D
Card #3 - Photo Paper Pro Perforated (4" x 6")
LTR - Photo Paper Pro Letter Size
A4 - Photo Paper Pro A4 Size

Step Three - Selecting the Border Options
Provides the following options

Step Four - Selecting the Date Options
Provides the following options

Step Five - Returning to the Print Menu
Press the <MENU> button on the back of the camera

The setting is complete and the Print Order menu resumes.
-
If [Borderless] is selected as the print style, the center portion of the recorded image (the image displayed on the LCD monitor) is printed at an enlarged size. As a result, the image?s top, bottom and sides may be cropped slightly. If you have not specified a trimming setting, a frame will appear around the area of the image that will be printed, allowing you to check the portion that will be cropped.

-
If you use the DPOF print settings for printing, the [Date] setting cannot be set. The date is printed according to the DPOF print setting.
-
With the [Bordered] option, the image area remains relatively unchanged from the recorded image when it is printed.
Top of Page
Selecting the Number of Copies
1. In Replaying mode, press SET and select the [Copies] option using up or down arrows.
2. Specify the desired number of copies using left or right arrows. You can specify from 1 to 99 prints.

Top of Page
Printing
An image can be printed when displayed in single replay or selected in index replay
1. Choose a photo using the left or right arrow on the camera, then press the <SET> button.
2. Set the number of copies, the print style and cropping settings as required.
3. Choose [Print] using the left and right arrows and press SET.
The image starts printing and, when it is completely finished, the display reverts to standard replay mode.
NOTE: You cannot print movies or images recorded in the RAW format.
Cancel Printing
To cancel printing between images, press SET. A confirmation dialog appears. Select [OK] using the right and left arrows on the multicontroller and press SET. The printing stops even if it is incomplete and the paper is fed through.
A print in progress cannot be stopped. Wait until the current image is printed and then cancel before the next one starts. The display reverts to standard replay mode.
Top of Page