This printer prints received faxes to paper loaded in the printer beforehand. You can use the operation panel to change the paper settings for printing faxes. Make sure that the settings are appropriate for the loaded paper.
 Important
-
If the size of loaded paper is different from that specified in the paper size setting, the received faxes are stored in the printer's memory and Check the page size and tap [OK]. is displayed on the touch screen. In this case, load the same size of paper as that specified in the paper size setting, and then tap OK.
You can also press the Stop button to close the message and print the stored documents in the printer's memory later.
-
If no paper is loaded, or paper has run out while printing is in progress, the received faxes are stored in the printer's memory and the error message for no paper is displayed on the touch screen. In this case, load paper and tap OK.
You can also press the Stop button to close the message and print the stored documents in the printer's memory later.
 Note
Note
- If the sender sends a document that is larger than Letter-size or Legal-size, such as 11 x 17 inches, the sender's device may send the fax automatically reduced in size or divided, or send only a part of the original.
-
Make sure that the printer is turned on.
-
Flick the HOME screen, and then tap  FAX.
FAX.
The Fax standby screen is displayed.
-
Tap Function list.
The Function list screen is displayed.
-
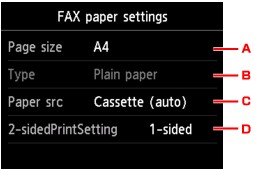
Tap FAX paper settings.
The FAX paper settings screen is displayed.
-
Specify settings.
-
Page size
Select the page size from A4, Letter, or Legal.
-
Type (Media type)
The paper type is set to Plain paper.
-
Paper src (Paper source)
Select the cassette to feed paper.
Selecting Cassette (auto) allows the printer to feed paper from the cassette 2 when the cassette 1 runs out of paper under the following conditions.
- A4, Letter, or Legal sized plain paper is loaded in cassette 1 and cassette 2.
- Yes is selected for Auto feed switch in Cassette settings.
-
2-sidedPrintSetting
Select two-sided printing or single-sided printing.
Two sided printing is available for black & white faxes. Color faxes are printed on the single-side of paper regardless of this setting.
After 2-sided is selected for 2-sidedPrintSetting, tap Advanced to specify the stapling side.
Note
- When Page size is set to A4 or Letter, the received faxes are printed on the two-sides of paper.
-
Press Back button twice to return to the Fax standby screen.