
Using an Android Smartphone to control the camera during remote shooting (PowerShot G3 X)
| Article ID: ART162820 | | | Date published: 10/01/2015 | | | Date last updated: 06/09/2017 |
Description
Using an Android Smartphone to control the camera during remote shooting (PowerShot G3 X)
Solution
| Solution |
You can check the shooting screen and shoot remotely using your smartphone.
Getting Started The procedure for using a smartphone to control the camera during remote shooting is explained in the following four steps. Proceed in order from Step 1.
 Step 1: Confirming the OS version Step 1: Confirming the OS version Step 2: Installing Camera Connect on the smartphone Step 2: Installing Camera Connect on the smartphone Step 3: Connecting the camera to the smartphone Step 3: Connecting the camera to the smartphone Step 4: Using the smartphone to control the camera during remote shooting Step 4: Using the smartphone to control the camera during remote shooting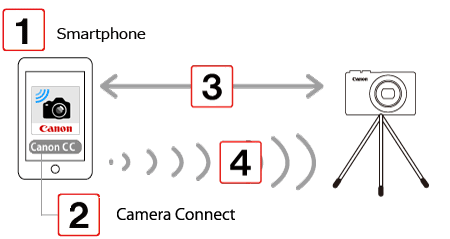
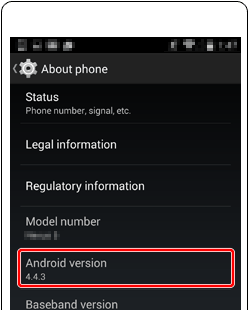
Step 1: Confirming the OS version
 1. Check the smartphone's specifications. 1. Check the smartphone's specifications.
Step 2: Installing Camera Connect on the smartphone
Download and install Camera Connect from Google Play.
If CameraãConnect is already installed on the smartphone, please proceed toStep 3: Connecting the camera to the smartphone.
 1. Touch the [Play Store] application on your smartphone to access Google Play. 1. Touch the [Play Store] application on your smartphone to access Google Play.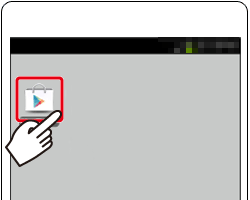
2. Touch the search icon.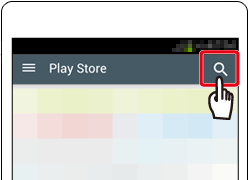
3.  Enter [Camera Connect] in the search field, and then Enter [Camera Connect] in the search field, and then  touch [Search]. touch [Search].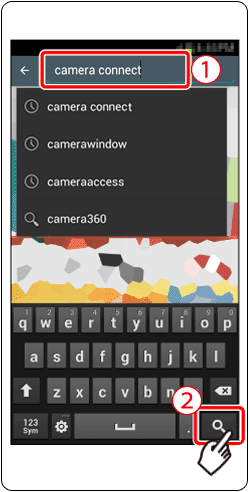
4. Choose [Camera Connect] from the displayed search results, and install it on the smartphone.After installation has been completed, tap the [Home] button to return to the Home Screen.
Step 3: Connecting the camera to the smartphone
1. Touch the menu key, and then touch [Settings] ( ). ).
2. Confirm that the smartphone is not set to [Airplane mode].
3. Set the [Wi-Fi] switch to [ON], and then touch [Wi-Fi].
 4. Secure the camera. 4. Secure the camera.- Once remote shooting begins, the camera lens will come out. Lens motion from zooming may also move the camera out of position. Keep the camera still by mounting it on a tripod or taking other measures.
5. Press the [Playback] ( ) button to turn the camera on. ) button to turn the camera on.
6. Press the [Wi-Fi] ( ) button. ) button.
7. Press the [  ], [ ], [  ], [ ], [  ], [ ], [  ] buttons to choose [ ] buttons to choose [  ], and then press the [ ], and then press the [  ] button. ] button. 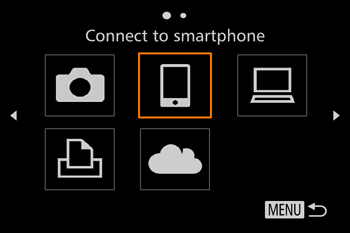
8. Press the [ ], [ ] buttons to choose [Add a Device], and then press the [ ] button.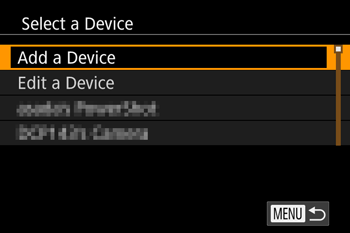
9. The cameraâs SSID is displayed on the screen.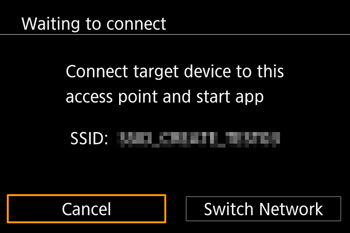
 10. Choose the SSID (network name) displayed on the cameraâs screen from the list of detected access points displayed on the smartphone. 10. Choose the SSID (network name) displayed on the cameraâs screen from the list of detected access points displayed on the smartphone.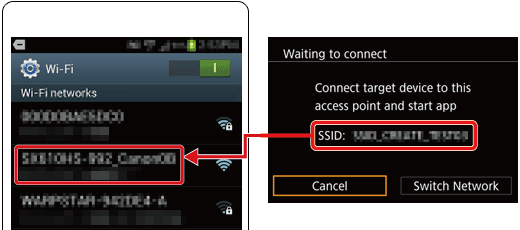
11. Tap the [Canon CC] application icon ( ) on the smartphone to start Camera Connect. ) on the smartphone to start Camera Connect.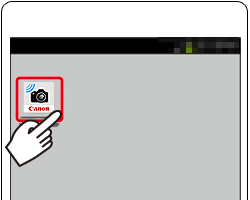
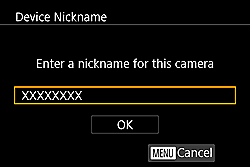
12. Press the [ ], [ ] buttons to choose the smartphone 's nickname, and then press the [ ] button.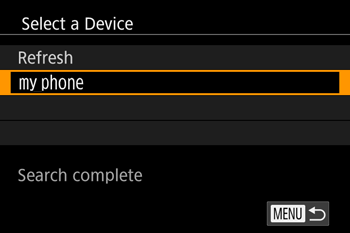
13. Press the [ ], [ ] buttons to choose [Yes], and then press the [ ] button.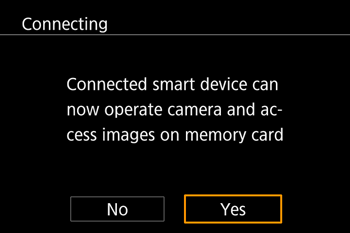
14. The following screen appears.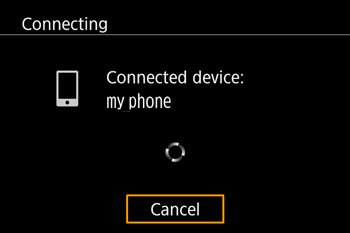
15. Once you have connected to the smartphone, a screen like the one below will appear.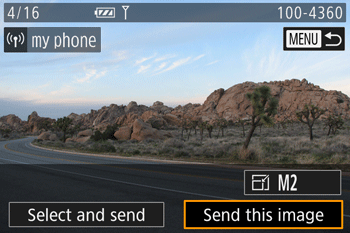
Step 4: Using the smartphone to control the camera during remote shooting
1. In Camera Connect on the smartphone, choose [Remote shooting].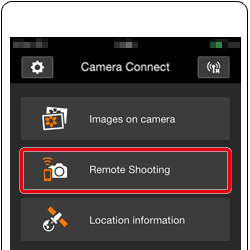
2. Once the camera is ready for remote shooting, a live image from the camera will be displayed on the smartphone. At this time, a message is displayed on the camera, and all operations except pressing the power button are disabled.
3. Use the smartphone to control the camera. Press the button to shoot.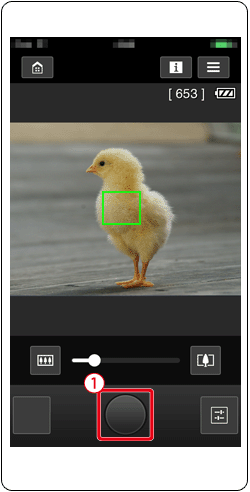
*Android, and Google Play are trademarks of Google Inc.
|
| Related Info | Smartphone (Device) Specifications and System Requirements for a Wireless Connection with a Camera (Canon Camera Connect) |
|
ID: 8202622200_EN_6
|
|
 icon.
icon.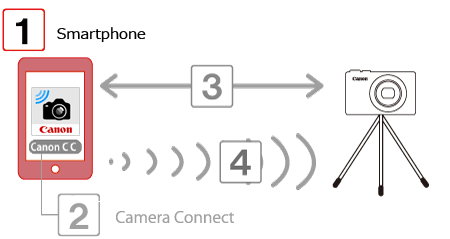
 [About device]
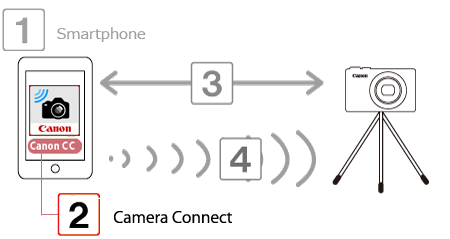
 ) will start Google Play on the smartphone.
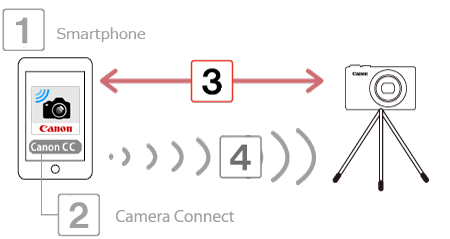
 ã
ã 4] tab
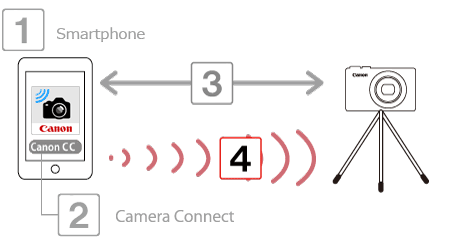
 ] button.
SIMS Doc Id
8202622200