This article names each part of the scanner and identifies their functions.
Front View
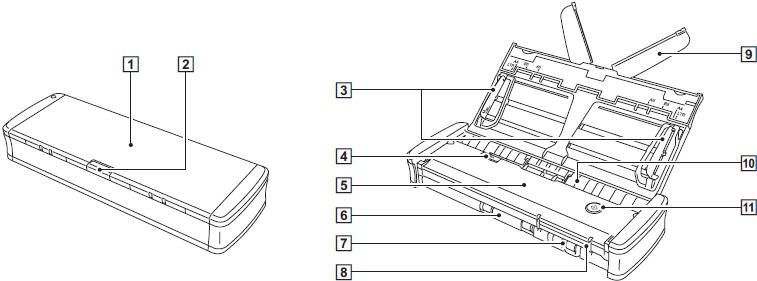
- Document Feed Tray
This tray is for feeding documents. Open it when scanning documents.
- Feed Tray Release Lever
Press this lever to release the document feed tray when opening the tray.
- Document Guides
These guides ensure documents are fed straight (one on the left and right sides). Raise the guides when loading a document, and then align them to sides of the document to be scanned.
- Feeder Cover Release Lever
Pull this lever to open the feeder cover when cleaning the scanner.
- Feeder Cover
Open this when cleaning the scanner.
- Eject Outlet
This outlet is for ejecting documents when scanning is completed.
- Card Slot
Insert plastic cards here.
- Card Guides
These guides ensure that cards inserted in the card slot are fed straight.
- Feed Extension Plate
Open this plate to support the document when loading a long document.
- Feed Inlet
Insert the document to be scanned.
- Start Button
Press this button when you want to start scanning the document loaded in the feed tray.
When the power of the scanner is ON, this button lights and indicates the status of the scanner as shown below.

The Start button may blink slowly when the USB cable is connected and the feed tray is opened. When this occurs, wait for the power indicator to stop blinking and light steadily before using the scanner.
Rear View

- Rear Card Slot
When a plastic card is fed, a portion of the card protrudes from here momentarily.
- Auto Start Switch
Use this switch to change the operation mode of the scanner.C
- USB Connector
Connect the USB cable supplied with the scanner (or one that supports Hi-Speed USB 2.0).
- Kensington Slot
Connect a key chain to prevent theft.
- Power Connector
Connect the supplied power supply USB cable or a separately sold AC adapter (Part#: 6144B005AA).

This scanner does not have a power switch.

 Paper is jammed.
 A double feed has been detected and the scanner has stopped.
 The top unit is open.
 Another scanner error has occurred.