Compatible maintenance cartridges
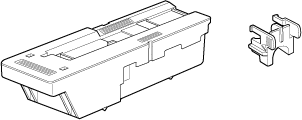
Maintenance Cartridge MC-08
Precautions when handling the Maintenance Cartridge
Take the following precautions when handling the Maintenance Cartridge.
Attention:
- For safety, keep the Maintenance Cartridge out of the reach of children.
- If ink is accidentally ingested, contact a physician immediately.
Important:
- Do not remove the Maintenance Cartridge except to replace it. Ink may leak out.
- To prevent ink from leaking from a used Maintenance Cartridge, avoid dropping the cartridge or storing it at an angle. Otherwise, ink may leak and cause stains.
- Ink adheres to the top of the Maintenance Cartridge after it has been used. Handle the Maintenance Cartridge carefully during replacement. The ink may stain clothing.
Confirm the message
When the Maintenance Cartridge is almost empty, a message is shown on the Display Screen. According to the message, replace the Maintenance Cartridge or prepare a new Maintenance Cartridge.

If a message is displayed requesting Maintenance Cartridge replacement, you can skip the step [Access the menu for Maintenance Cartridge replacement]. Follow the instructions in [Replace the Maintenance Cartridge].

Important:
- Do not replace the Maintenance Cartridge during initialization immediately after turning on the printer, during Printhead cleaning, or when ink is being absorbed. Ink may leak out.
Access the menu for Maintenance Cartridge replacement
1. On the [Tab Selection screen] of the Control Panel, press  or
or  to select the Settings/Adj. tab (
 ).
).

Note:
- If the [Tab Selection screen] is not displayed, press the [Menu] button.
2. Press the [OK] button.
The [Set./Adj. Menu] is displayed.
3. Press  or
or  to select [Maintenance], and then press the [OK] button.
4. Press  or
or  to select [Repl. maint cart], and then press the [OK] button.
A message on the Display Screen advises you to open the Maintenance Cartridge Cover.
Replace the Maintenance Cartridge
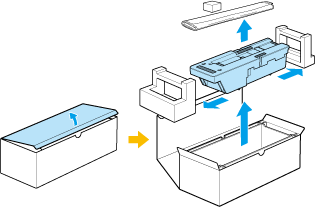
1. At this point, open the Maintenance Cartridge Cover.

2. Hold the used Maintenance Cartridge by the grip (a) with one hand and put your other hand under the Maintenance Cartridge to hold it firmly on the bottom, keeping it level as you pull it out.

Important:
- Used maintenance cartridges are heavy. Always grasp the cartridge firmly and keep the cartridge level during removal and storage. If you drop a used Maintenance Cartridge or store it at an angle, ink may leak and cause stains.
- The remaining Maintenance Cartridge capacity is recorded on each printer. Do not install a used Maintenance Cartridge in another printer.
3. Open the box, remove the plastic bag, packaging material, and Shaft Cleaner, and then take out the Maintenance Cartridge.
Important:
- Never touch the metal contacts (a). This may damage the Maintenance Cartridge.

4. Attach the packaging material to the used Maintenance Cartridge and put it in the box. Keep it level as you put it in the plastic bag. Expel excess air from the plastic bag and seal the zipper.
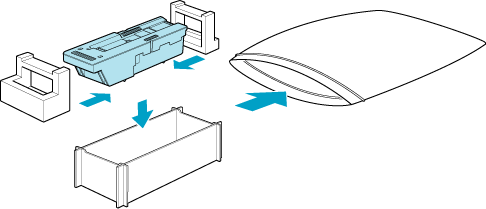
5. Confirm the Maintenance Cartridge is right-side up, put it in the box, and store it so that it stays level.

Important:
- Always put the used Maintenance Cartridge back in the box and store the box on a flat surface. Otherwise, ink may leak and cause stains.
6. Wipe away any soiling on the Maintenance Cartridge Cover.

Important:
- Support the Maintenance Cartridge Cover from underneath as you wipe it.
7. Keeping the new Maintenance Cartridge level, insert it all the way in.

8. Close the Maintenance Cartridge Cover.

9. Press the [OK] button.

The printer now initializes the Maintenance Cartridge.
Next, replace the Shaft Cleaner.
Replacing the Shaft Cleaner
Replace the Shaft Cleaner when you replace the Maintenance Cartridge. New Shaft Cleaner is included with replacement Maintenance Cartridge.
After you execute [Repl. maint cart] and replace the Maintenance Cartridge, a message will appear on the Display Screen requesting you to replace the Shaft Cleaner. Select [Yes] and press the [OK] button. When a message requests you to open the Top Cover, go to step 5.
1. On the [Tab Selection screen] of the Control Panel, press  or
or  to select the Settings/Adj. tab (
 ).
).

Note:
- If the [Tab Selection screen] is not displayed, press the [Menu] button.
2. Press the [OK] button.
The [Set./Adj. Menu] is displayed.
3. Press  or
or  to select [Maintenance], and then press the [OK] button.
4. Press  or
or  to select [Repl. S. Cleaner], and then press the [OK] button.
After the Carriage is moved, the Display Screen indicates "Open Upper Cover".
5. Open the Top Cover.

Note:
- If you do not respond within two minutes, shaft cleaner replacement is canceled. In this case, repeat the procedure.
6. Hold the Shaft Cleaner on the right side of the Carriage by the grips (a) and pull it to the right to remove it.

Important:
- Do not touch the Linear Scale (a), Carriage Shaft (b), or Fixed Blade (c). This may stain your hands and damage the printer.

7. Holding the new Shaft Cleaner by the grips (a), attach it to the Carriage.

Note:
- Be sure to put the used Shaft Cleaner in the small box before putting it in the larger box with the used Maintenance Cartridge for disposal.
8. Close the Top Cover.

The Carriage moves back into position.
