You can set the printer to reject faxes with no sender information or those from specific senders.
Select one of the following conditions to reject faxes.
- Faxes with no caller identification.
- Faxes from senders not registered in the printer's directory.
- Faxes from senders registered in the printer as rejected numbers.
Select a fax rejection condition following the procedure below.
-
Make sure that the printer is turned on.
-
Select  Setup on the HOME screen.
-
Select  Device settings and press OK.
-
Select FAX settings and press OK.
-
Select Security control and press OK.
-
Select FAX reception reject and press OK.
-
Select ON and press OK.
-
Select a fax rejection condition and press OK.
- No sender info.
- Rejects faxes with no caller identification.
- Not in directory
- Rejects faxes from the senders not registered in the printer's directory.
- Rejected numbers
- Rejects faxes from the senders registered in the printer as rejected numbers.
- For details on how to register the rejected number, see Registering Rejected Number.
 Note
Note
- When the printer rejects reception, Reception rejected. is displayed on the Fax standby screen.
- Faxes with no caller identification are also rejected when the setting other than No sender info. is selected.
Registering Rejected Number
Register the rejected number following the procedure below.
-
When a confirmation screen to register a rejected number is displayed, select Yes and press OK.
-
Select a registration number and press OK.
-
Select a registration method and press OK.
-
Register rejected number.
Register the rejected number depending on the registration method.
-
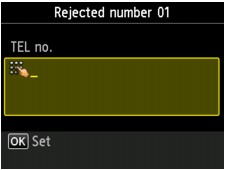
By entering the number
When you select this registration method, the screen to register the fax/telephone number is displayed.
The screen to enter the fax/telephone number is displayed when you press the OK button. Enter the fax/telephone number you want to register, and then press the OK button.
-
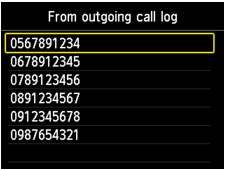
From outgoing call log
When you select this registration method, the screen to select the fax/telephone number from the outgoing call logs is displayed.
Select a fax/telephone number and press OK.
-
From incoming call log
When you select this registration method, the screen to select the fax/telephone number or the name from the incoming call logs is displayed.
Select a fax/telephone number or a name and press OK.
Note
- This registration method may not be available depending on the country or region of purchase.
-
Tap Register to finalize registration.
Note
-
To register another rejected number, select another registration number, and then register the rejected number.
You can register up to 10 rejected numbers.
-
You can print the list of rejected numbers (REJECTED NUMBER LIST).
-
To change the registered rejected number:
-
Select a registered rejected number you want to change and press OK.
-
Select Edit and press OK.
The screen to change the registered rejected number is displayed.
-
Change the registered rejected number in the same procedure when you register.
-
Finalize the registration in the same procedure when you register.
-
To delete the registered rejected number:
-
Select a registered rejected number you want to delete and press OK.
-
Select Delete and press OK.
The confirmation screen is displayed.
-
Select Yes and press OK.
- You can also register the rejected number by pressing Function list on the Fax standby screen, and then selecting Rejected numbers under TEL number registration.