
PC faxing with the MX330
| Article ID: ART129240 | | | Date published: 05/12/2015 | | | Date last updated: 08/17/2015 |
Description
Solution
![]()
 Sending a FAX
You can send faxes using the fax driver from applications that support document printing. You can only specify one fax recipient. You cannot send a fax to two or more recipients in one operation.
Only black and white transmission is supported.
1. Open the document you want to fax with an application (such as Word), and then click the Print command. (The command is Print... on the File menu.)
2. In Select Printer or Name in the Print dialog box, select Canon XXXX FAX, then click Print or 'OK'.
(XXXX stands for the model name of your printer.)
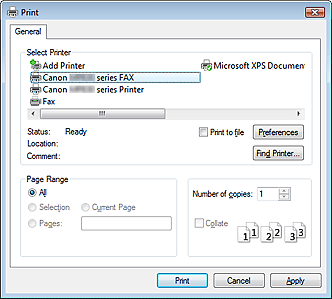
* Print dialog box in NotePad
Reference
You can specify the paper size and orientation for faxing in the setting dialog box. To open the setting dialog box, click Preferences or Properties (Windows 2000: Fax Options tab or Properties) in the Print dialog box.
3. Enter the name and fax number of the recipient, then click Add to Recipient List. Alternatively, click Display Address Book..., select a recipient from the recipient list, click Add to Recipient List, then click 'OK'.

See the section below for details on the address Book.
Creating an Address Book
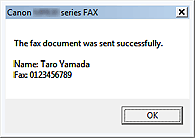
4. Click 'Send Now'.
A confirmation message is displayed when transmission finishes.
 Important
![]() If you cannot send a fax because of line failure etc., refer to User's Guide (On-screen Manual).
If you cannot send a fax because of line failure etc., refer to User's Guide (On-screen Manual).
 To Cancel a Fax
If you click Send Now in the Send Fax dialog box, the printer icon is displayed in the taskbar. Double-click this icon to display the list of fax jobs awaiting transmission or being sent.
Right-clicking a job and selecting Cancel stops transmission.

![]() Opening the Address Book for the First Time (Windows XP/Windows 2000)
Opening the Address Book for the First Time (Windows XP/Windows 2000)
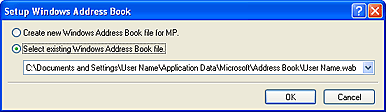
In Windows XP/Windows 2000, when you open the Address Book for the first time, the Setup Windows Address Book dialog box will be displayed.
 To Create a Windows Address Book (WAB file) Exclusively for Faxing
Click Create new Windows Address Book file for MP., then click 'OK'.
You can also change the setting later so as to be able to use another Address Book. For details, refer to the help for the fax driver.
![]() To use an existing Windows Address Book
To use an existing Windows Address Book
Select this option if you do not create a new address Book file exclusively for faxing.
Click Select existing Windows Address Book file., select an address Book file from the list, then click 'OK'.
Using an existing Windows Address Book enables you to share it with other applications that use Windows Address Books. This option cannot be selected if there is no Windows Address Book file created.
Important
![]() For details on how to open the Windows Address Book (the default address Book of the operating system), refer to the help or manual for the applications that use Windows Address Book.
For details on how to open the Windows Address Book (the default address Book of the operating system), refer to the help or manual for the applications that use Windows Address Book.
Creating an Address Book
By using the Address Book, you can send a fax by simply specifying a recipient from it. You can register the recipient's name, fax number and other information in the Address Book.
To open the Windows address Book, click the Start button, then click All Programs - Windows Contacts.
![]() Registering a recipient (WAB contact) in the Address Book
Registering a recipient (WAB contact) in the Address Book
You can register an individual recipient (Contact) in the Address Book.
1. On the Windows taskbar, click the Start button, then click Control Panel - Hardware and Sound - Printers. (For Windows XP: Click the Start button, then click Control Panel - Printers and Other Hardware - Printers and Faxes. For Windows 2000: Click the Start button, then click Settings - Printers.)
2. Right-click the printer icon for Canon XXXX FAX, then click Printing Preferences....
(XXXX stands for the model name of your printer.)
3. In the Canon XXXX FAX Printing Preferences dialog box, click Address Book....
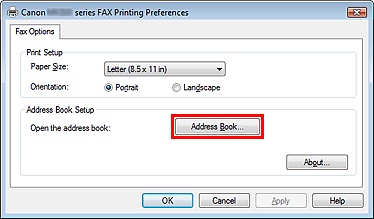
To create a Windows Address Book exclusively for faxing, click Create new Windows Address Book file for MP., then click 'OK'.
To use an existing Windows Address Book, click Select existing Windows Address Book file., select an existing address Book file, then click 'OK'. This option cannot be selected if there is no Windows Address Book file created.
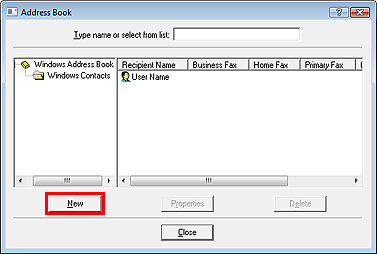
4. In the Address Book dialog box, click New.
5. Click Contact in the New Entry dialog box, then click 'OK'.

6. Enter the first, middle, and last name of the contact in the Name and E-mail tab (Name tab when using other than Windows Vista) on the Properties screen.
The recipient's name will be printed at the top of the fax received by the recipient.
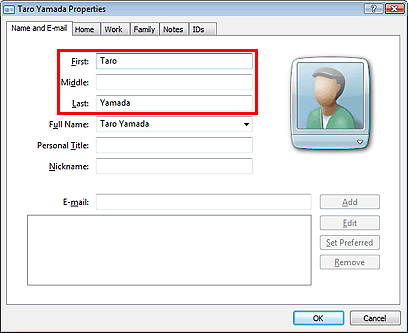
7. Enter the fax number on the Home or Work tab, then click 'OK'.
1. Click the Start button, then click Users - XXXX (User Name) - AppData - Roaming - Canon - MP5.
2. Double-click the ".wab" file in the folder.
The address Book will be reflected in Windows Vista automatically.
![]() Other Features
Other Features
![]() Edit or remove a recipient from an Address Book
Edit or remove a recipient from an Address Book
![]() Search for a recipient in an Address Book
Search for a recipient in an Address Book
![]() Use a different Windows Address Book (Windows XP/Windows 2000)
Use a different Windows Address Book (Windows XP/Windows 2000)
![]() Import a Windows Address Book (Windows XP/Windows 2000)
Import a Windows Address Book (Windows XP/Windows 2000)
For details, refer to the help for the fax driver.