Change the Paper Source
In this machine, there are two paper sources, a rear tray and a cassette.
You can facilitate printing by selecting a paper source setting that matches your print conditions or purpose.
You can also set the paper source on the Quick Setup tab.
- Open the printer driver setup window
-
From the Paper Source list on the Main tab, select the paper source that matches your purpose.
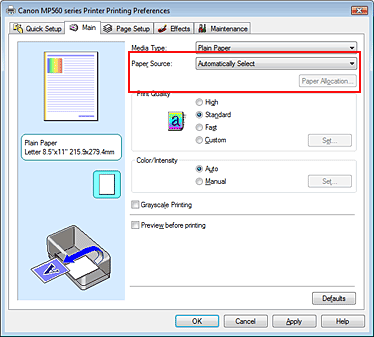
Automatically Select
Plain paper whose Page Size is Letter 8.5"x11", A5, A4, or B5 is fed from the cassette. Other sizes of plain paper and paper types other than plain paper are fed from the rear tray.
Rear Tray
Paper is always fed from the rear tray.
Cassette
Paper is always fed from the cassette.
Important: Plain paper that is not Letter 8.5"x11", A5, A4, or B5 and paper types other than plain paper cannot be fed from the cassette.
Continuous Autofeed
When plain paper runs out in the specified paper source, the printer automatically switches the paper source.
When printing a large volume of data, load plain paper of the same size in paper sources. You can therefore reduce the trouble of having to load paper because the printer automatically switches the paper source when paper runs out in one paper source.
Important:
- Continuous Autofeed is unavailable when paper other than Plain Paper is selected for Media Type.
- Since the printer feeds paper from the paper source that was being used the last time Continuous Autofeed was selected and printing ended, load the same paper in the rear tray and the cassette.
Paper Allocation
When the media type for the print data is plain paper and the paper size matches the paper allocation setting, the printer automatically feeds paper from the cassette. If not, the printer feeds paper from the rear tray.
To change the paper allocation settings, click Paper Allocation..., specify the Paper Size to be loaded in the cassette, and then click OK.
When you load frequently used plain paper in the cassette, the printer feeds paper from the rear tray when the print data uses a different type of paper. You can therefore reduce the trouble of having to load different paper.
- Click 'OK' to complete the setup.
When you execute print, the printer uses the specified paper source to print the data.
The printer driver setup window can be displayed through the application software in use or the Start menu of the Windows.
Open the Printer Driver Setup Window through the Application Software
Follow the procedure below to configure printing profile when printing.
- Select the command you perform printing on the application software in use.
In general, select 'Print' on the File menu to open the Print dialog box.
- Select your model name and click 'Preferences' (or 'Properties').
The printer driver setup window appears.
Note: Depending on application software you use, command names or menu names may vary and there may be more steps. For details, refer to the user's manual of your application software.
Open the Printer Driver Setup Window through the Start Menu
Follow the procedure below to perform maintenance operations such as print head cleaning, or to configure printing profile that are common for all application software.
-
Based upon your computer's operating system, select items from the Start menu as shown below,
- If you are using Windows 7, select the 'Start' menu -> 'Devices and Printers'.
- If you are using Windows Vista, select the 'Start' menu -> 'Control Panel' -> 'Hardware and Sound' -> 'Printers'.
- If you are using Windows XP, select the 'Start' menu -> 'Control Panel' -> 'Printers and Other Hardware' -> 'Printers and Faxes'.
- If you are using Windows 2000, select the 'Start' menu -> 'Settings' -> 'Printers'.
- Right-click your model name icon, and then select 'Printing Preferences' from the displayed menu
The printer driver setup window appears.
Important: Opening the printer driver setup window through Properties displays such tabs regarding the Windows functions as the Ports (or Advanced) tab. Those tabs do not appear when opening through Printing Preferences or application software. For tabs regarding Windows functions, refer to the user's manual for the Windows.
Return to Paper Source Selection
