| Solution |
You can print images by wirelessly connecting the camera to a printer supporting PictBridge (Wireless LAN).
This article explains how to make a connection using the camera access point. You can use the camera access point mode when no other access points are available, allowing you to print images easily at any time.
IMPORTANT
- To establish a connection, operations on the printer are required. For details, refer to the printer's instruction manual.
- When in <
 >, < >, <  >, < >, <  >, < >, <  >, < >, <  >, or < >, or <  > mode, when HDR shooting is set, or when Multi Shot Noise Reduction is set, the camera cannot be connected to a printer. > mode, when HDR shooting is set, or when Multi Shot Noise Reduction is set, the camera cannot be connected to a printer.
Step 1: Connect the camera and printer via Wireless LAN (camera access point mode) 1. Turn on the camera and the printer.
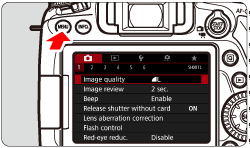
2. Press the camera's <MENU> button to display the menu.
IMPORTANT
If the camera's auto power off functions while connected via Wi-Fi, the Wi-Fi connection will be disconnected. Under the [  ] tab, setting [Auto power off] to [Disable] is recommended.
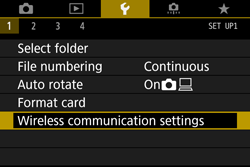
3. Press the <  > <  > keys to choose the [  ] tab.

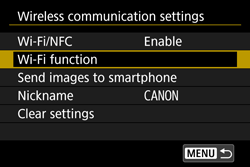
4. Press the <  > <  > keys to select [Wireless communication settings], then press <  >.
5. Press the < > < > keys to select [Wi-Fi/NFC], then press < >.
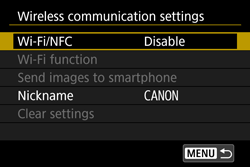
6. Press < > to select [Enable], then press < >.

NOTE
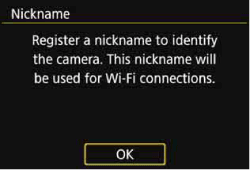
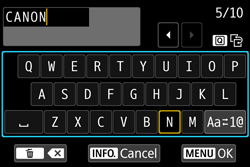
When this setting is selected for the first time, a screen to register a nickname (identification name) is displayed.
When the camera is connected to another device wirelessly, the nickname will be displayed on the device. Be sure to set a nickname as otherwise you cannot set the wireless functions.
Select [OK] and enter a nickname. (You can enter between 1 to 10 characters.)
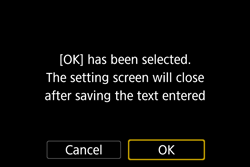
When you are finished, press the <MENU> button.
Select [OK] on the confirmation dialog and press < >.
* For details on how to use the keyboard, refer to "Operation Reference: Virtual Keyboard Operation".
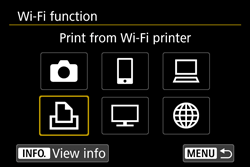
7. Press the < > < > keys to select [Wi-Fi function], then press < >.
8. Press the < > < > or < > < > keys, select [  ] (Print from Wi-Fi printer), and then press < >.
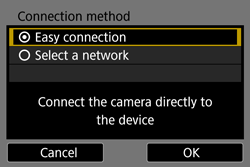
9. Press the < > < > keys to select [Easy connection], then press < >. Select [OK] and press < > to go to the next screen.
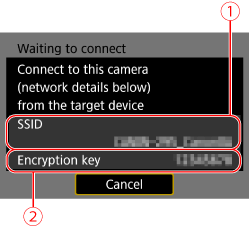
10. Operate the printer and connect it to the camera.
- On the Wi-Fi settings menu of the printer to be used, select the SSID (network name) (
 ) displayed on the camera's LCD monitor. ) displayed on the camera's LCD monitor.
- For the password, enter the encryption key (
 ) displayed on the camera's LCD monitor. ) displayed on the camera's LCD monitor.
NOTE
- In camera access point mode, when connecting by selecting [Easy connection], "_Canon0A" is displayed at the end of the SSID.
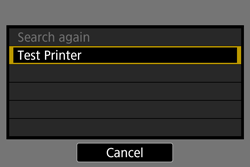
11. When a list of detected printers is displayed, select the printer to connect to and press < >.
- Some printers may make a beeping sound.
- When 16 or more printers are detected or search takes over 3 minutes, you can select [Search again].
The processing screen is displayed.
When a connection is established, an image on the card is displayed.
The settings for connecting to a printer are now complete.
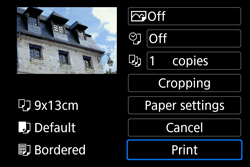
Step 2: Print 1. Turn the <  > dial to select an image to print, then press < >. By pressing the [  ・  ] button, you can switch to the index display and select an image.
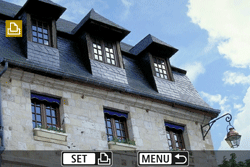
2. Press the < > < > keys to select [Print image], and then press the < > button.
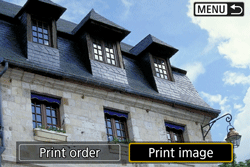
3. Press the < > < > keys to select [Print], and then press the < > button.
- For more information about settings, refer to "Printing Images Using a Wi-Fi Printer" in the Wireless Function Instruction Manual.
- When printing is completed, the screen for step 1 will reappear. To print another image, repeat steps 1 to 3.
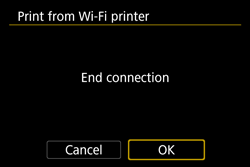
4. Press the <MENU> button to terminate the connection.
A confirmation dialog is displayed. Press < >, select [OK], then press < >.
IMPORTANT
- While connected, a picture cannot be taken even if the camera's shutter button is pressed.
- When printing a large number of images or large files (total size), make sure that the battery is adequately charged so it does not run out during the process.
- Movies cannot be printed.
- The screen display and setting options will differ depending on the printer. Some settings may not be available. For details, refer to the printer's instruction manual.
NOTE
RAW images shot with this camera can also be printed.
Operation Reference: Virtual Keyboard Operation For details on keyboard operation when registering a nickname (identification name) of the camera, refer to the following.
You can change the nickname later on the [General sett.] screen.
| Changing the entry area | Press the <
 > button to toggle between the top and bottom entry areas.
 |
| Moving the cursor | Press the <
> <
> keys in the top area to move the cursor. |
| Entering text | In the bottom area, press the <
> <
> or <
> <
> keys to select a character, then press <
> to enter it.
You can check how many characters you have entered, and how many more can be entered, by referring to [*/*] on the upper right of the screen. |
| Changing the entry mode* | Select [
 ] at the bottom right of the bottom entry area. Each time you press <
>, the entry mode will change as follows: Lower case → Numerals/Symbols 1 → Numerals/Symbols 2 → Upper case.
] at the bottom right of the bottom entry area. Each time you press <
>, the entry mode will change as follows: Lower case → Numerals/Symbols 1 → Numerals/Symbols 2 → Upper case.
* When [Touch control: Disable] is set, you can enter all characters on one screen. |
| Deleting a character | Press the <
 > button to delete one character.
 |
| Finishing the text entry | Press the |
| Canceling the text entry | Press the button to cancel text entry and exit. If a confirmation dialog is displayed, select [OK] to exit. |
|