Adjusting the Scan Resolution or the Scan Contrast
You can adjust the scan resolution of the original you send. The higher you set the scan resolution setting, the better the output quality will be at the other end, but the longer it will take for the transmission. Adjust the scan resolution according to the type of original you are sending.
| Standard: |
Suitable for text-only documents. |
| Fine: |
Suitable for fine-print documents. |
| Extra fine: |
Suitable for detailed illustration or fine-print quality documents. |
| |
If the recipient's fax machine is not compatible with Extra fine (300x300dpi), the fax will be sent in the Standard or Fine resolution. |
| Photo: |
Suitable for photographs. |
 Note: When sending a color fax, documents are always scanned in the same resolution (200x200dpi). The image quality (compression rate) is determined by which scan resolution is selected, except that Extra fine and Photo provide the same image quality.
Contrast is the degree of difference between light and dark. Increasing the scan contrast setting further blackens dark areas and whitens bright areas, whereas decreasing the contrast setting reduces the difference between bright and dark areas. You can adjust the contrast among three contrast levels.
Sending Faxes
-
Prepare for sending a fax.
- Make sure that the printer is powered on.
- Load the original in the ADF or on the Platen Glass.
Note: When sending a double-sided document, load the document on the Platen Glass. You cannot scan double-sided documents in the ADF.

- Press the FAX button.
The fax standby screen will appear.
-
Adjust the scan resolution and contrast as necessary.
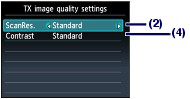
- Press the right Function button to select TX image qlty.

- Use the
 or
or  button to select the preferred scan resolution (2).
Note: When sending a color fax, documents are always scanned in the same resolution (200x200dpi). The image quality (compression rate) is determined by which scan resolution is selected, except that Extra fine and Photo provide the same image quality.
- Use the or button to select the scan contrast (4).
The button decreases the scan contrast, and the button increases the scan contrast.
- Press the OK button.
-
Send the fax.
- Use the numeric buttons to dial the recipient's fax/telephone number.
The following operations are available.
- Press a Numeric button to enter that number.
- To enter a space, press the right Function button (A) to select Space.
- To delete the last character you entered, press the center Function button (B) to select  .
.
- Press the  button to enter "#", and the
  button to enter "
 ".
".
- Press the Redial /Pause button to enter a pause "P".
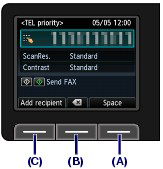
Note: If you press the left Function button (C) to select Add recipient, you can add recipients by selecting fax numbers registered to a coded speed dial and/or group dial.
-
Press the Color button for color sending, or the Black button for black & white sending.
The machine starts scanning the original.
Note:
- Color sending requires that the recipient's fax machine supports color faxing. If the recipient's fax machine does not support color faxing, you can set the machine to send a fax in black-and-white.
- Do not open the Document Cover until scanning is completed.
- Start sending.
When the document was loaded in the ADF
The machine scans the document automatically and starts sending the fax.
Note:
To cancel sending the fax, press the Stop button, and follow the message on the LCD.
If documents remain in the ADF after pressing the Stop button, follow the message and press the OK button. The remaining documents are automatically fed out.
When the original was loaded on the Platen Glass
The message will appear after scanning the original.
To send the scanned page, press the OK button to start sending it.
- To send two or more pages, follow the message to load the next page, and press the Color or Black button. After scanning all pages, press the OK button to start sending.
- To cancel sending the fax, press the Stop button.
