Mirror Lockup 
Although using the self-timer or Remote Switch can prevent camera shake, using mirror lockup to prevent camera vibrations (mirror shock) can also help when you use a super telephoto lens or shoot close ups (macro photography).
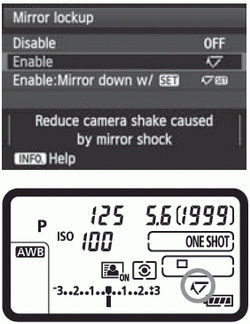 | 1 Set [Mirror lockup]. Under the  tab, select [Mirror lockup], then press < tab, select [Mirror lockup], then press < >. >. Select [Enable] or [Enable: Mirror down w/SET], then press <>.
2 Focus the subject, then press the shutter button completely. 3 Press the shutter button completely again. - The picture will be taken.
- With [Enable] set, the mirror will go back down when the shooting ends.
- If [Enable: Mirror down w/SET] is set, the mirror lockup will be maintained even after shooting. To cancel the mirror lockup, press <>.
|
- In very bright light such as at the beach or a ski slope on a sunny day, take the picture promptly after mirror lockup.
- Do not point the camera toward the sun. The sun’s heat can scorch and damage the shutter curtains.
- If you use the self-timer and mirror lockup in combination with bulb exposure, keep pressing the shutter button completely (self-timer delay time + bulb exposure time). If you let go of the shutter button during the self-timer countdown, there will be a shutter-release sound, but no picture will be taken.
- During mirror lockup, shooting function settings and menu operations, etc. are disabled
- When [Enable] is set, single shooting will take effect even if the drive mode is set to continuous. When [Enable: Mirror down w/SET] is set, the current drive mode will take effect for the shooting.
- You can also use the self-timer with mirror lockup.
- If 30 seconds elapse after the mirror has locked up, it will go back down automatically. Pressing the shutter button completely again locks up the mirror again.
- For mirror lockup shooting, using a tripod and Remote Switch RS-80N3 (sold separately) or Timer Remote Controller TC-80N3 (sold separately) is recommended
