Setting Menu You can move to each setting page from Setting Menu for following various camera settings. For details, refer to each page of this manual.

- Network - Settings for the administrator password, LAN, IPv6, DNS and SNMP
- Date and Time - Settings for the date, time and time zone on the camera
- Camera - Settings for the camera name, camera initial settings, camera control, day/night, installation conditions, camera position control, external input device names and external output device names
- Image - Settings for image quality, image size and frame rate of JPEG image and MPEG-4 video
- Upload - Settings for HTTP/FTP upload via HTTP or FTP and e-mail notification
- Server - Settings for the image server, audio server and HTTP server
- Event - Settings for image buffer, motion detection, external device input, interval timer and voice file upload
- Access Control - Settings for the authorized user account, user authority and host access restriction
- IPsec - Settings for IPsec
- Reboot Item - Settings for items that require a reboot after the setting
- Maintenance - Viewing of the event log and current settings, rebooting the camera, and restoring the factory default settings
Note
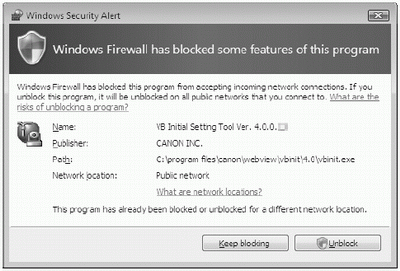
Windows Vista/XP
- If the "Windows Security Alert" dialog box appears, click "Unblock". Once you click "Unblock", this dialog box will not be displayed again.
- If a pop-up blocker appears when you attempt to view "Help" of each setting item or when you attempt to open "View Log Events" or "View Current Settings" in the "Maintenance" page, follow the instructions of the information bar to disable the pop-up blocker.

Access the Setting Menu
To configure each setting, first you need to access to the camera via a web browser.
To begin with, access to the camera's top page. For details of entering a user name and a password
Setting Menu
You can access each setting page and the Admin viewer from the Setting Menu.
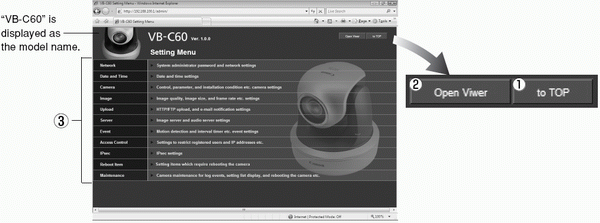
1. to Top button - Click this button to move to the camera's top page.
2. Open Viewer button - Click this button to open the Admin viewer.
3. Setting Menu - Click this button to move to each setting page.
Note
For security reasons, be sure to close the browser after you finish setting on the setting pages.
Common Items
Apply Changes
When you change the settings on each setting page, the grayed-out "OK" button on the top right of the page changes to blue.

Click "OK" to enable the changes.
Click "Clear" to reset the changes.
Setting Items That Require Reboot
An orange mark is indicated for each setting item that requires rebooting the camera to enable the change.

When you change a setting item with the orange mark, the "OK" button displayed on the top right of the setting page changes to "OK and Reboot".

Click "OK and Reboot" to enable the change. The setting changes and then the camera reboots.
Click "Clear" to reset the changes.
Tip
- A dialog box appears to alert when clicking "OK" or "OK and Reboot" after changing the network setting, in which the currently-used browser becomes unable to access to the camera.
- If the above network setting is changed and so the viewer cannot reconnect to the camera automatically, links to candidate URIs are displayed. However, you may not be able to connect using the URI, as these are just candidate URIs. In such case, try connecting from VB Initial Setup Tool.
Return to the Setting Menu
Click "to Menu" on the top right of each setting page to return to the Setting Menu.
Note
- Do not open multiple setting pages when changing settings for a single camera settings.
- Do not use "Back" and "Forward" of the web browser to move between the setting pages. The old page is displayed due to effects of caching, so the set values may return to the older ones, or unintended changes may be made.
Tip
Detailed information for each setting item is available by clicking  "HELP" in each column.
