When you connect the camcorder to an external monitor for recording or playback, use the terminal on the camcorder that matches the one you wish to use on the monitor. Then, select the video signal output configuration.  The camcorder will automatically switch between the AV OUT and HDMI OUT terminals based on the external connection. IMPORTANT - Be sure to turn off the camcorder and the external monitor when making the connections.
- Please refer also to the documentation supplied with the external monitor set.
NOTE The position and shape of the operation buttons, screens displayed, and setting items may differ according to the model you use.
Connection Diagram
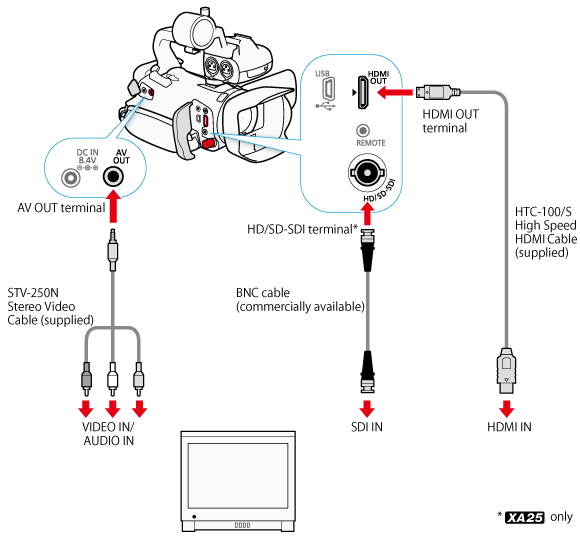 REFERENCE - We recommend that you power the camcorder from a household power outlet using the compact power adapter.
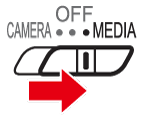
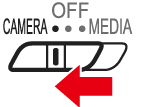
Playing back images/movies 1. Turn off the camcorder and external monitor. 2. Connect the camera to the external monitor. 3. Turn on the external monitor and change the input. 4. Set the camcorders power switch to <MEDIA>.
 Touch the desired movie on the camcorders LCD screen to begin playback. Select the output terminal/output signal type from the following menu: Using the HD/SD-SDI Terminal (XA25)
Using the HDMI OUT Terminal
Using the AV OUT Terminal
Selecting the Terminal Used For Output
Selecting the Terminal Used For Output
Selecting the Audio Output Channel
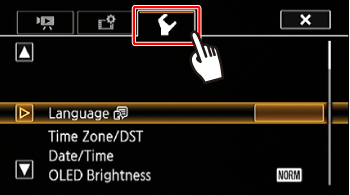
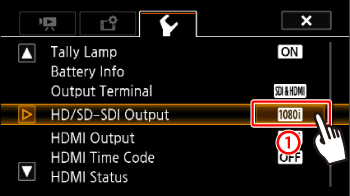
Using the HD/SD-SDI Terminal (XA25) The digital signal output from the HD/SD-SDI terminal includes the video signal, audio signal and time code signal. If necessary, perform the following procedure to change the output to HD or SD. 1. Select the output terminal. Touch [  ].
 2. Touch [  ].
 3.  Drag your finger up and down bring [Output Terminal] into the orange selection bar,  and touch the button.
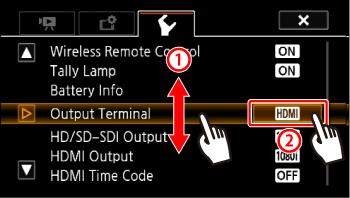 4. Select [HD/SD-SDI].
 5. Touch [  ].
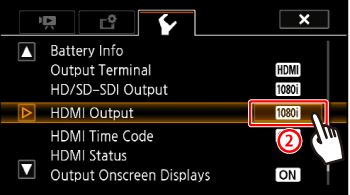
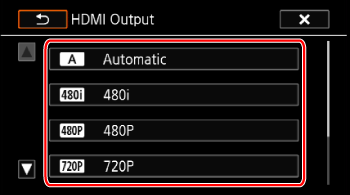
Using the HDMI OUT TerminalThe HDMITM OUT terminal also offers a digital connection and outputs a video and audio signal.
If you selected [  Automatic], the output signal will automatically switch to HD or SD depending on the capability of the external monitor. In CAMERA mode, when the recording mode is set to 28 Mbps LPCM (59.94P/50.00P) or 24 Mbps LPCM, the HDMI OUT terminal outputs two-channel linear PCM audio with a sampling frequency of 48 kHz. Automatic], the output signal will automatically switch to HD or SD depending on the capability of the external monitor. In CAMERA mode, when the recording mode is set to 28 Mbps LPCM (59.94P/50.00P) or 24 Mbps LPCM, the HDMI OUT terminal outputs two-channel linear PCM audio with a sampling frequency of 48 kHz. 1. Select the output terminal. Touch [ ].
2. Touch [ ].
3. Drag your finger up and down bring [Output Terminal] into the orange selection bar, and touch the button.
4. Select [HD/SD-SDI & HDMI] or [HDMI].
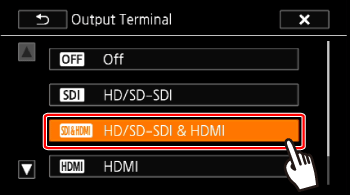 5. Touch [ ]. NOTE  When [Output Terminal] is set to [ HD/SD-SDI & HDMI], the signal output from the HDMI OUT terminal will be determined by the [HD/SD-SDI Output] setting. When [Output Terminal] is set to [ HD/SD-SDI & HDMI], the signal output from the HDMI OUT terminal will be determined by the [HD/SD-SDI Output] setting.- The HDMI OUT terminal on the camcorder is for output only. Do not connect it to an HDMI output terminal on an external device, as this may damage the camcorder.
- There will be no video output from the AV OUT terminal while an external monitor is connected to the HDMI OUT terminal.
- Correct operation cannot be guaranteed when connecting the camcorder to DVI monitors.
- Video may not be output correctly depending on the monitor. In such case, use another terminal.
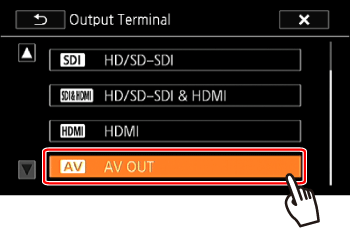
Using the AV OUT Terminal The AV OUT terminal outputs a down-converted analog video signal and audio signal for connection to monitors with a composite audio/video input. 1. Select the output terminal. Touch [ ].
2. Touch [ ].
3. Drag your finger up and down bring [Output Terminal] into the orange selection bar, and touch the button.
4. Select [AV OUT].
 5. Touch [ ]. NOTE - When you play back a scene on a monitor with a 4:3 aspect ratio, the monitor will switch automatically to widescreen mode if it is compatible with the Video ID-1 system.
- If you are connecting the camcorder to a standard definition monitor without widescreen mode, make sure to change the [TV Type] setting.
Selecting the Terminal Used For Output (XA25) To output your recordings on an external monitor, you must first select which terminal you will use. 1. Set the power switch to <MEDIA>.
2. Select the output terminal. Touch [ ].
3. Touch [ ].
4. For HD/SD-SDI output, touch [HD/SD-SDI]. For HDMI output, touch [HDMI].
 5. Select the desired option. (HD/SD-SDI has been selected in the image.)
 6. Touch [ ]. NOTE If you selected an option other than [  ]: Automatic] and the connected monitor is not compatible with the signal output from the camcorder, then HDMI output will stop.
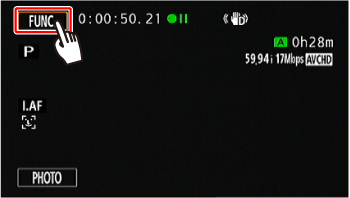
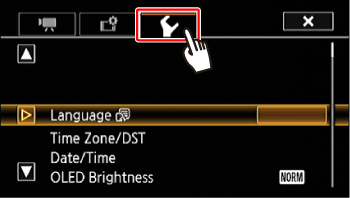
Selecting the Audio Output The camcorder can output audio from the HD/SD-SDI terminal ( only), HDMI OUT terminal, AV OUT terminal or <  > (headphone) terminal. When audio is output from the AV OUT terminal or < > (headphone) terminal, you can configure the following settings. 1. Set the power switch to <CAMERA>.
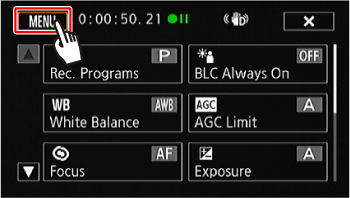
 2. Touch [  ].
 3. Touch [ ].
 4. Touch [ ].
 5. Touch [Monitor Delay].
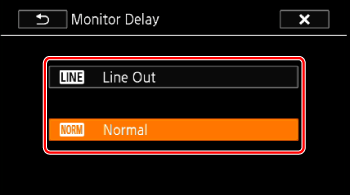
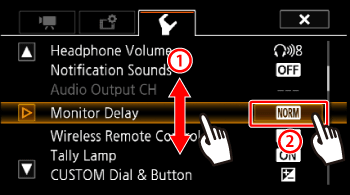 6. Touch the desired option [  Line Out]: Synchronizes the audio and video signals. [  Normal] (  Default value): Allows you to monitor the audio in real time.
 7. Touch [ ]. Selecting the Audio Channel You can select the audio channel that is output from the AV OUT terminal or < > (headphone) terminal. When performing this procedure in CAMERA mode, set the INPUT terminal ON/OFF switch to ON. 1. Set the power switch to <CAMERA>.
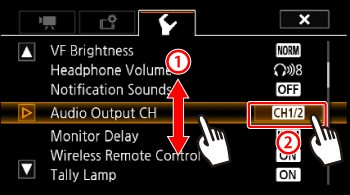
2. Touch [ ].
3. Touch [ ].
4. Touch [ ].
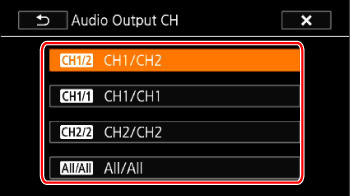
5. Touch [Audio Output CH].
 6. Touch the desired option [  CH1/CH2] Audio from INPUT 1 is output from the left audio channel and audio from INPUT 2 is output from the right audio channel. (Default value) [  CH1/CH1] Audio from INPUT 1 is output from the left and right audio channels. [  CH2/CH2] Audio from INPUT 2 is output from the left and right audio channels. [  All/All] Audio from INPUT 1 and INPUT 2 is mixed and output from the left and right audio channels.
 7. Touch [ ]. NOTE If you set an assignable button to [Audio Output CH] , you can press the button to change the audio channel directly.
| 