Preparations for Using ScanGear Toolbox CS
Default Settings for the ScanGear Toolbox CS Toolbar
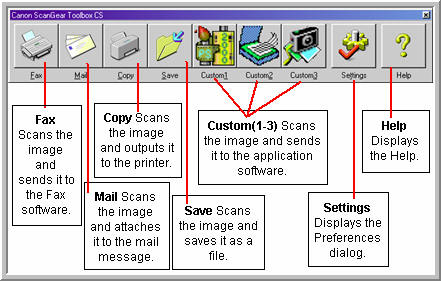
The conditions to make buttons visible as above and to use the function are as following; Fax: a fax modem is connected to the PC and a fax software is installed.
Mail: a MAPI compatible mail software is installed.
Copy: a printer is connected to the PC and an appropriate driver is installed.
Custom(1-3): When all the software programs are installed using the CanoScan Setup Utility CD-ROM, the bundled application software will be registered.
Tab Settings
Clicking the Settings button opens the Canon ScanGear Toolbox CS Settings window, which features a tab for each button. These tabs are used to specify the button settings, such as the driver or program to which it is linked. The tabs can also be used to adjust settings for scanned images.
Fax Settings Tab
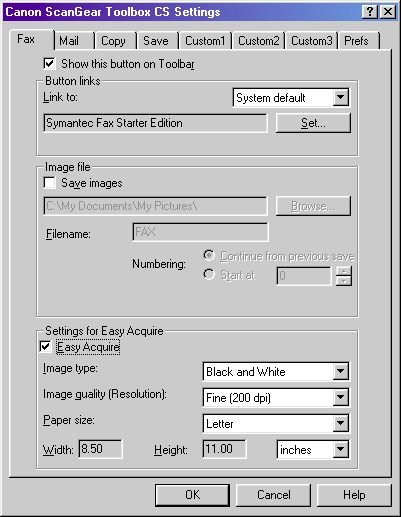
- Show this button on Toolbar
Place a check in this box to display the button for this function on the ScanGear Toolbox CS toolbar.
- Button links
Click the arrow of the [Link to:] list box. Select [System default] to register the printer driver "Set as Default" for your computer.
- Save images
Place a check in this box to save the scanned image to a file in addition to sending it to the fax driver. The save folder, and root filename and numbering options can be set when a check is present in this box.
- Settings for Easy Acquire
Place a check in the box to turn Easy Acquire on. And specify the settings (image type, image quality, paper size (scan area)) used when Easy Acquire is turned on from the lists. Custom Setting is performed for the paper size. See ScanGear Toolbox CS Settings Categories/Settings Chart (p. 31) for a list of the options for these settings.
Mail Settings Tab

- Show this button on Toolbar
Place a check in this box to display the button for this function on the ScanGear Toolbox CS toolbar.
- Button links
Click the arrow of the [Link to:] list box and select [System default] to register the default MAPI mail program for your computer.
- Application can open multiple images
Place a check in this box if the application can open more than two images. When an ADF is equipped, the application opens more than two images at a time. When no ADF is equipped, this check is invalid.
- Save images
Place a check in this box to save the scanned image to a file in addition to sending it to the mail program. The save folder, root filename and numbering options, and file format can be set when a check is present in this box.
- Settings for Easy Acquire
Place a check in the box to turn Easy Acquire on. And specify the settings (image type, image quality, paper size (scan area)) used when Easy Acquire is turned on from the lists. Custom Setting is performed for the paper size.
Copy Settings Tab
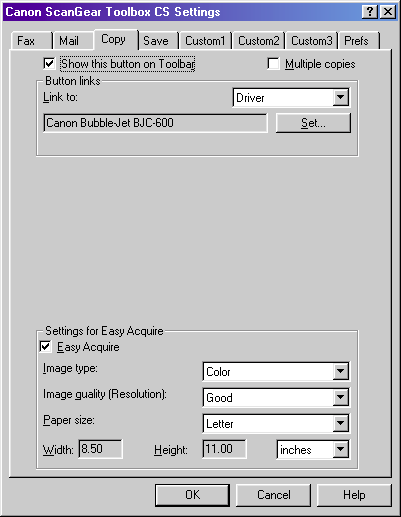
- Multiple copies
Place a check in this box to display the button for this function on the ScanGear Toolbox CS toolbar.
- Show this button on Toolbar
Place a check in this box to display the button for this function on the ScanGear Toolbox CS toolbar.
- Button links
Click the arrow of the [Link to:] list box. Select [System default] to register the printer driver "Set as Default" for your computer.
- Settings for Easy Acquire
Place a check in the box to turn Easy Acquire on. And specify the settings (image type, image quality, paper size (scan area)) used when Easy Acquire is turned on from the lists. Custom Setting is performed for the paper size.
Save Settings Tab
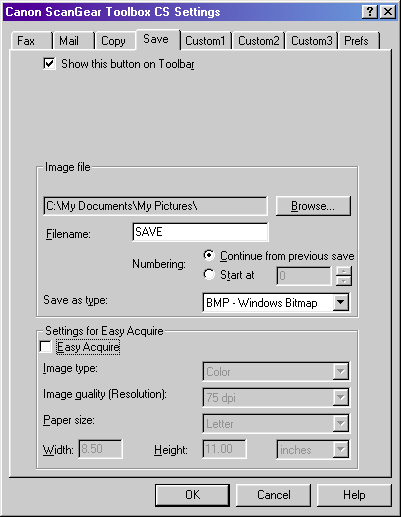
- Show this button on Toolbar
Place a check in this box to display the button for this function on the ScanGear Toolbox CS toolbar.
- Image file
The save folder, root filename and numbering options, and file format can be set in this section.
- Settings for Easy Acquire
Place a check in the box to turn Easy Acquire on. And specify the settings (image type, image quality, paper size (scan area)) used when Easy Acquire is turned on from the lists. Custom Setting is performed for the paper size.
Custom (1, 2, 3) Settings Tab

- Show this button on Toolbar
Place a check in this box to display the button for this function on the ScanGear Toolbox CS toolbar.
- Button links
Click the [Set] button to register an application program, which is selected with the next dialog, to a custom button.
- Application can open multiple images
Place a check in this box if the application can open more than two images. When an ADF is equipped, the application opens more than two images at a time. When no ADF is equipped, this check is invalid.
- Save images
Place a check in this box to save the scanned image to a file in addition to sending it to the registered program. The save folder, root filename and numbering options, and file format can be set when a check is present in this box.
- Settings for Easy Acquire
Place a check in the box to turn Easy Acquire on. And specify the settings (image type, image quality, paper size (scan area)) used when Easy Acquire is turned on from the lists. Custom Setting is performed for the paper size.
Default Settings on the Prefs Tab

- Image source
Click the arrow on the image source list box to specify which scanner you will use if two or more scanners are connected to your computer.
- Scan from
Click the arrow on the "scan from" list box to specify the optional device when Automatic Document Feeder (ADF) is equipped.
- When Scanner Push Button pressed
The option selected in this list box determines what happens when the push button on the scanner is pressed. This function is valid with a scanner with the start button. The available options are Show Toolbox, Fax, Mail, Copy, Save and Custom 1-3.
- Toolbar always on top
Place a check in this box to have the toolbar display on top of other windows on the desktop. Remove it to turn this function off.
- Load on Windows Startup
Place a check in this box to have ScanGear Toolbox CS automatically start when Windows is run. Remove it to turn this function off.
- Button size
Place a check in one of the [Large], [Medium] or [Small] box to control the relative size of the toolbar as it appears on the desktop.
