WARNING:
Install the camera securely.
- When installing the VB-C50i / VB-C50iR on the ceiling, contact your Canon dealer.
- When installing the VB-C50i / VB-C50iR on the ceiling, check that the ceiling is strong enough to bear the weight of the VB-C50i / VB-C50iR including the mounting plate. Installation in a weak location could result in the VB-C50i / VB-C50iR falling and causing serious injury.
- At least once a year, check for looseness in the camera installation mount. (If the optional wide-angle converter is used, check the converter mount also.
The permissible camera installation angles are +/-20° from the horizontal. (+/-15° when the optional wide-angle converter is used for the VB-C50i / VB-C50iR.)
The MAC address required when making network settings is shown on the bottom of the VB-C50i / VB-C50iR Please make a note of it before installing this unit
Using a Tripod (VB-C10)
The screw for mounting a tripod is on the bottom of the VB-C50i / VB-C50iR toward the front.
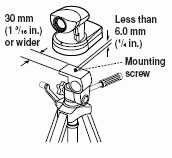
- Do not over tighten the mounting screw. If excessive force is used to tighten the mounting screw, camera head movement may be impeded, or other malfunctions may result.
- Always use a tripod mounting screw that is less than 6.0 mm (1/4 in.) in length. The use of screws 6.0 mm (1/4 in.) long or longer could damage the camera. Also, the tripod seat used should be at least 30 mm (1 3/16 in.) in diameter.


