Displaying the Status Screens
You can use the status screens to check the camcorder’s various settings.
You can also output the status screens to an external monitor.
1 Press the STATUS button to open the status screens.
- The status screen most recently displayed will appear.
- You can also press the AUDIO STATUS button to display only the [Audio] status screens
2 Push the joystick left/right to scroll through the status screens.
3 Press the STATUS button again to close the status screens.
- You can also press the MENU button to close the status screen and open the menu instead.
|
 |
[Gamma/Color Space/Color Matrix] screen
[SDR Gain/Range] screen
[/Data] screens
[Camera] screens
[Assignable Buttons] screens
[Audio] screens
[Media] screen
[Terminal Outputs] screen
[Recording] screen
[Metadata] screens
[Battery/Hour Meter] screen
[Network] screens
[GPS Information Display] screen*
* Only when the optional GP-E2 GPS Receiver is connected to the camcorder
[Gamma/Color Space/Color Matrix] and [SDR Gain/Range] Status Screens ( mode only)
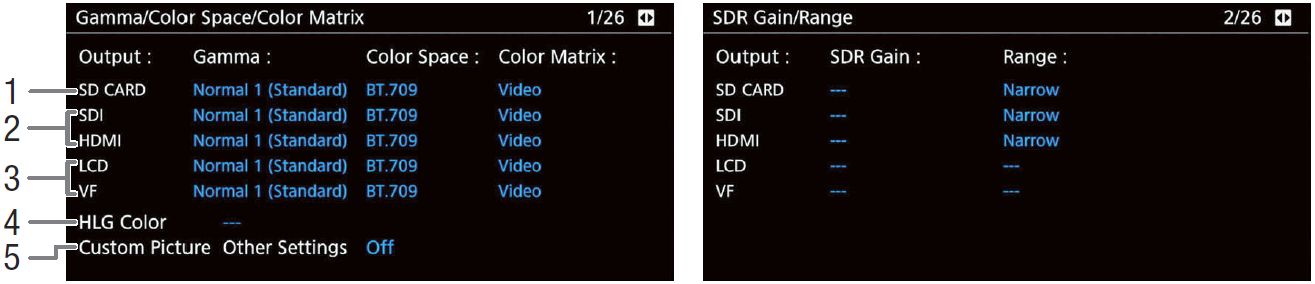 |
| Gamma curve, color space, color matrix, SDR gain and range used for recordings, video output and displays |
1 [SD CARD]: Settings used for clips recorded on the SD card
2 [SDI], [HDMI]: Settings/LUT used for video output from the respective terminals
3 [LCD], [VF]: Settings/LUT used for the LCD screen and viewfinder
|
4 HLG color
 setting (whether detailed settings in the custom picture file are active or not) setting (whether detailed settings in the custom picture file are active or not) |
|
|
[/Data 1/3] to [/ Data 3/3] Status Screens ( mode only)
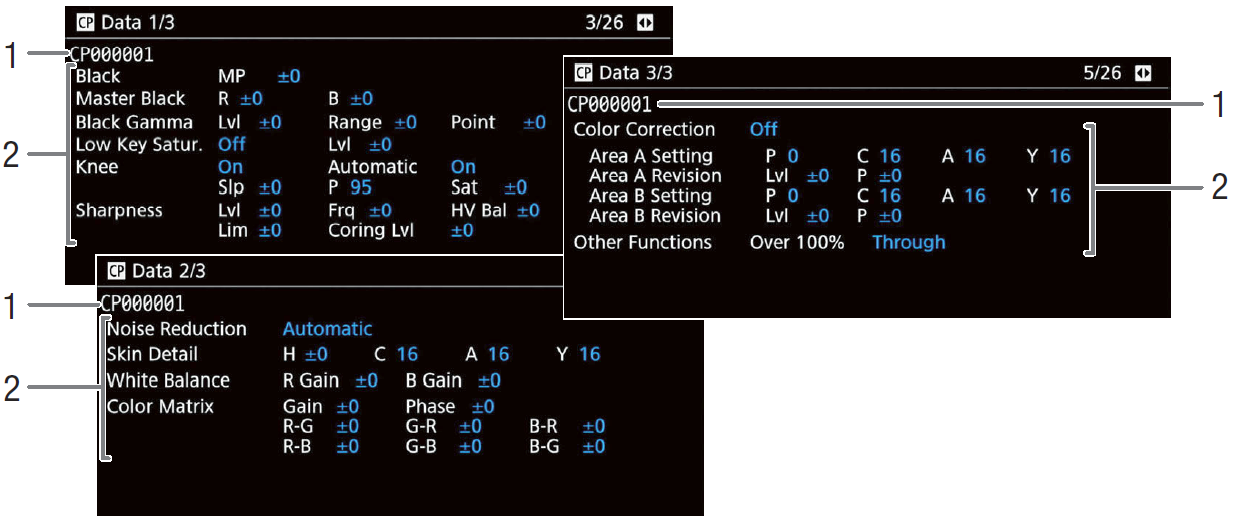
1 Custom picture file name 2 Custom picture file's [Other Settings] (detailed settings)
[Camera 1/4] to [Camera 4/4] Status Screens ( mode only)
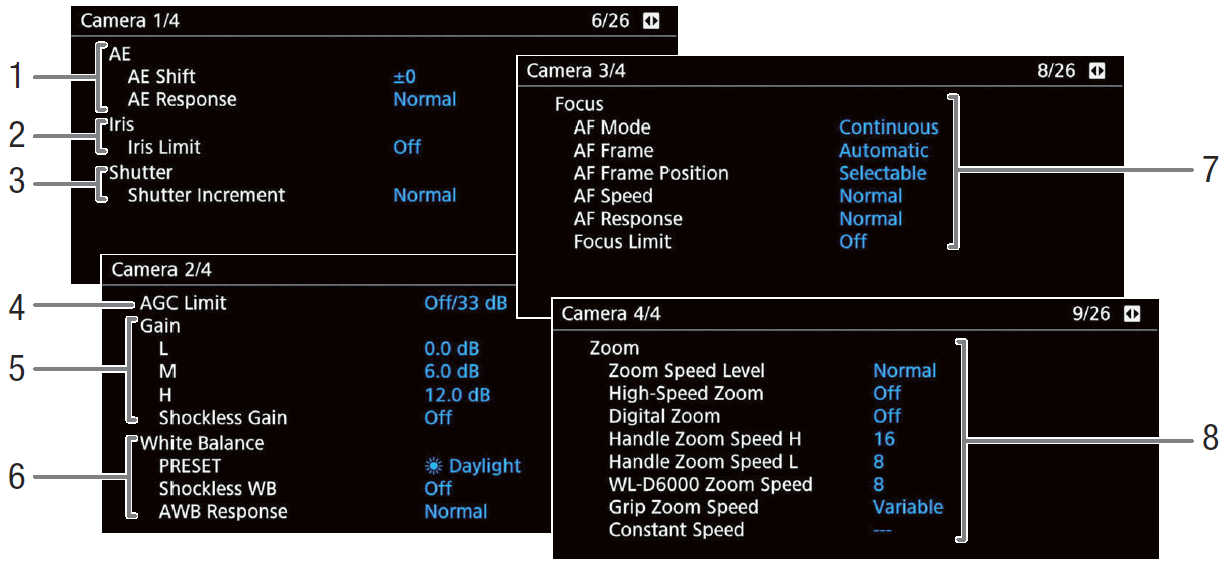
1 Automatic exposure (AE)
AE shift (A61), AE response
2 Aperture limit
3 Shutter speed increment
4 AGC limit
5 Gain settings by switch position
6 White balance
Setting of the PRESET switch position, shockless white balance and auto white balance (AWB) response |
7 Focus
AF mode, AF frame size and position, AF speed, AF response and focus limit
8 Zoom
Zoom speed level, high-speed zoom setting and zoom speed settings for the handle zoom rocker, supplied wireless controller and grip zoom rocker |
[Assignable Buttons 1/3] to [Assignable Buttons 3/3] Status Screens
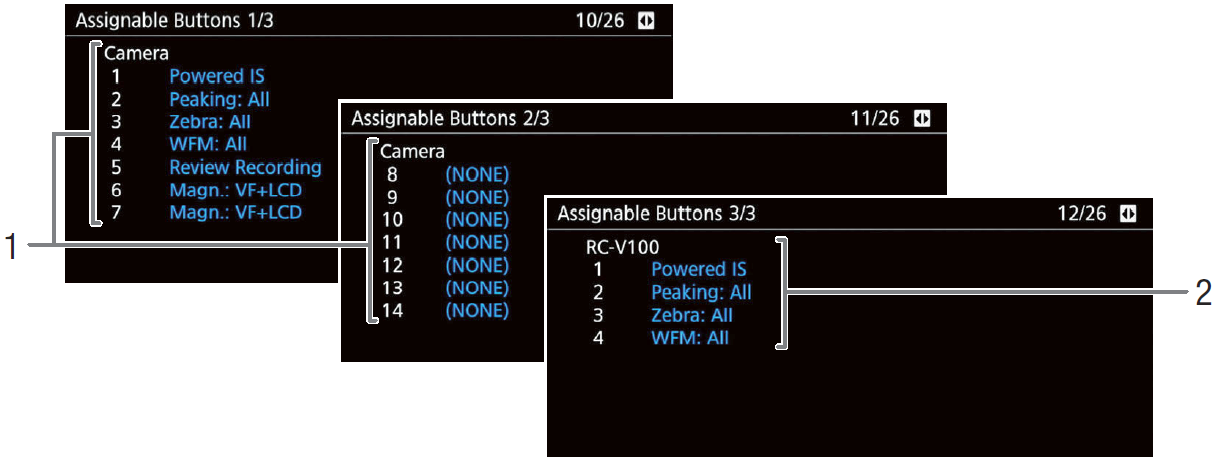
Current functions of the assignable buttons
1 On the camcorder’s body Assignable buttons Camera 8 to 13 appear only in mode |
2 On the optional RC-V100 Remote Controller |
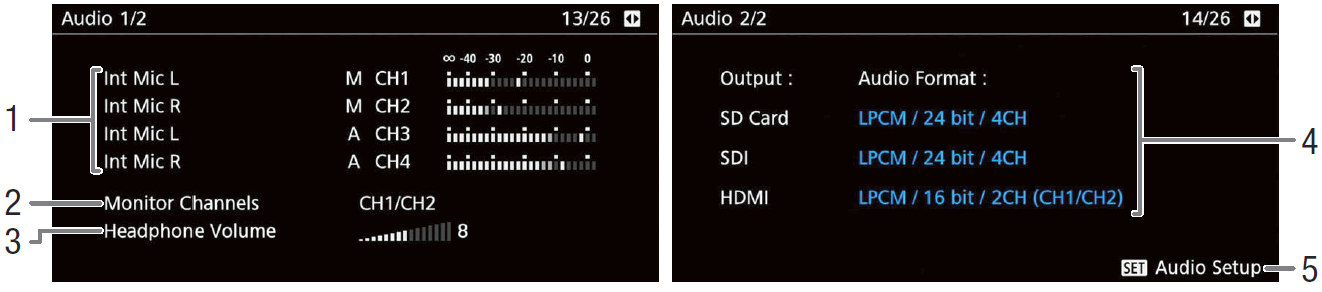
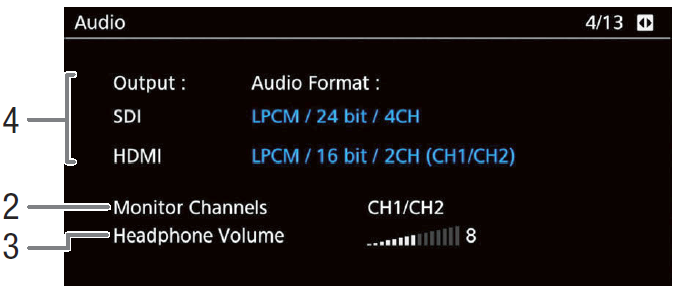
[Audio] Status Screens
In
mode
In

mode
1 Audio source input, audio level adjustment modeand audio level indicator for each audio channel
2 Audio channels output from the headphones/built-in speaker
3 Headphone volume
4 Audio format, audio bit depth and audio channels used for recording or output |
[SD Card]: Settings used for clips recorded on the card.
[SDI], [HDMI]: Settings used for audio output from the respective terminal.
5 Press SET to open the [¡!Audio Setup] menu.
(Only when the [Audio] status screen was opened using the AUDIO STATUS button.) |
[Media] Status Screen
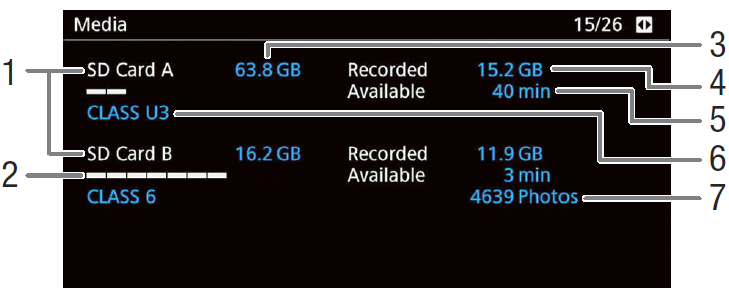
1 SD card A/SD card B
For each:
2 Visual bar: Approximate used/available space
3 Total space
4 Used (recorded) space |
5 Available space
6 SD/UHS speed class
Only for SD card B:
7 Number of remaining photos |
NOTES
• Depending on the SD card, the total space displayed on the screen may differ from the nominal capacity listed on the card.
[Terminal Outputs] Status Screen
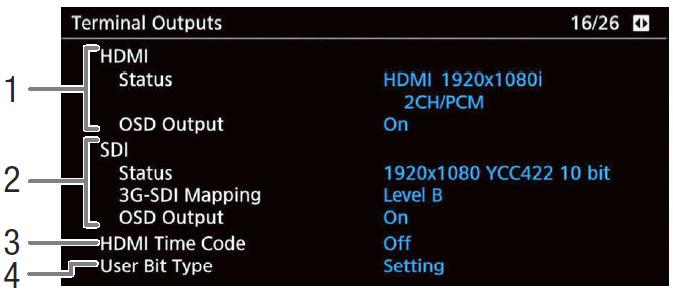
1 HDMI OUT terminal status: Output signal, output onscreen displays
2 SDI terminal status: Video output*, 3G-SDI output mapping, output onscreen displays
* The displayed bit depth refers to the video signal’s bit depth. |
3 Time code output from the HDMI OUT terminal
4 User bit type |
[Metadata 1/2] and [Metadata 2/2] Status Screens ( mode only)
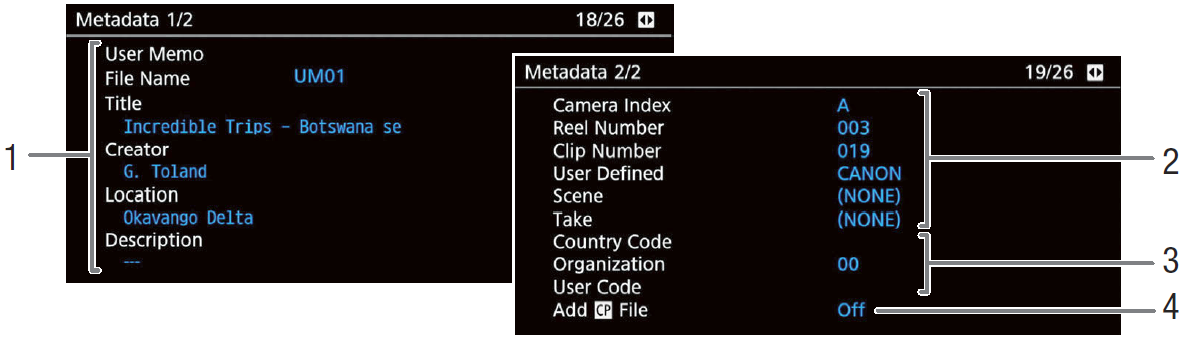
1 User memo
(file name, title, creator, location and description)
2 Clip name and slate information (camera index, reel number, clip number,
user-defined field, scene number and take number) |
3 Unique Material Identifier (UMID) information (country code, organization and user code)
4 Custom picture file embedding in clips |
[Battery/Hour Meter] Status Screen
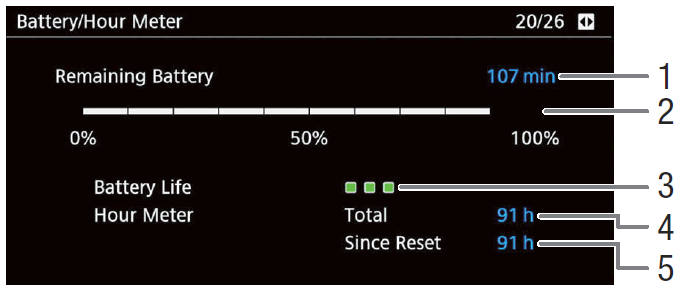
1 Remaining recording time
2 Remaining recording time indicator
3 Battery life indicator |
4 Total operation time
5 Operation time since using [Reset Hour Meter] |
[Network 1/6] to [Network 3/6] Status Screens
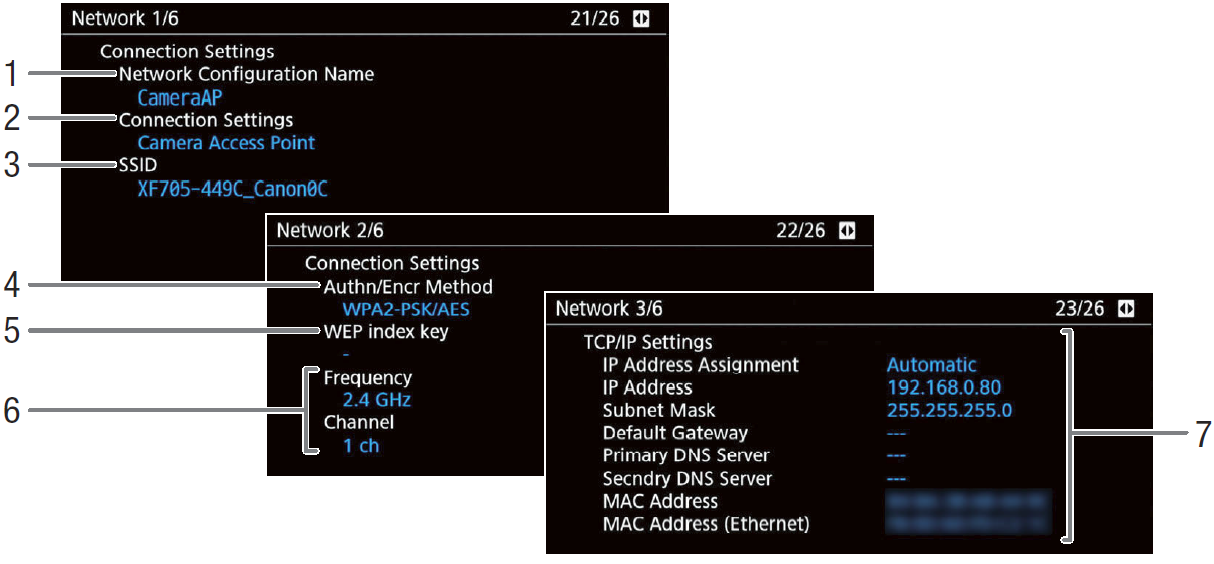
Connection settings of the current network connection
1 Network configuration name
2 Connection type
3 SSID (network name)
4 Authentication and encryption method |
5 WEP index key
6 Wi-Fi frequency band and channel
7 TCP/IP settings of the current network
connection |
[Network 4/6] and [Network 5/6] Status Screens ( mode)
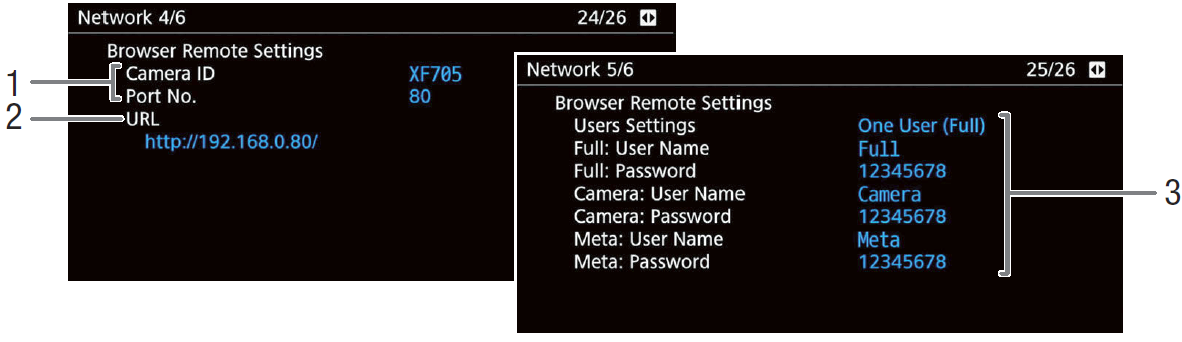
Browser Remote settings
1 Camcorder settings
2 Browser Remote's URL |
3 User settings* |
* Only default passwords will be displayed. If a password was changed, the status screen will show
only that the field is password protected
[Network 6/6] Status Screen ( [GPS Information Display] Status Screen ( mode only)
mode)
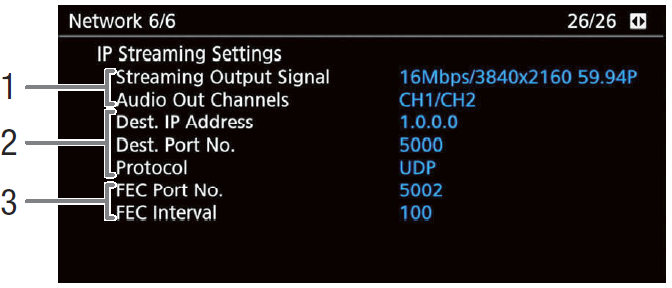
I
P streaming settings
| 1 Streaming video configuration and audio channels |
2 Receiver settings and transfer protocol
3 Error correction settings |
[Network 4/6] to [Network 6/6] Status Screens (  mode)
mode)
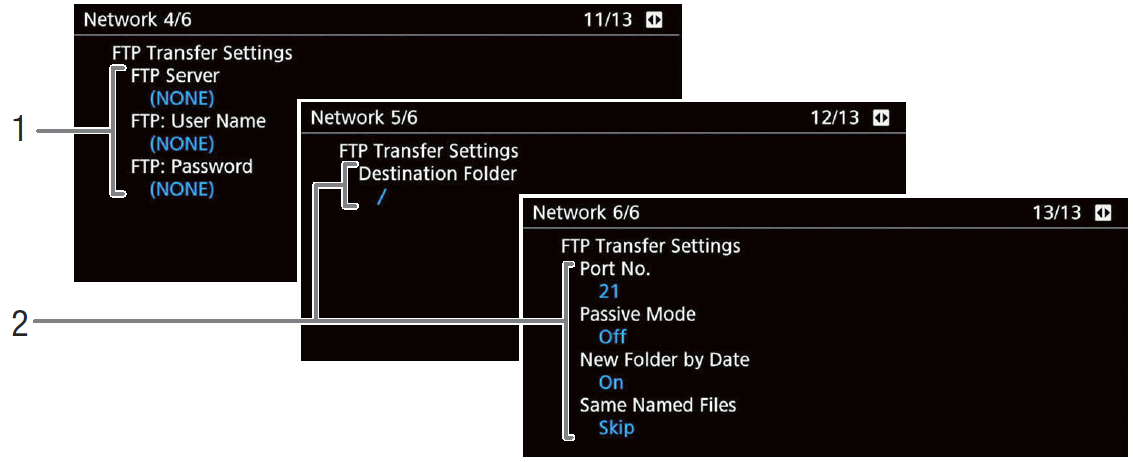
FTP settings
1 FTP server settings
(destination server, user name and password*) |
2 FTP transfer settings
(destination folder, port number, passive mode,
new folder creation and dealing with samenamed
files) |
[GPS Information Display] Status Screen ( mode only)
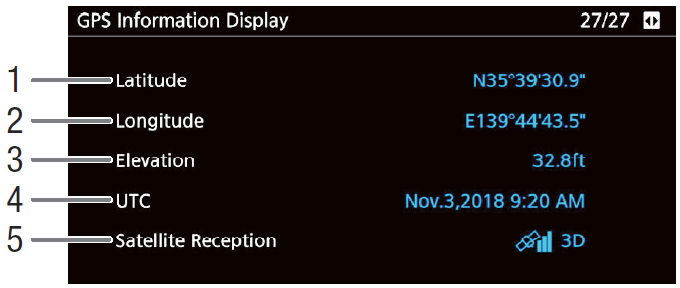
1 Latitude
2 Longitude
3 Elevation |
4 UTC (coordinated universal time) date and time
5 Satellite signal strength |
For details refer to Recording GPS Information (Geotagging)
