
Change the machine settings (MP500 / MP800 / MP950)
| Article ID: ART153873 | | | Date published: 06/09/2015 | | | Date last updated: 08/17/2015 |
Description
Solution
Change the machine settings
Instructions to change the settings on the machine.
Accessing the [Device Settings]
- Press the <Menu> button.
- Use the right / left cursor button to select [Maintenance / settings] and press the <OK> button.
Note: This procedure is skipped if your machine is in Scan mode. Proceed to step 3. - Use the right / left cursor button to select [Device settings], and press the <OK> button.
- Use the up / down cursor button to select the item to set, then press the <OK> button.
*Click the link below on each setting for additional information regarding that setting.
< 1 > Print settings
< 2 > Wireless print settings
< 3 > Bluetooth settings
< 4 > Other settings
< 5 > Language selection
< 6 > Reset setting
< 7 > Save settings
< 8 > Load settings
< 1 > Quiet mode
< 2 > Prevent paper abrasion
< 3 > Extended copy amount
Quiet mode: The operation noise is reduced.
Note: The printing speed when this setting is set to [ON] is reduced compared to when being set to [OFF].
Prevent paper abrasion: Use this setting only if the print surface becomes smudged.
Note: Be sure that this setting reverts to OFF after printing since the inside of the printer is likely to be dirty after continuous printing.
Extended copy amount: Select the amount of image that extends off the paper when printing in borderless.
Note: When setting [SMALL], more amount of the edges of an image is reduced.
Click here to return to the [Device Settings] reference image.
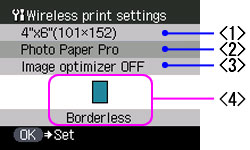
< 1 > Page size
< 2 > Media type
< 3 > Image optimizer
< 4 > Borderless
Page size: Set the paper size for printing images located in a compatible mobile phone.
Note: Available size: 8.5" x 11" (215 x 279), A4, Stickers, 4" x 6" (101 x 152), 5" x 7" (127 x 177), Credit card and 4" x 8" (101.6 x 203.2)
Media type: Set the media type for printing images located in a compatible mobile phone.
Note: Available media types: Photo Paper Plus Glossy, Matte Photo Paper, plain paper, Glossy Photo Paper and Photo Paper Pro
Image Optimizer: Smooths out the jaggedness on the contour of an image when printing images located in a compatible mobile phone.
Note: Image Optimizer can either be set to [Image optimizer ON] or [Image optimizer OFF].
Layout print: Sets the layout according to the paper for printing images located in a compatible mobile phone.
Note:
1) Selectable layout for stickers: Stickers x16. Selectable layout for other media: Bordered: x1, x2, x4, x8; Borderless: x1, x2, x4, x8; Mixed: 1, 2, 3.
2) When printing on the Canon special stickers, select the layout according to their types. Mixed 1, Mixed 2, and Mixed 3 can be selected only when the page size setting is 8.5" x 11" (215.9 x 279.4) or A4.
Click here to return to the [Device Settings] reference image.
< 1 > Device name
< 2 > Access refusal
< 3 > Security
< 4 > Passkey
Note: The setting item [Bluetooth settings] is displayed only when the optional Bluetooth unit is installed into the direct print port of the printer.
Device name: Specifies the name of this machine that is displayed on a Bluetooth compatible device.
Note: The default name will be unit specific.
Access refusal: When this is set to [ON], the machine denies access from all Bluetooth compatible devices except those specified. When set to [OFF], the machine will grant access to any Bluetooth compatible device.
Note: Available settings are [ON] or [OFF]. The default setting (factory setting) is [OFF].
Security: When this is set to [Enable], the passkey can be specified. When enabled users will be required to enter a passkey to access the printer via Bluetooth.
Note: Available settings are [Enable/Disable]. The default setting (factory setting) is [Disable].
Passkey: Changes the passkey.
Click here to return to the [Device Settings] reference image.

< 1 > Date display
< 2 > Read/write attribute
< 3 > Power save setting
< 4 > Adjust contrast
< 5 > Slide show setting
Date display: Changes the display order for shooting dates to be printed.
Note: The shooting date format is as specified in the [DPOF setting] from [DPOF printing].
Read/write attribute: Selects whether to allow data to be written onto memory cards from a computer.
Note: This setting cannot be changed when a memory card is inserted.
|
Read/write mode |
: |
Data in the memory card can be read and be written into the memory card with a computer. |
|
|
|
Printing from a memory card is not possible. |
|
Read-only mode |
: |
Data in the memory card can be read with a computer. |
|
|
|
Printing from a memory card is possible. |
- Power save setting: Specifies the time until power saving is enabled.
Note: Power Saver mode is the function with which the display on the LCD is turned off while the machine is powered on and not in use after a specific amount of time. - Adjust contrast: Use this to adjust the contrast of the LCD.
Note: This function is to adjust the LCD's contrast, not the images' contrast. - Slide show setting: Specifies the photo quality during the slide show.
Note: When [Image quality: Std] is selected, images are displayed at 5-second intervals. When [Image quality: High] is selected, images are displayed at different time intervals according to their resolutions.
Click here to return to the [Device Settings] reference image.
- Changes the language for LCD messages.
Click here to return to the [Device Settings] reference image.
- Changes the settings back to the default (factory settings), except for the language for LCD messages and the position of the print head.
Click here to return to the [Device Settings] reference image.
- Selects whether to save the current media settings.
- Selects whether to load the saved media settings.
Click here to return to the [Device Settings] reference image.