|
|
Shoot videos with your EOS 7D Mark II
| Article ID: ART168792 |
| |
Date published: 10/27/2017 |
| |
Date last updated: 11/22/2019 |
Description
Learn how to shoot videos with your EOS 7D Mark II camera using the default settings.
Solution
Before you begin
When you shoot a movie, you need to first make some decisions about the video format and resolution.
The default settings should be adequate for most uses, but there are many options that affect video quality, format, file type, and file size.
Before you start recording, consider the following:
- Avoid pointing the camera toward and intense light source, such as the sun or other bright light. You can damage the image sensor.
- Use a large-capacity memory card that has a fast read/write speed.
- CF card
ALL-I (For editing): 30 MB/sec. or faster
IPB (Standard) ( : :   ): 30 MB/sec. or faster ): 30 MB/sec. or faster
IPB (Standard) Other than above: 10 MB/sec. or faster
IPB (Light): 10 MB/sec. or faster
- SD card
ALL-I (For editing): 20 MB/sec. or faster
IPB (Standard) ( : ): 20 MB/sec. or faster
IPB (Standard) Other than above: 6 MB/sec. or faster
IPB (Light): 4 MB/sec. or faster
Steps for shooting video
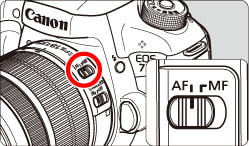
- Set the lens focus mode switch to <AF>.
- Turn <ON> the camera.
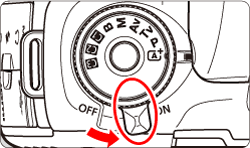
- Set the Live View shooting/Movie shooting switch to <
 >. The reflex mirror clicks and then the image appears on the LCD. >. The reflex mirror clicks and then the image appears on the LCD.
- Set the Mode Dial to <
 >, <P>, or <B>. >, <P>, or <B>.
- Autoexposure control adjusts the exposure to match the current brightness.
- When you press the shutter button halfway, the camera focuses with the current AF method.
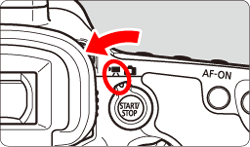
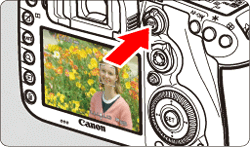
- Press the <
 > button to start shooting a movie. While the movie is being shot, the " > button to start shooting a movie. While the movie is being shot, the " " mark appears in the upper right of the screen. " mark appears in the upper right of the screen.
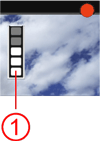
Note: If you use a card with a slow writing speed, a five-level indicator (  ) may appear on the right of the screen during movie shooting. It indicates how much data has not yet been written to the card (buffer memory). The slower the card, the faster the indicator climbs upward. If the indicator becomes full, shooting stops. If the card has a fast writing speed, the indicator either does not appear or the level may not increase.
- To stop shooting the movie, press the <> button again.
Additional information
Temperature consisderations
If the temperature of the camera increases due to prolonged Live View shooting or under a high ambient temperature, a white [  ] or red [ ] or red [  ] icon appears. ] icon appears.
- The white [ ] icon means the image quality of still photos is decreasing. You should stop shooting photos and allow the camera to cool. Movie image quality is not affected.
- The red [ ] icon means movie shooting is about to be stopped. Turn off the power and let the camera cool.
Factors that affect recording and image quality
- If the attached lens has an Image Stabilizer and you set the Image Stabilizer (IS) switch to <ON>, the Image Stabilizer will operate at all times even if you do not press the shutter button halfway. The Image Stabilizer consumes battery power and may shorten the total movie shooting time or decrease the number of possible shots. If you use a tripod or if the Image Stabilizer is not necessary, switch it off.
- The built-in microphone can pick up camera operation noise. Use an external microphone to avoid this.
- With autoexposure shooting or shutter-priority AE, if the brightness changes during movie shooting, the movie may freeze temporarily. In such cases, shoot movies with aperture-priority AE or manual exposure.
- If there is a very bright light source in the image, the bright area may appear black on the monitor and in the recording.
- In low light, noise or irregular colors may appear in the image.
- Sound may not record accurately when the memory card approaches maximum capacity.
Cautions for Movie Shooting
- Under [
 : Record func+card/folder sel.], even if [Record func.] is set to [Rec. to multiple], the movie cannot be recorded to the CF card [ : Record func+card/folder sel.], even if [Record func.] is set to [Rec. to multiple], the movie cannot be recorded to the CF card [  ] and SD card [ ] and SD card [  ]. If [Rec. separately] or [Rec. to multiple is set, the movie is recorded to the card set for [Playback]. ]. If [Rec. separately] or [Rec. to multiple is set, the movie is recorded to the card set for [Playback].
- If <
 > is set and the ISO speed or aperture changes during movie shooting, the white balance may also change. > is set and the ISO speed or aperture changes during movie shooting, the white balance may also change.
- If you shoot a movie under fluorescent or LED lighting, the movie may appear to flicker.
- If you use the zoom during movie shooting, changes in exposure may be recorded.
- During movie shooting, you cannot magnify the image even if you press the <
 > button. > button.
- [Multi Shot Noise Reduction] and [Distortion] cannot be set.
- If you connect or disconnect the HDMI cable during movie shooting, the movie shooting ends.
- Movie-related settings are under the [
 ] and [ ] and [  ] tabs. In the < > mode, they are under the [ ] tabs. In the < > mode, they are under the [  ] and [ ] and [  ] tabs. ] tabs.
- If the movie file size exceeds 4 GB, a new file is created.
- Under [ :
 button function], if [ button function], if [  / ] [ / ] [  / ] is selected, you can press the shutter button completely to start or stop the movie shooting. / ] is selected, you can press the shutter button completely to start or stop the movie shooting.
- Monaural sound is recorded by the built-in microphone.
- You can use an HDMI cable HTC-100, to show the movie on a TV or monitor. If the picture does not appear check that the video system on the camera is correctly set to NTSC or PAL (depending on the video standard of your TV).
- You can use Remote Controller RC-6 to start and stop the movie shooting if the drive mode is <
 > or < > or <  >. Set the shooting timing switch to <2> (2-second delay), then press the transmit button. If the switch is set to < >. Set the shooting timing switch to <2> (2-second delay), then press the transmit button. If the switch is set to <  > (immediate shooting), still photo shooting takes effect. > (immediate shooting), still photo shooting takes effect.
- With a fully-charged Battery Pack LP-E6N, the total movie recording time is about 1:40 at 23°C/73°F and 1:30 at 0°C/32°F.
- The focus preset function is possible for movie shooting when using a (super) telephoto lens equipped with the focus preset mode.
Related information
|
