This article explains how to connect smartphones and computers to your printer with a direct wireless connection. Follow the steps below to use a direct connection with the printer.
-
Enable direct connection.
-
Connect devices to the printer.
-
Perform printing or scanning operation.
This section also describes changing direct connection to wireless LAN.
 Important
- The administrator password is required to change settings if it is enabled for changing settings using the operation panel.
- You can connect up to 5 devices to the printer at the same time.
Preparing for Direct Connection
Change settings below to prepare for direct connection.
Changing Printer's Settings
-
Make sure that the printer is turned on.
-
Select  Setup on the HOME screen.
-
Select  Device settings and press the OK button.
-
Select LAN settings and press the OK button.
-
Select Change LAN and press the OK button.
-
Select Activate direct connect. and press OK button.
-
Select Yes and press OK button.
The identifier (SSID) for direct connection appears.
The device detects the printer by the identifier (SSID).
 Note
Note
-
If you press the right Function button, select Yes and press the OK button, the following items appear.
- Security setting
- Password
- Printer's name which appears on a Wi-Fi Direct compatible device
The password is required when connecting a device to the printer. Depending on the device you are using, no password is required.
When you connect a Wi-Fi Direct compatible device to the printer, select the device name displayed on the LCD from your device.
-
The identifier (SSID) and the security setting are specified automatically. To update them, see below.
-
Press the OK button.
The direct connection is enabled and a device can be connected to the printer wirelessly.
Changing Settings of a Device and Connecting It to the Printer
-
Turn on wireless communication on your device.
Enable "Wi-Fi" on your device's "Setting" menu.
For more on turning on wireless communication, see your device's instruction manual.
-
Select "DIRECT-XXXX-MB2100series" ("X" represents alphanumeric characters) from list displayed on device.
Note
-
If "DIRECT-XXXX-MB2100series" does not appear on the list, direct connection is not enabled.
See Changing Printer's Settings to enable direct connection.
-
Enter the password.
Your device is connected to the printer.
Note
-
Check the password for the direct connection.
Check by one of the following methods.
- Depending on the device you are using, entering the password is required to connect a device to the printer via wireless LAN. Enter the password specified for the printer.
-
If your Wi-Fi Direct compatible device is set to prioritize using Wi-Fi Direct and it is connecting to the printer, the printer displays a confirmation screen asking if you allow the device to connect to the printer.
Make sure the name on the LCD is the same as that of your wireless communication device, select Yes, and then press the OK button.
Printing/Scanning with Direct Connection
Connect a device and the printer and start printing/scanning.
Note
Changing Printer Setting to Use Wireless LAN
Follow the procedure below to change the printer setting to use wireless LAN.
-
Select Setup on the HOME screen.
-
Select Device settings and press the OK button.
-
Select LAN settings and press the OK button.
-
Select Change LAN and press the OK button.
-
Select Activate wireless LAN and press the OK button.
If you do not use the printer over wireless LAN, select Disable LAN.
Changing Direct Connection Setting
Change the settings for the direct connection following the procedure below.
-
Make sure printer is turned on.
-
Select Setup on HOME screen.
-
Select Device settings and press the OK button.
-
Select LAN settings and press the OK button.
-
Select Other settings and press the OK button.
-
Select Direct connection settings and press the OK button.
-
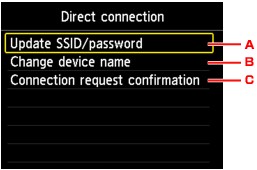
Select an item and press the OK button.
-
To update the identifier (SSID) and the password for direct connection
Selecting A and pressing the OK button displays the confirmation screen. To update the identifier (SSID) and the password, select Yes and press the OK button.
To check the security setting and the updated password, press the right Function button select Yes on the screen displayed next and press the OK button.
-
To change the printer's name displayed on the Wi-Fi Direct compatible device
Selecting B and pressing the OK button displays the screen to specify the device name.
Follow the procedure below to change the name.
-
Press the OK button.
-
Enter the device name (up to 32 characters).
-
Press the left Function button to finish entering the device name.
-
To change the confirmation screen setting when a Wi-Fi Direct compatible device is connecting to the printer
Selecting C and pressing the OK button displays the confirmation screen. If you want the printer to display the screen to inform you a Wi-Fi Direct device is connecting to the printer, select Yes and press the OK button.
Important
- To prevent unauthorized access, we recommend that you do not change the setting from the default.
When you finish adjusting the settings, the printer will return to the Direct connection settings screen.
-
Press the HOME button.
The HOME screen is displayed.
Note
- If you change the direct connection setting of the printer, also change the wireless router setting of the device.