Preparation
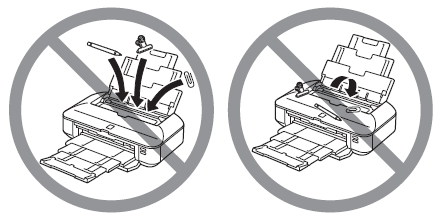
important:
Do not install the printer where an object may fall on it. In addition, do not place any object on the top of the printer. It may fall into the printer when opening covers, resulting in malfunction.
1.
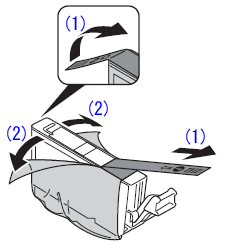
Remove all orange tape and protective materials from the inside and outside of the printer.
reference:
The tape and protective materials may differ in shape and position from those shown here.
2.
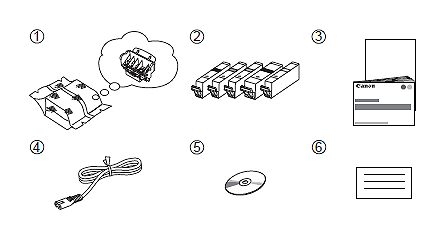
Make sure all the following items are supplied.
(1) Print Head
(2) Ink tanks (5: BK, M, C, PGBK, Y)
(3) Manuals
(4) Power cord
(5) Setup CD-ROM (containing the drivers, applications and on-screen manuals)
(6) Other documents
reference:
A USB cable is necessary to connect the printer with your computer.
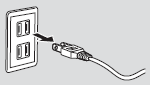
3.
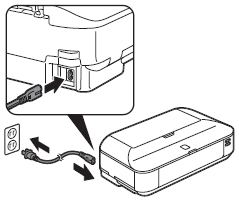
Insert the power cord into the connector on the left side at the back of the printer and into the wall outlet firmly.
important:
Do NOT connect the USB cable at this stage.
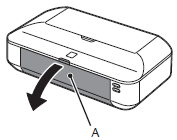
4.
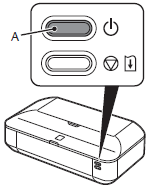
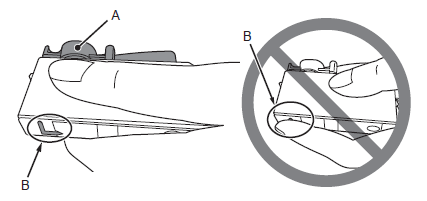
Press the ON button (A) to turn on the printer.
reference:
It takes about 5 seconds for the ON button to work after the power cord is plugged in.
5.
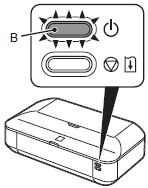
Make sure that the lamp (B) of the ON button lights blue.
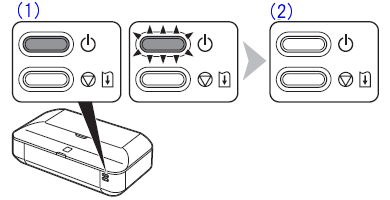
important:
When it is necessary to turn off the printer
Be sure to follow the procedure below.
(1) Press the ON button to turn off the printer.
(2) Make sure that the lamp of the ON button is not lit.
Operating noise may continue for up to 30 seconds until the printer turns off.
important:
Before removing the power plug, make sure that the lamp of the ON button is not lit.
Removing the power plug while the lamp of the ON button is lit or flashing may cause drying and clogging of the Print Head, resulting in poor printing.
reference:
The specification of the power cord differs for each country or region.
Install the Print Head
1.
Open the Front Cover (A).
2.
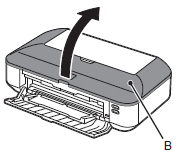
Open the Top Cover (B).
3.
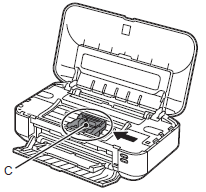
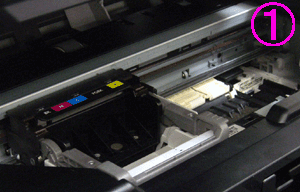
The Print Head Holder (C) moves to the installation position.
If the Print Head Holder does not move, make sure that the printer is turned on. For details, refer to 3 to 5 in [ Preparation ].
4.

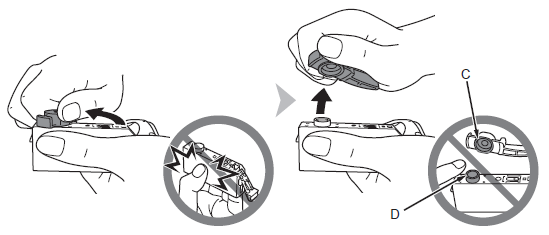
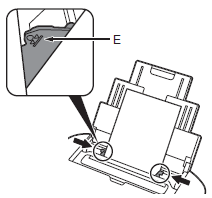
Firmly lift the part (D) of the Print Head Lock Lever in the Print Head Holder until it stops.
important:
Do not touch the inside of the Print Head Holder (E). The printer may not print properly if you touch it.
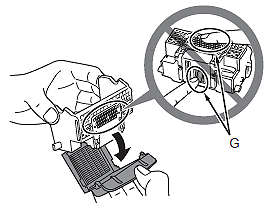
5.
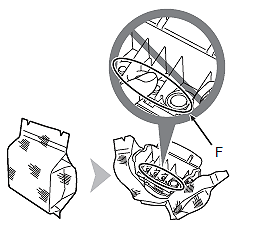
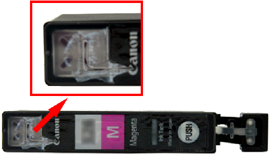
Remove the Print Head from the silver package.
important:
- Handle the Print Head carefully. Do not drop or apply excessive pressure to it.
- Do not touch the inside (F) or metal parts (G) of the Print Head. The printer may not print properly if you touch them.
- There may be some transparent or light blue ink on the inside of the bag the Print Head comes in, or the inside of the protective cap - this has no effect on print quality. Be careful not to get ink on yourself when handling these items.
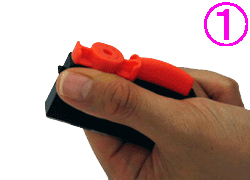
6.
Remove the orange protective cap.
7.
Tilt the Print Head forward and set it in place as shown.
important:
Do not knock the Print Head against the sides of the holder.
8.
Hold the Print Head Lock Lever firmly and lower it completely.
important:
Once you have installed the Print Head, do not remove it unnecessarily.
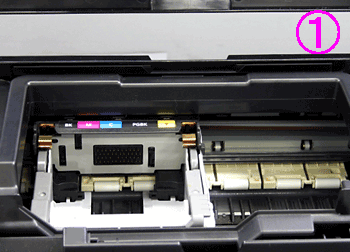
Install the Ink Tanks
1.

(1) Remove the orange tape completely.
(2) Remove the protective film completely.
important:
- Handle the ink tanks carefully. Do not drop or apply excessive pressure to them.
- Be sure to use the supplied ink tanks.
- If the orange tape remains on the L-shape air hole, ink may splash or the printer may not print properly.
- If you push the sides of the ink tank with the L-shape air hole blocked, ink may splash.
2.
(1) Hold the ink tank with the orange protective cap (A) pointing up.
(2) Hold the ink tank being careful not to cover the area (B) including the L-shape air hole.
3.
Hold the ink tank by its sides and slowly twist the orange protective cap 90 degrees horizontally to remove it off.
Do not push the sides of the ink tank.
important:
Do not touch the inside (C) of the orange protective cap or the open ink port (D). The ink may stain your hands if you touch them.
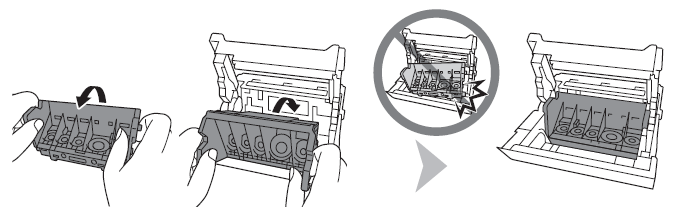
4.
Tilt the ink tank, then insert it under the label and against the back end of the slot.
Make sure that the color of the label matches the ink tank.
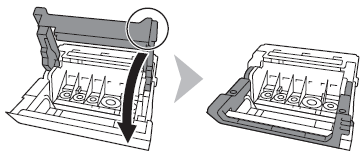
5.

Press the PUSH mark  on the ink tank firmly until it clicks.
When the installation is completed properly, the Ink lamp lights red.
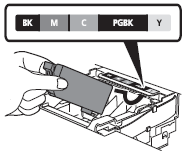
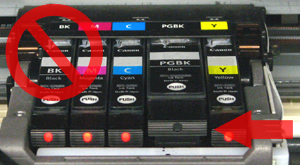
6.
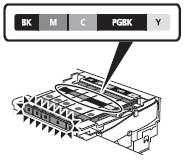
Install all the other ink tanks in the same way according to the color order indicated on the label.
Make sure all the Ink lamps light red.
important:
- Once you have installed the ink tanks, do not remove them unnecessarily.
- If the Print Head Holder moves to the right, close and reopen the Top Cover.
7.
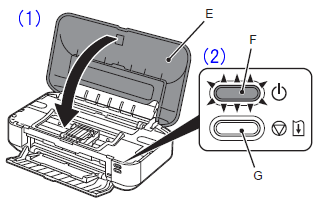
(1) Close the Top Cover (E).
(2) Wait for about 4 to 5 minutes until the lamp of the ON button (blue) (F) stops flashing and stays lit, then proceed to the next step.
The printer may make some operating noises when preparing to print. This is normal operation.
important:
If the Alarm lamp (G) flashes orange, make sure that the Print Head and the ink tanks are correctly installed.
Load Paper
1.
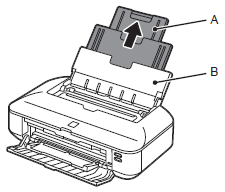
Extend the Paper Support (A).
Make sure that the Paper Support (B) is open.
2.
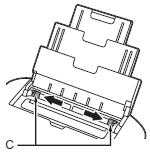
Move the Paper Guides (C) to edges.
3.
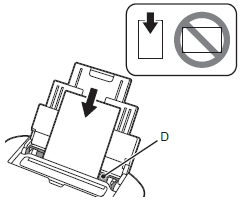
Load A4 or Letter-sized plain paper in the center of the Rear Tray (D).
Load paper in portrait orientation with the printing side facing up.
4.
Slide the left and right Paper Guides against edges of the paper.
Make sure that the height of the paper stack does not exceed the line (E).
reference:
For details on how to handle paper, refer to [ ] .
