Cleaning the Inside of the Machine (Sheet Cleaning)
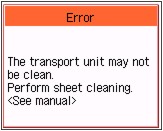
When the message shown below is displayed, the inside of the machine should be cleaned with a cleaning sheet as soon as possible.
|
 Caution Caution
You do not need to clean the inside of the machine until this message is displayed.
|
|
 Note Note
You can continue to print even after the message informing you that cleaning is necessary is displayed. However, if the inside of the machine is not cleaned, printed surfaces may be smudged or print quality reduced. We recommend that you clean the inside of the machine as soon as possible.
|
 Installing and Using the Cleaning Sheets
The machine comes with five cleaning sheets.
These cleaning sheets can be stored in the Cleaning Sheet Holder on the back side of the Document Cover.
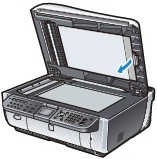
1 Open the Document Cover and remove the Cleaning Sheet Holder.
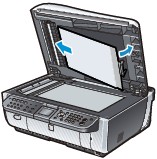
2 Install or use cleaning sheets.
(1) Install or use cleaning sheets.

| |
Note
 The machine comes with five cleaning sheets. The machine comes with five cleaning sheets.
Return unused cleaning sheets to the package they came in and seal the package.
|
(2) Reattach the Cleaning Sheet Holder.
Cleaning the Inside of the Machine with a Cleaning Sheet
|
 Important Important
Sheet cleaning requires a specified cleaning sheet fed from the Rear Tray.
Do not perform any other operation while the sheet cleaning is being performed.
|
1 Make sure that the machine is turned on, and then remove any paper from the Rear Tray.
2 Prepare a cleaning sheet.
Take out a cleaning sheet. For details on taking out cleaning sheets, see Installing and Using the Cleaning Sheets.
3 Open the Paper Output Tray, and then open the Output Tray Extension.
(1) Press the Open button to open the Paper Output Tray.
(2) Open the Output Tray Extension.
4 Peel off the protective tape from the cleaning sheet and load the cleaning sheet into the Rear Tray with the adhesive area on top and facing DOWN.

(A) Load the cleaning sheet with the notch at the top.
(B) Peel off the protective tape.
5 Perform sheet cleaning.
(1) Press the Menu button.
(2) Use the  or
or  button to select Maintenance/settings
  , then press the OK button.
The Maintenance/settings screen is displayed.
(3) Use the or button to select Maintenance, then press the OK button.
The Maintenance screen is displayed.
(4) Use the  or
or  button to select Sheet cleaning, then press the OK button.
The confirmation screen is displayed.
(5) Use the or button to select Yes, then press the OK button.
The sheet cleans the inside of the machine as it feeds through the machine.
|
Important
Discard used cleaning sheets as soon as sheet cleaning is done. Handle the sheets carefully to avoid staining clothing or the surrounding area since the ejected sheet is stained.
|
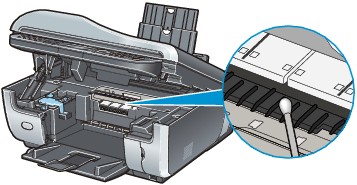
Cleaning the Protrusions Inside the Machine
|
Caution
Be sure to turn off the power and unplug the power cord before cleaning the machine.
The power cannot be turned off while the machine is sending or receiving a fax, or when there are unsent faxes stored in the machine's memory.
The machine cannot receive faxes when the power is turned off.
If you unplug the power cord, all the documents stored in memory are deleted. Send or print necessary documents before unplugging the power cord.
|
If protrusions inside the machine are stained, wipe off any ink from the protrusions using a cotton swab or the like.