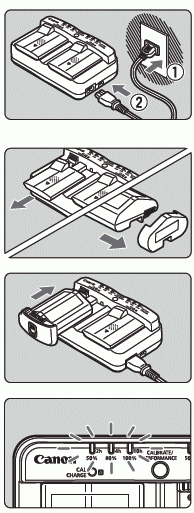
 | 1 Connect the charger to a power outlet. Connect the power plug to a power outlet, and connect the power cord to the charger. When no battery is attached, all the indicator lamps will be off
|
2 Remove the protective covers. |
3 Recharge the battery. Slide the battery into the charger’s slot as shown by the arrow, and make sure it is securely attached. You can attach the battery to slot A or B.
The battery will start recharging and the green status lamp will blink. When the battery is fully charged, all three Charge level indicators will light up (50%/80%/100%).
|
It takes approx. 130 min. for LP-E4N and approx. 120 min. for LPE4 to fully recharge a completely exhausted battery at 23°C/73°F.
The time required to recharge the battery will vary greatly depending on the ambient temperature and the battery’s remaining capacity
Tips for Using the Battery and Charger
Upon purchase, the battery is not fully charged. Recharge the battery before using.
Recharge the battery on the day before or on the day it is to be used. Even during storage, a charged battery will gradually drain and lose its capacity.
After recharging the battery, detach it and disconnect the charger from the power outlet. When not using the battery and charger, attach the protective covers provided.
Use the battery in an ambient temperature range of 0°C - 45°C / 32°F - 113°F. To attain best battery performance, an ambient temperature of 10°C - 30°C / 50°F - 86°F is recommended. In cold locations such as snowy areas, battery performance and operation time may temporarily decrease.
When not using the camera, remove the battery. If the battery is left in the camera for a prolonged period, a small amount of power current is released, resulting in excess discharge and shorter battery life. Store the battery with the protective cover attached. Storing the battery when it is fully charged may lower the battery’s performance.
The battery charger can also be used in foreign countries. The battery charger is compatible with a 100 V AC to 240 V AC 50/60 Hz power source. If necessary, attach a commercially-available plug adapter for the respective country or region. Do not attach any portable voltage transformer to the battery charger. Doing so can damage the battery charger.
Check the battery performance. While the battery is recharging, press the charger’s <PERFORMANCE> button to check the battery’s performance level indicated by the Charge level indicator.

Use a Car’s Cigarette Lighter Socket to Recharge the Battery
With Car Battery Cable CB-570 (sold separately), you can connect the charger’s car battery cable socket (<DC IN> terminal) to your car’s cigarette lighter socket.
When recharging the battery this way, be sure that the car’s engine is running. Disconnect the car battery cable from the cigarette lighter socket when the car engine is off. If you leave the car battery cable connected to the cigarette lighter socket, it may drain the car battery.
Do not use a transformer for the car with the battery charger.
Battery charging from a car battery is possible only with a 12 V DC or 24 V DC car battery in a minus-grounded car. The shape or dimensions of the cigarette lighter socket in certain cars might not be compatible with the car battery cable.
The <CAL/CHARGE> Lamp Blinks in Red
This indicates that you should calibrate the battery so that the correct battery level is detected and the camera’s battery level indicator can display the correct battery level. Calibration is not a required operation. If you just want to recharge the battery, you can let the battery start recharging automatically after approx. 10 sec. If you want to perform calibration, press the <CALIBRATE> button while the <CAL/CHARGE> lamp is blinking in red. The Charge level indicator will blink in red and calibration (power discharge) will start.
After calibration is complete, the battery will start recharging automatically. Note that the less depleted the battery is the longer calibration will take. The <2h>, <4h>, and <10h> figures on the side of the Charge level indicator indicate the approximate time it will take to complete calibration (power discharge). If the <10h> indicator blinks in red, it will take approx. 10 hours.
After calibration is complete and the battery is totally drained, it will take a further 2 hours to recharge the battery fully. If you want to stop calibration before it is completed and start recharging the battery, remove the battery from the charger and attach it again.
None of the Charger’s Status Lamps Light Up
All Three Charge Level Indicators Blink
If any of the following occurs, remove the battery from the charger and consult your dealer or nearest Canon Service Center: All the Charge level lamps blink in green, all the Calibration (Discharge) status indicator lamps blink in red, or the indicators blink alternately in red and green (including the <CAL/CHARGE> lamp).
Also, if a battery other than the Battery Pack LP-E4N/LP-E4 is attached to the charger, the indicators will blink in red and green (including the <CAL/CHARGE> lamp) and the battery cannot be recharged.
The charger cannot charge any battery other than the Battery Pack LP-E4N/ LP-E4.
When two battery packs are attached to the charger, the battery attached first will be charged first, then the other battery will be charged. Although one battery can be recharged and another calibrated at the same time, two batteries cannot be recharged or calibrated at the same time.
It is best to perform battery calibration when the battery is nearly exhausted. If you try to calibrate the battery while it is fully charged, it can take as long as approx. 15 hours to calibrate and then fully charge the battery
