➤
Home
Articles
FAQs
Ask a Question
Search
Models related to this article
PIXMA MP160
Home
Articles
Articles Detail
Print head alignment on MP160
Article ID: ART153866
|
Date published: 06/09/2015
|
Date last updated: 07/19/2018
Description
Print head alignment on the Photo All-In-One printer.
Solution
Print Head Alignment
If diagrams or ruled lines are misaligned, print head alignment is required.
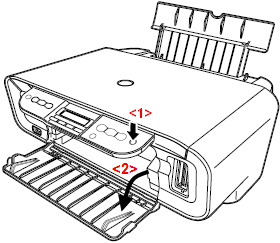
Ensure that the printer is powered on and open the paper output tray. (Confirm that the paper thickness lever is set to the left.)
Load a sheet of A4 or Letter-sized plain paper in the auto sheet feeder (or ASF).
Press the <Maintenance> button repeatedly until [P] appears.
Press the <Black> or <Color> button. The machine prints the head alignment sheet.
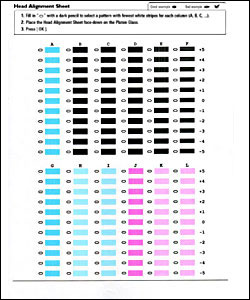
From each group (lettered column), select the pattern which has the least visible streaks.
Example of the pattern with the least visible vertical streaks.
Example of the pattern with the most visible vertical streaks.
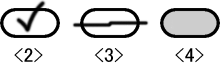
Pencil in the circles on the left side of the selected pattern, using a dark pencil.
< 1 > Good example
< 2 > Bad example: Checkmark
< 3 > Bad example: Line only
< 4 > Bad example: Not dark enough
Open the document cover and load the head alignment sheet on the platen glass.
Note: - Place the printed side down.- Align the sheet with the alignment mark (shown by the arrow) on the lower right corner of the platen glass.
Alignment Mark
Close the document cover gently.
Confirm that
U
is displayed in the LED.
If
U
is not displayed, press the <Maintenance> button repeatedly until [U] appears.
Press the <Black> or <Color> button.
The machine scans the head alignment sheet and aligns the print head automatically.
SIMS Doc Id
0
Rate this Article
Was this article helpful?
Yes, This document is helpful
No, This document needs a clearer explanation
Please provide your comments
Rate Article


 Alignment Mark