Installing / removing ink tanks MP130
| Article ID: ART154319 |
| |
Date published: 06/09/2015 |
| |
Date last updated: 08/17/2015 |
Description
Installing or removing the ink tanks from the printer.
Solution
Installing / Removing Ink Tanks
To print normally, install or remove ink tanks in an orderly procedure.
Installing ink tanks:
- Make sure the machine is powered on.
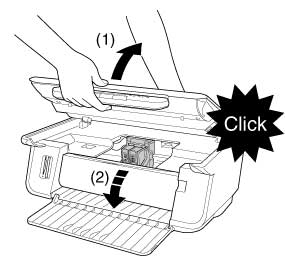
- Lift the Scan Unit until it locks into place (1). The Print Head Holder moves to the center.
- Open the Paper Output Tray (2).
- Open the Inner Cover (2). The print head holder (3) should be centered.

- Lift up the lock lever. Print Head Lock Lever (6).

- Remove the print head from its package and remove the orange protective cap.
Print head (7)
Orange protective cap (8)
Print head nozzles and electrical contacts (9)

- Insert the print head into the print head holder.

- Lower the print head lock lever until a click sound is made.

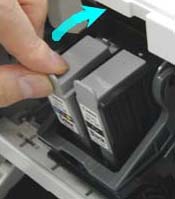
- Remove the new ink tank from its packaging.
- Hold the ink tank as shown and remove the protective cap (A).

CAUTION:
* Do not touch the ink port (B).
* Do not shake or drop the ink tank as the ink may leak and stain your clothes or hands.
* Do not attempt to reattach the protective cap once you remove it.
* Do not place the ink port in contact with any other surface.

- Insert the ink tank into the empty slot on the print head.

- Press firmly on the ink tank's tab until it locks into place.
IMPORTANT:
a. Set a black ink tank in the right slot of the print head.
b. Set a color ink tank in the left slot of the print head.
- Close the Inner Cover (1) and the Scan Unit (2).

CAUTION: Press the center of the Inner Cover until the cover locks into place.
- After the Scan Unit is return to its original position, the LCD displays a message asking if you replaced an ink tank.

- If you replaced an ink tank, press [-]. If you did not, press [+].
- The LCD displays a message asking if you replaced the black ink tank.

- If you replaced the black ink tank, press [-]. If you did not, press [+].
- The LCD displays a message asking if you replaced the color ink tank.

- If you replaced the color ink tank, press [-]. If you did not, press [+].
The ink counter is now reset, and replacement of the ink tanks is completed.
NOTES:
a. Pressing [+] does not reset the ink counter. Be sure to press [-] if you replaced the ink tank.
b. If you pressed [+] by mistake, follow the procedure to reset the ink counter. (See Resetting The Ink Counter)
Removing Ink Cartridges:
- Make sure the machine is powered on.
- Lift the Scan Unit until it locks into place (1). The Print Head Holder moves to the center.
- Open the Paper Output Tray (2).
- Open the Inner Cover (2). The print head holder (3) should be centered.
- Hold the ink tank's tab and pull forward to release. Lift out the ink tank.

Note:
a. Do not remove the print head from the machine
b. Remove one ink tank at a time.
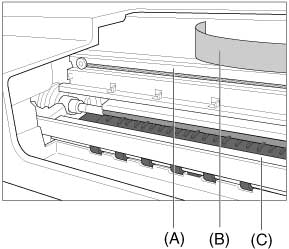
c. Do not touch the transparent film (A), film cable (B), ink absorber (sponge part) (C), or any metal parts.
Caution:
Handle ink tanks carefully to avoid staining clothing or the surrounding area.
- Repeat step 5 to remove the other ink tank if necessary.
