Untitled Document
Scanning an Image
- Install the IS-12 or IS-22 Color Image Scanner Cartridge in the appropriate printer.
-
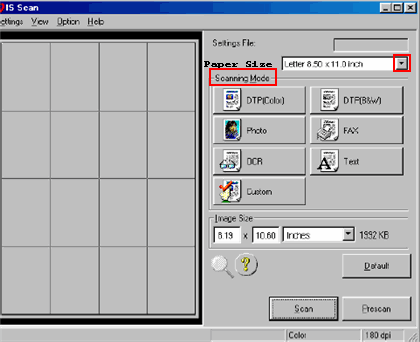
Make sure Canon IS Scan 2 is set as the Acquire Source and then select the command used for scanning (such as Acquire or TWAIN) from the menu of the application program. The main IS Scan dialog box displays:
-
Specify the basic settings.
- Click the down-arrow on the right of the Paper Size box and select the most appropriate paper size for the image you wish to scan.
- Select the most appropriate scanning mode for the image you wish to scan in the Scanning Mode box. Changing the Scanning Mode
-
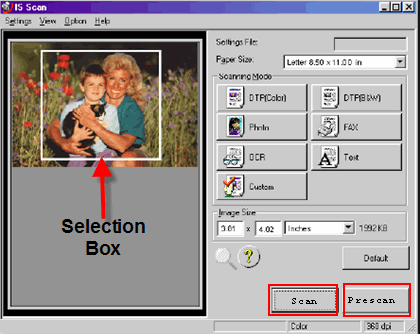
Load the image you wish to scan in the auto sheet feeder of the printer and click the 'Prescan' button.
Note: It's a good idea to use prescanning to determine whether or not an image can be scanned properly or to test the effects of image adjustments. If the image is slanted or a portion of the image is cut off in the preview area, click the 'Clear' button. Load the image correctly and click the 'Prescan' button again.
-
To scan only a portion of the image, you can drag the mouse to specify the portion. The specified portion is called a Selection Box and only the area in the Selection Box will be scanned. To specify the Selection Box:
- Point to a corner of the rectangular area of the image that you want to select.
- Drag the mouse to the opposite corner of the rectangle.
- Release the mouse button. The Selection Box appears on the image.
Note:
To move the Selection Box, place the mouse pointer within the Selection Box and drag the mouse to the desired position. To resize the Selection Box, point to a corner of the Selection Box and then drag the mouse. You can confirm the dimensions of the Selection Box in the Image Size box. The minimum size of the Selection Box is 1" x 1" (25.4 mmx 25.4 mm).
- Load the image you wish to scan in the auto sheet feeder again.
- Click the 'Scan' button. Remember, if you specified a Selection Box in step 5, only that portion of the image is scanned.
-
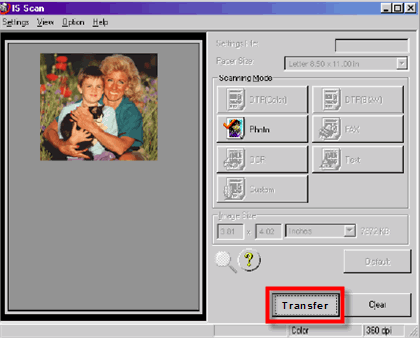
After scanning is complete, click the 'Transfer' button to transfer the image data to the TWAIN-compatible graphics application program. Adjust, edit, or enhance the image in the application program as needed.
Note:
Some TWAIN-compliant graphics application programs do not display the main IS Scan dialog box but instead display a different screen characteristic of the application program. If you are using this type of application program, read the documentation of the application program carefully and perform prescanning or normal scanning. After launching IS Scan from within a TWAIN-compatible application program, do not close the application program. If you do, the system may not be able to respond. To quit IS Scan, select 'Exit Driver' from the Settings menu.
Top of Page
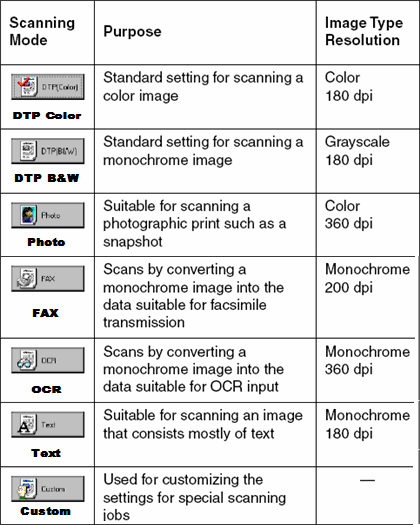
Changing the Scanning Mode
You can select a scanning mode according to your scanning purpose. Optimum settings, such as image type and resolution, are pre-assigned based on the contents of a scanning job. When you wish to customize the settings for special scanning jobs, click the 'Custom' button.
Selecting a Default Scanning Mode
Select the most appropriate icon in the Scanning Mode box of the main IS Scan dialog box according to your scanning purpose.
Using the Custom mode
Note:
When you select 'FAX' or 'OCR', the document is scanned and processed as a grayscale image and converted to monochrome binary image data. This process eliminates unnecessary image background and increases the quality of the scanned text and line art. When you select 'Text', the document is scanned and processed as a monochrome image.
Top of Page
Using the Customized Scanning Mode
When you select 'Custom' in the Scanning Mode box of the main dialog box, the Custom dialog box opens and allows you to adjust the scanning settings for special scanning jobs.
1. Open the main IS Scan dialog box.
2. Click the 'Custom' button in the Scanning Mode box. This displays the Custom dialog box:
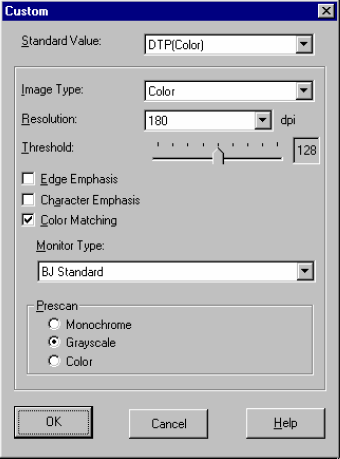
3. Specify these settings in the Custom dialog box:
Standard Value
You change the standard value for the default settings here. Select from:
DTP(Color), DTP(B&W), Photo, FAX, OCR, Text, Previous Setting.
Image Type
Select a type of image: Color (the default), Grayscale, or Monochrome.
Resolution
Determines the precision of the scanned image. The higher the resolution setting, the higher the precision and quality of the scanned image. (However, the higher the resolution setting, the larger the file size.) Possible settings: 90, 180, 200, 300, 360. The 90 dpi setting is sufficient for viewing images on a screen. The 180 dpi setting is sufficient for printing images.
Threshold
Determines the intensity of halftones for monochrome images. Drag the slide bar to the left for a lighter image or drag it to the right for a darker image. The Threshold option is available only when the Image Type is set for 'Monochrome' and Character Emphasis is off.
Edge Emphasis
Sharpens the edges of a soft image to create a clearer, more accented appearance in the entire image. This option is available only when the Image Type is set for Monochrome. Edge Emphasis is not used with prescanning.
Character Emphasis
Determines whether or not Image Trust processing is used for scanning grayscale images. Image Trust processing sharpens the appearance of characters in monochrome documents. This is especially helpful if you intend to use the scanned original with an OCR software application. This option is available only when the Image Type is set for Monochrome.
Color Matching
In some cases, the colors displayed on your monitor may not match the colors you see in your printout. Color Matching attempts to match the colors of the scanned image with the selection in the Monitor Type box in order to attain a better match between the colors you see on the monitor and the colors you see in your printout. This option is available only when the Image Type is set for Color.
Monitor Type
Displays the name of the monitor profile currently in use. To select another monitor type setting, click the down-arrow and select a name from the dropdown list. This list includes the names of ICC profile formats, standard profiles for monitors, installed in the system. A monitor profile can be selected only when 'Color Matching' is selected.
Prescan
Selects the type of image for prescanning. Select 'Monochrome', 'Grayscale' (the default) or 'Color'.
4. Click the 'OK' button to return to the main dialog box.
5. Make sure that the image you wish to scan is inserted into the scanning holder properly and is loaded in the auto sheet feeder of the printer, then click the 'Scan' or 'Prescan' button.
Top of Page
