When ink cautions or errors occur, the error code will appear on the printer LCD to inform you of a problem. When this occurs, the printer cannot print or scan. Check the error code / support code details and take appropriate action.
Before replacing an ink cartridge, there are some things to know.
 Cautions
-
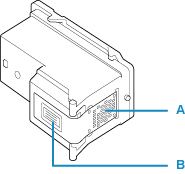
Do not touch the electrical contacts (A) or print head nozzle (B) on a cartridge, or other parts inside the printer. The printer may not print properly if you touch them.
-
Handle the ink cartridge so you don't stain your clothes or the surrounding area.
-
Don't drop or apply excessive pressure to the cartridge.
 For Windows, if a cartridge runs out of ink, for a while you can print with either a color or black cartridge, in whichever ink remains. However, the print quality may be reduced compared to printing with both cartridges.
-
Even when printing with only one ink color all cartridges must be installed, even if they are empty. If either the color or black cartridge is not installed, an error will occur and the printer cannot print. For information on how to configure this setting, see how you can set the cartridge to be used.
-
Color ink may be consumed even when printing a black and white document or when black and white printing is specified.
-
Both color and black ink are also consumed in the standard cleaning and deep cleaning of the print head, which may be necessary to maintain the performance of the printer.
Replace an ink cartridge
When you need to replace an ink cartridge, follow the procedure below.
-
Turn on the printer.
-
Retract the paper output tray and the output tray extension.
-
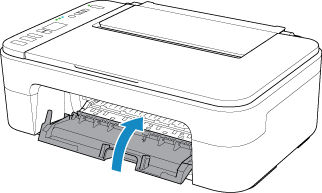
Open the printer cover. Wait for the print head holder to move to the replacement position.
Don't try to move or stop it yourself.
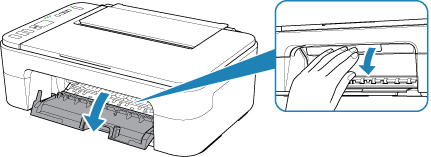
If the cover is left open for more than 10 minutes, the cartridge holder moves to the far left and an error occurs. In this case, close the cover, then open it again.
-
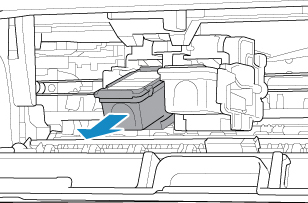
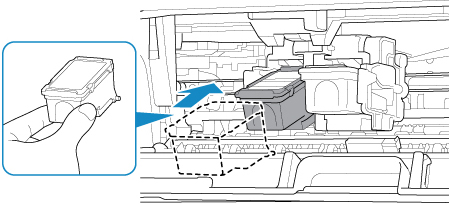
Remove the empty ink cartridge.
-
Push down on the cartridge until it clicks.
-
Remove the cartridge.
-
Take a new cartridge out of its package and remove the protective tape (C) gently.
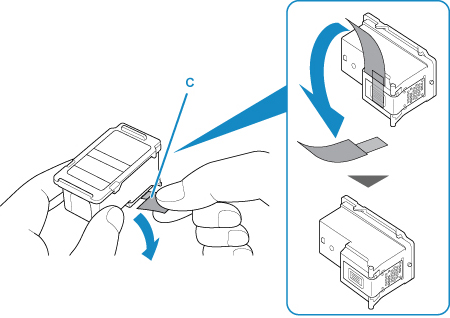
If you shake a cartridge, ink may spill out and stain your hands and the surrounding area.
-
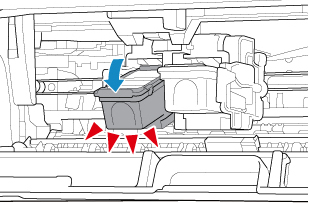
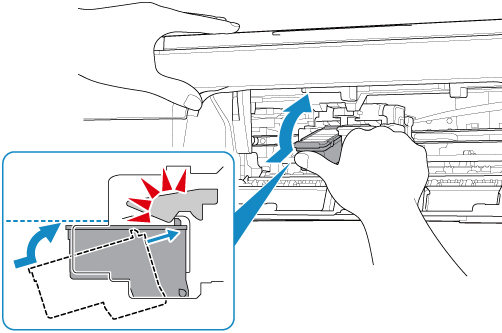
Install the cartridge.
Remember, the printer cannot print unless both the color cartridge and black cartridge are installed.
-
Insert the new cartridge at a slant into the ink cartridge holder. The color cartridge should be installed into the left slot and the black cartridge should be installed into the right slot.
Insert the cartridge gently so that it does not hit the electrical contacts on the cartridge holder.
-
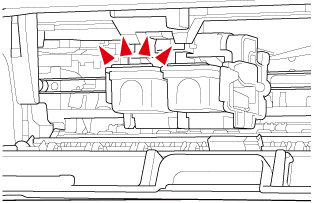
Push the cartridge in and up firmly until it snaps into place.
- Close the cover.
If the error code is displayed on the printer after the cover is closed, check the error code / support code details and take the appropriate action.
After installation
-
The printer starts cleaning the print head automatically.
-
Do not perform any other operations until the printer completes the cleaning of the print head.
-
If the print head is out of alignment, align the print head.
-
The printer may make a noise during these operations, but this does not indicate a problem.
About ink cartridges
We recommend you use a new ink FINE cartridge in order to obtain optimum qualities.
-
If you remove an ink cartridge from your printer, replace it immediately. Don't leave the printer with ink cartridges removed.
-
Install the ink cartridge as soon as you remove it from the packaging. If you leave it out, it will dry and may damage the printer when installed.
-
Replace one cartridge before you remove / replace the next.
-
You can't print unless all the ink cartridges are installed.
-
Use new cartridges for replacement. Used cartridges may cause the nozzles to clog and won't alert you when it's time to replace the ink.
-
To maintain optimal printing quality, use a FINE cartridge within six months of first use.
-
Discard the empty cartridge according to the local laws and regulations regarding disposal of consumables.
-
Find more tips about how the ink in your printer is used for various purposes.
