|
|
Print using an infrared connection MP450
| Article ID: ART158722 |
| |
Date published: 06/09/2015 |
| |
Date last updated: 08/18/2015 |
Description
Instructions to print via an Infrared connection.
Solution
How to print via infrared communication
Wireless printing is possible with a mobile phone via infrared communication. Follow the instructions below to establish an Infrared connection for printing.
Note: The machine illustrated below is MP500. The location of the part for communication may vary depending on the machine you use.
- Printing is possible with a mobile phone with an IrDA infrared port for data transmission via infrared communication.
- Depending on your mobile phone, it may not print data stored in a memory card.
- Depending on your mobile phone, the Fine print quality option may not be available due to the restriction on the infrared transfer capacity.
- It does not support printing a downloaded content and images downloaded from URL which is attached to an email for security reason.
- It does not support printing video files.
How to print
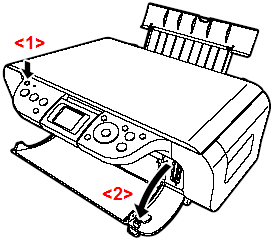
- Confirm that the printer is powered on <1> then open the paper output tray <2>.
- Load paper in the auto sheet feeder (ASF).
- Set the page size, media type, and layout.
- Press the <Menu> button.
- Use the right / left cursor button to select [Maintenance/settings], then press the <OK> button.
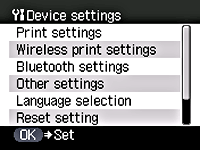
- Use the right / left cursor button to select [Device settings], then press the <OK> button.
- Use the up / down cursor button to select [Wireless print settings], then press the <OK> button.
- Use the up / down cursor button to select the item to set and use the right / left cursor button to select the setting. Click for more information on the print settings.
- After setting the necessary settings, press the <OK> button.
- Direct the infrared port of the mobile phone to that of the machine at a distance of less than 20 cm (7.87 inch).
Memo: The effective angle of the infrared port of the machine is about 10 degrees from the central axis in vertical and horizontal directions. The allowable distance of communication with the machine depends on the mobile phone you use. For the distance, refer to your mobile phone manual.
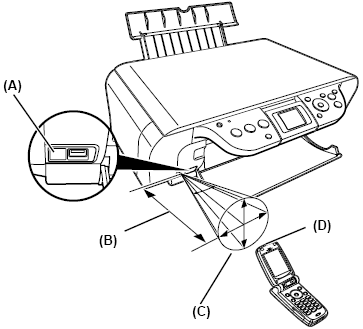
A. Infrared port of the machine
B. Less than 20 cm (7.87 inch)
Caution: Do not block with any obstacle or communication may fail.
C. Effective angle (in vertical and horizontal direction): About 10 degrees
D. Infrared port of mobile phone
- Select the photo to print and send the data to the machine using the infrared communication function of the mobile phone.
Memo: It automatically sets the photo quality and orientation (horizontal or landscape) according to the photo size. When performing borderless printing, the edges of photos may be cut, depending on the photo size set in the mobile phone. When performing bordered printing, the size of margins may be changed , depending on the photo size set in the mobile phone.
Note: Printing will start after receiving all data. Depending on the size of a photo, it may take a while for the machine to start to print after starting the infrared transfer.
Caution: During printing, be careful not to interrupt infrared communication with the machine. If it is interrupted, send the data from the mobile phone again.
Wireless Print Settings
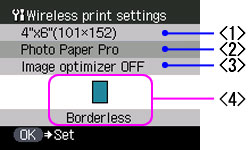
- Page size: Set the paper size for printing images located in a compatible mobile phone.
NOTE: Available size: 8.5" x 11" (215 x 279), A4, Stickers, 4" x 6" (101 x 152), 5" x 7" (127 x 177), Credit card and 4" x 8" (101.6 x 203.2)
- Media type: Set the media type for printing images located in a compatible mobile phone.
NOTE: Available media types: Photo Paper Plus Glossy, Matte Photo Paper, plain paper, Glossy Photo Paper and Photo Paper Pro
- Image Optimizer: Smooths out the jaggedness on the contour of an image when printing images located in a compatible mobile phone.
NOTE: Image Optimizer can either be set to [Image optimizer ON] or [Image optimizer OFF].
- Layout print: Sets the layout according to the paper for printing images located in a compatible mobile phone.
NOTE: Selectable layout for stickers: Stickers x16. Selectable layout for other media: Bordered: x1, x2, x4, x8; Borderless: x1, x2, x4, x8; Mixed: 1, 2, 3.
Memo: When printing on the Canon special stickers, select the layout according to their types. Mixed 1, Mixed 2, and Mixed 3 can be selected only when the page size setting is 8.5" x 11" (215.9 x 279.4) or A4.
Click to return to step 8
|
