Using the LCD Monitor
The LCD monitor can be used to compose images while shooting, adjust menu settings and play back recorded images. Icons showing the camera's status and setting contents appear on the LCD monitor.
 The image in the LCD monitor will darken in strong sunlight or bright light. This does not constitute a malfunction. The image in the LCD monitor will darken in strong sunlight or bright light. This does not constitute a malfunction. |
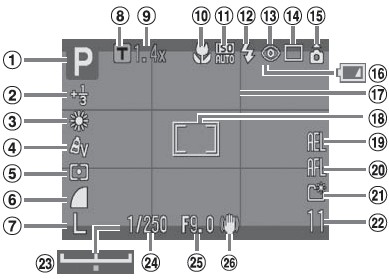
Shooting Information (Shooting Mode)
When setting the flash, continuous mode, self-timer, macro mode, infinity mode, or the metering method, the shooting information displays on the LCD monitor for approximately 6 seconds even if the LCD monitor is set to Standard (No Information) or Off. It may not display under some circumstances, depending on the selected settings.
|
1
|
Shooting Mode |
| 2 |
Exposure Compensation / Long Shutter Mode |
| 3 |
White Balance |
| 4 |
My Colors |
| 5 |
Metering Mode |
| 6 |
Compensation Ratio |
| 7 |
Recording Pixels |
| 8 |
Digital Tele-Converter |
|
9
|
Zoom Factor |
|
10
|
Macro / Infinity Mode |
|
11
|
ISO Speed |
|
12
|
Flash |
|
13
|
Red-Eye Correction |
|
14
|
Drive Mode |
|
15
|
Auto Rotate |
|
16
|
Battery Charge Indicator |
|
17
|
Grid Lines |
|
18
|
AF Frame / Spot AE Point Frame |
|
19
|
AE Lock / FE Lock |
|
20
|
AF Lock |
|
21
|
Create Folder |
|
22
|
Still Images: Recordable Shots / Movies: Remaining Time / Elapsed Time |
|
23
|
Exposure Shift Bar |
|
24
|
Shutter Speed |
|
25
|
Aperture Value |
|
26
|
Image Stabilizer |

If the indicator blinks orange and the camera shake warning icon ( ) displays, this indicates that a slow shutter speed may have been selected due to insufficient illumination. ) displays, this indicates that a slow shutter speed may have been selected due to insufficient illumination.
Use the following methods to shoot:
- Raise the ISO speed.
- Configure Auto ISO Shift to a setting other than off.
- Select a setting other than  (flash off) (flash off)
- Attach the camera to a tripod or other device.
|
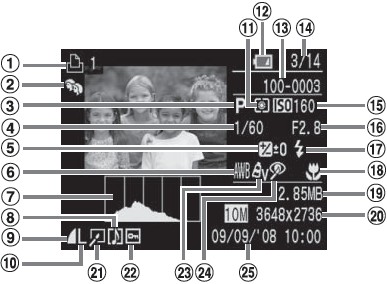
Playback Information: Standard (Playback Mode)
|
1
|
Print List |
|
2
|
Auto Category / My Category |
|
3
|
Shooting Mode |
|
4
|
Shutter Speed |
|
5
|
Exposure Compensation |
|
6
|
White Balance |
|
7
|
Histogram |
|
8
|
Sound Memo |
|
9
|
Compression Ratio |
|
10
|
Recording Pixels |
|
11
|
Metering Mode |
|
12
|
Battery Charge Indicator |
|
13
|
Folder Number - File Number |
|
14
|
Displayed image number and total number of images |
|
15
|
ISO Speed |
|
16
|
Aperture Value |
|
17
|
Flash |
|
18
|
Macro / Infinity Mode |
|
19
|
File Size |
|
20
|
Still Images: Recording Pixels Movies: Movie Length |
|
21
|
Red-Eye Correction / Resize |
|
22
|
Protect |
|
23
|
My Colors |
|
24
|
Red-Eye Correction |
|
25
|
Shooting Date and Time |
The following information may also be displayed with some images.
|

|
JPEG file with format not conforming to Design rule for Camera File System Standards |
|

|
RAW format file |
|

|
File with unrecognized format |
The brightness of the LCD monitor can be adjusted to better suit the shooting conditions. When shooting in dark conditions, the camera will also automatically brighten the LCD monitor.
LCD Monitor Brightness Settings
The brightness of the LCD monitor can be changed in the following two ways.
- Changing Settings Using the Set up Menu
- Changing Settings Using the DISP. Button (Quick-bright LCD Function)
- Pressing the <DISP.> button for at least 1 second switches the brightness to the highest setting. Pressing it again for at least 1 second restores it to the original setting.
If you set the brightness to the highest setting using this method and turn the camera power off, the brightness setting will revert to the value set in the Set up menu.
- Right after a shot is taken, the image and its information appear in the LCD monitor for 2 seconds (or for the number of seconds selected if the review time was changed (2 - 10 sec.)) even if you release the shutter button. If you continue to press the shutter button right after shooting an image, or press the <FUNC./SET> button while the image is displayed, the image will continue to display.
- While a recorded image is displayed on the LCD monitor, you can check the exposure with the graph (Histogram) that shows the distribution of the brightness data. If the exposure requires adjustment, set the exposure compensation and re-shoot. Press the <DISP.> button if the histogram and other information are not shown.
|
| Please note that image information recorded by this camera may not display correctly on other cameras and image information recorded by other cameras may not display correctly on this camera. |
Histogram Function
The histogram is a graph that allows you to judge the brightness of the shot image. The greater the bias toward the left in the graph, the darker the image. The greater the bias toward the right, the brighter the image. If the image is too dark, adjust the exposure compensation to a positive value. Similarly, adjust the exposure compensation to a negative value if the image is too bright.
| -- |
--Sample Histograms
|
-- |
|

|

|

|
|
Dark Image
|
Balanced Image
|
Bright Image
|
