
Converting RAW images using ZoomBrowser EX ver. 5.x
| Article ID: ART153981 | | | Date published: 06/09/2015 | | | Date last updated: 08/17/2015 |
Description
Solution
Converting RAW images using ZoomBrowser EX ver. 5.x
If your camera supports RAW images you can handle higher quality images. However, since they are a special type of image, they cannot be opened by many image editing, email, or printing applications. It is first necessary to convert them into standard image files. This explains conversion procedures.
IMPORTANT
|
REFERENCE
|
Raw Image Task Procedure:
1. Select RAW image(s) in the Browser Area.
2. Click [Edit] in the Main Window, followed by [Process RAW Images].

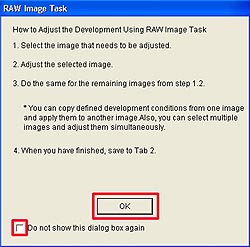
3. When the window showing the procedures for converting and adjusting RAW images appears, click [OK].
- You can check the box at the bottom of this window if you would like to prevent this window from popping up again.
REFERENCE
|
The following 3 windows should appear one on top of another:
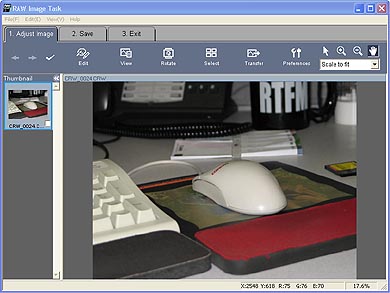
RAW Image Task Main Screen
You can use the buttons on this window to switch between images and display modes and set various conversion settings, such as the image rotation.
|
|
|
|
RAW Image Task Navigator Window You can change the area of a preview image that is zoomed in the Main Window by clicking the red box and dragging it. |
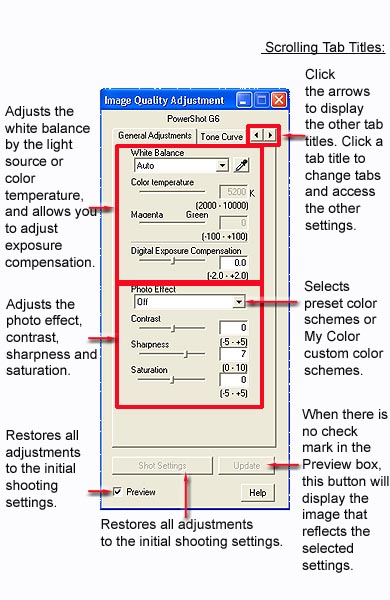
Image Quality Adjustment Window You can adjust the brightness, contrast and coloration of a RAW image as it is converted |


4. Adjust the image quality as required in the Image Quality Adjustment Window.
5. Click the [2. Save] tab in the Main Window, set the image type and save destination, and then click [Save].
In the Save step tabs, specify the format, save destination folder, and save file name and then convert/save. There are 4 sections on the Save step window: Conversion Target, Conversion from RAW to Other Formats, Save Folder, and Rename File.
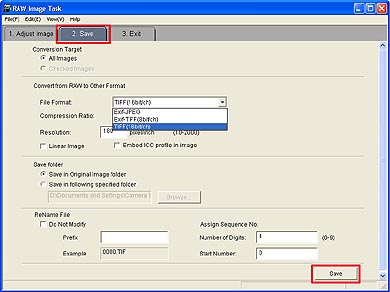
To save/convert the RAW images, select from among the following.
-
All Images --- Converts/saves all RAW images shown on the list of thumbnails in step 1. Adjust Image.
-
Checked Images --- Converts/saves only those RAW images displayed on the list of thumbnails in step 1. Adjust Image that are checked.
Conversion from RAW to Other Formats
Specify the format into which the RAW image is to be converted.
-
File Format --- Select one of the following formats: Exif-JPEG, Exif-TIFF (8bit/ch), TIFF (16bit/ch)
-
Compression Ratio --- If you selected Exif-JPEG in File Format, you can select from four JPEG compression ratios.
-
Resolution --- You can specify the print resolution in dpi (dots per inch).
-
Linear Image --- This check box is only activated when TIFF (16bit/ch) is specified as the File Format. It is normally deselected. When this check box is selected, nonlinear image processing such as gamma processing is not done when RAW images are converted to 16 bit TIFF images, so the created image data is closer to the actual source data. Select this check box only when you are using photo retouching software to adjust the tone curve, etc.
-
Embed ICC Profile in Image --- Select this check box to embed ICC profile data in an image that has been converted and saved. (This function only applies to images taken with an EOS Digital camera.)
Selects the folder into which an image is saved/converted.
-
Save in Original Image Folder --- Saves the converted image in the same folder containing the RAW image file being converted/saved.
-
Save in Following Specified Folder --- Click the Browse button and specify the folder into which the converted image is to be saved.
The naming conventions for the converted/saved file are set as follows.
-
Do Not Modify check box --- If you select this check box, the converted image is saved under the same file name as the original RAW image file (except for the file extension).
-
Prefix --- This option can be selected when the Do Not Modify check box not checked. Specifies the file name prefix.
-
Assign Sequence No. --- You can assign a sequence number of up to nine digits after the file name. Specify the number of digits for the sequence number with Number of Digits, and specify the beginning sequence number with Start Number.
6. Click the [3. Exit] tab.
- Closes RAW Image Task. If there are any images whose image qualities were adjusted but were not converted/saved, an exit confirmation dialog box displays.
Detailed Description of Each Function in the Menus
-
Transfer Images - Transfers the images displayed in the thumbnail area into a specified application after the images have been converted into a general-purpose format. Specify the destination application on the Image Transfer Settings tab of the Preferences dialog box.
-
Save Selected Images - Displays the Save Selected Images dialog box, converts the images selected in the thumbnail area into a general-purpose format, and saves them to a file.
-
-
In the Save Selected Images dialog box, specify the format, save destination folder, and file name as indicated below, and then convert/save.
-
-
Conversion from RAW to Other Formats - Specify the format into which the RAW image is to be converted.
-
-
File Format --- Select one of the following formats: Exif-JPEG, Exif-TIFF (8bit/ch), TIFF (16bit/ch)
-
Compression Ratio --- If you selected Exif-JPEG for File Format, you can select from four JPG compression ratios.
-
Resolution --- You can specify the print resolution in dpi (dots per inch).
-
Linear Image --- This check box is only activated when TIFF (16bit/ch) is specified as the File Format. It is normally deselected. When this check box is selected, nonlinear image processing such as gamma processing is not done when RAW images are converted to 16 bit TIFF images, so the created image data is closer to the actual source data. Select this check box only when you are using photo retouching software to adjust the tone curve, etc.
-
Embed ICC Profile in Image --- Select this check box to embed ICC profile data in an image that has been converted and saved. (This function only applies to images taken with an EOS Digital camera.)
-
-
Save Folder - Selects the folder into which an image is saved/converted.
-
-
Save in Original Image Folder --- Saves the converted image in the same folder containing the RAW image file being converted/saved.
-
Save in Following Specified Folder --- Click the Browse button and specify the folder into which the converted image is to be saved.
-
-
Rename File - The naming conventions for the converted/saved file are set as follows.
-
-
Do Not Modify check box --- If you select this check box, the converted image is saved under the same file name as the original RAW image file (except for the file extension).
-
Prefix --- This option can be selected when the Do Not Modify check box not checked. Specifies the file name prefix.
-
Assign Sequence No. --- You can assign a sequence number of up to nine digits after the file name. Specify the number of digits for the sequence number with Number of Digits, and specify the beginning sequence number with Start Number.
-
-
-
Preferences - Displays the Preferences dialog box. The following types of RAW Image Task basic operations are set using the Preferences dialog box.
-
-
General Settings tab
-
-
Arrange ---You can choose to arrange the thumbnails By Name or By Shooting Date/Time.
-
View
-
-
Show All Warnings --- Clears the status of dialog boxes whose Do not show this dialog box again check boxes are selected and sets all warning dialog boxes to display.
-
The Window will be placed in the default position --- Returns all window positions to their default.
-
-
-
Image Transfer Settings tab
-
-
Image Transfer Application --- Specifies the application name and execution file to which an image is transferred when selected on the Image Transfer menu.
-
Image Transfer Folder --- Specifies the folder to which an image is transferred when selected on the Image Transfer menu.
-
Image Format --- Specifies the file format to which an image is converted when selected on the Image Transfer menu.
-
Compression Ratio --- Specifies the compression ratio when an image is transferred in JPEG format.
-
Resolution --- Specifies the resolution at which an image is transferred. The specified resolution is the resolution at which the image is printed by the destination application.
-
Linear Image --- This check box is only active when TIFF (16bit/ch) is specified for the Image Format. It is normally deselected. If this check box is selected, because nonlinear image processing such as gamma processing is not implemented when RAW images are converted to 16 bit TIFF images, image data that is closer to the source data is created. Select this check box only when tone curve adjustments are made with the transfer destination application.
-
Embed ICC Profile in Image --- Select this check box to embed ICC profile data in an image that has been converted and saved. (This function only applies to images taken with an EOS Digital camera.)
-
-
Default button - Returns the Preferences dialog box to its default settings.
-
-
Exit - Closes RAW Image Task.
-
Edit Menu
-
Select
-
-
Select All - Selects all images displayed as thumbnails.
-
Delete Selection - Deletes all selected images displayed as thumbnails.
-
Select Checked Images - Selects all checked images (images whose check box in the lower-right of their corresponding thumbnail is selected) from the list of displayed thumbnails.
-
Invert Selection - Reverses the current selection status of the images displayed on the thumbnail list (deselects previously selected images, selects the images that were not selected).
-
-
Rotate
-
-
90 degrees right - Rotates the selected image 90 degrees to the right (clockwise).
-
90 degrees left - Rotates the selected image 90 degrees to the left (counter clockwise).
-
180 degrees - Rotates the selected image 180 degrees.
-
-
Tools
-
-
Arrow - The default cursor.
-
Zoom In - The cursor becomes a Zoom In cursor when positioned over the preview area. When you use the Zoom In cursor, you can select a point on the image within the preview area and enlarge it by up to 800%. Tip: At a display of 100%, pixels are displayed at a one-to-one ratio.
-
Zoom Out - The cursor becomes a Zoom Out cursor when positioned over the preview area. When you use the Zoom Out cursor, you can select a point on the image within the preview area and decrease its size down to 12.5% of the original.
-
Hand - The cursor becomes a Hand cursor when positioned over the preview area. If the entire image is not displayed within the preview area, you can use the Hand cursor to scroll the image in any desired direction.
-
-
Check Mark
-
-
Set - Checks the selected image to On. Tip: When the check box in the lower right of the thumbnail is checked, its status is referred to as being checked On.By adding a check mark (checking to On), in step 2. Save, you can convert/save only those images that are checked.
-
Remove - Removes check marks from the selected images.
-
-
Development Conditions
-
-
Copy - Copies the development conditions (all set values for the image quality adjustment parameters) of the selected images.
-
Paste - Pastes the copied development conditions (all set values for the image quality adjustment parameters) to the selected images.
-
Shot Settings - Returns the development conditions of the selected images (all set values for the image quality adjustment parameters) to the image quality adjustment value (shot settings) that existed when the RAW image was captured.
-
Load...- Loads the development conditions file (*.dvp) and applies it to the selected images.
-
Save... - Saves the development conditions (all set values for the image quality adjustment parameters) of the selected images in a development conditions file (*.dvp).
-
-
My Colors - In RAW Image Task, you can change specific colors in an image to your preferred color combination. The function that sets and saves a selected color to a preferred color combination is called My Color.You can apply My Color to only RAW images taken with a PowerShot camera. Take note that you cannot apply My Color to RAW images taken with an EOS Digital camera.
-
-
Create and Add My Color - Starts the Create My Color Wizard. Refer to the explanation given on the Create My Color Wizard screen for information on creating and adding My Colors. Tip: The My Colors created or added using the Create My Color Wizard are listed in the Photo Effect box of the Image Quality Adjustment Window.You can select a My Color from the list, and apply the added color combination to the RAW image. Before starting the Create My Color Wizard, you must prepare the source image (the original image) and the image that was edited to your color preference using photo retouching software (the target image). The vertical and horizontal sizes of the original and target images must be the same. The original and target files must be saved in TIFF, JPEG, or BMP format. In addition, TIFF files must be in uncompressed all color 8 bit format. My Colors are created with the conversion amount limited to the extent that the image will not fail when My Colors are applied. As a result, when a My Color is applied to the original image, its effects may not match those of the target image. The actual application of the created My Color to the original image is displayed in Preview My Color Applied to the Image. Add the color after verifying the results of the application.
-
Edit Photo Effect List Box - Opens the Edit Photo Effect List Box dialog box. In the Edit Photo Effect List Box dialog box, you can make the following changes to the My Colors listed in the Photo Effect box.
-
-
Edits the name of the selected My Color.
-
Edits the comment information of the selected My Color.
-
Deletes the selected My Color. Tip: The deleted My Color is completely removed from the computer you are using. My Colors are created or added using the Create and Add My Color menu.
-
-
View Menu
-
Preview Display Size - You can specify the preview display size from 12.5-800%. When Scale to fit is specified, the Preview window frame size displays in full. When 100% is specified, pixels are displayed at a one-to-one ratio.
-
Thumbnail Display Size
-
-
80 x 80 - A 80 x 80 pixel thumbnail displays in the thumbnail display area.
-
160 x 160 - A 160 x 160 pixel thumbnail displays in the thumbnail display area.
-
-
Thumbnail Display Position
-
-
Display Left - The thumbnail list displays on the left side of the main window.
-
Display at Bottom - The thumbnail list displays at the bottom of the main window.
-
-
Show (Hide) Navigator - Shows (hides) the Navigator window.
-
-
In the Navigator window, if the entire image does not fit into the preview area, the section of the image being displayed is shown framed in red, and you can change the area that is displayed by moving this red frame.
-
-
Show (Hide) Histogram - Shows (hides) the Histogram window.
-
-
A histogram of the focus image shown in the preview area is displayed in the Histogram window. A brightness histogram is displayed on the Y tab, and histograms for the RGB (Red, Green, Blue) channels are arranged and displayed on the RGB tab.
-
-
Show (Hide) Image Quality Adjustment Window - Shows (hides) the Image Quality Adjustment Window.
-
Show (Hide) Image Properties Window - Shows (hides) the Image Properties window. The following information about the focus image shown in the preview area is displayed in the Image Properties window.
-
-
File Name
-
File Size
-
Image Size
-
File Format
-
File Path
-
Comment (editable)
-
Shot Information (shutter speed, aperture value, focal length, etc.)
-
Help Menu
-
RAW Image Task Help - Displays a help file.
-
About - Displays the version information about RAW Image Task.