You can display electronic level in the viewfinder and on the LCD monitor to help correct camera tilt. CAUTION - Even when the tilt is corrected, there may be a margin of error of ±1°.
- If the camera is very tilted, the electronic level's margin of error will be bigger.
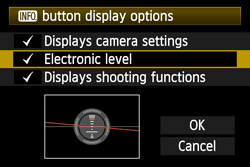
Displaying the Electronic Level on the LCD Monitor 1. Set the power switch to <ON>. 2. Press the <INFO.> button. Each time you press the <INFO.> button, the screen display will change. Display the electronic level.  NOTE If the electronic level does not appear, set [  : INFO. button display options] under [  ] tab so that the electronic level can be displayed.
3. Check the camera's tilt. - The horizontal and vertical tilt are displayed in 1° increments.
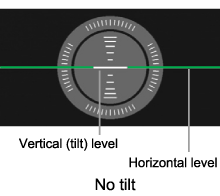 - When the red line turns green, it indicates that the tilt is corrected.
 NOTE With this same procedure, you can display the electronic level during Live View shooting and before shooting a movie.
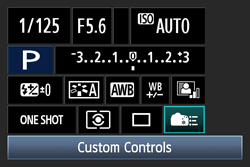
Displaying the Electronic Level in the Viewfinder The viewfinder can display an electronic level using the AF points. To display the electronic level in the viewfinder, follow the procedures below. 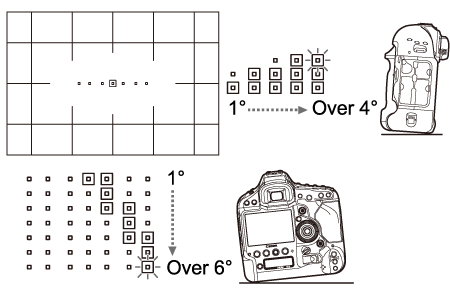 1. Set the power switch to <ON>. 2. Press the <MENU> button to display the menu screen. 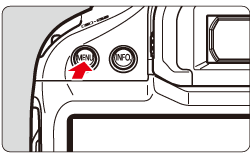 3. Press the <Q> button to select [  ] tab, then turn the <Main Dial> to select [  ].  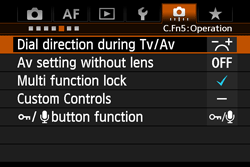 4. Turn the <Quick Control Dial> to select [Custom Controls], then press the <SET> button.  5. When the [Custom Controls] screen appears, select either [  ] (the Depth-of-field preview button) or [  ] (the Multi-function button), and then press the <SET> button (here the [Depth-of-field preview button] is selected as an example).  6. Select [  ](VF electronic level), then press the <SET> button.  7. When the screen shown in step 5 returns, confirm that the setting has been changed, and then press the <MENU> button to return to the menu screen. 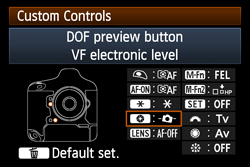 8. Press the shutter button halfway, and the camera will be ready for shooting. NOTE The settings can also be made by selecting the [Custom Controls] on the [Quick Control] screen that appears when pressing the <Q> button. For information on how to make settings on the [Quick Control] screen, please see the instruction manual supplied with the camera.
|