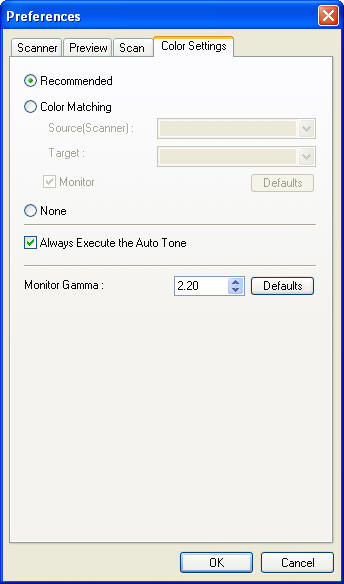
Adjust the settings on the Color Settings tab in Preferences (5600F, LiDE 100, LiDE 200)
To adjust the Color Settings (color matching):
- Open ScanGear from the desired application (ex.- MP Navigator EX, PhotoStudio, etc.).
- If not already in Advanced Mode, click on the 'Advanced Mode' Tab.
- Click the 'Preferences...' button near the bottom of the Window.
- Click the 'Color Settings' tab.
- The Recommended setting is usually preferred. On occasion, you may find that the None setting will give you a more desirable output. You may want to try the various settings as these are user preference settings. Click here for more information on these settings.
More Information About the Color Settings Tab
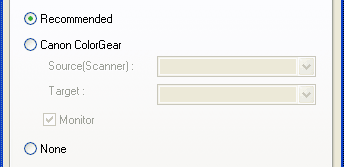
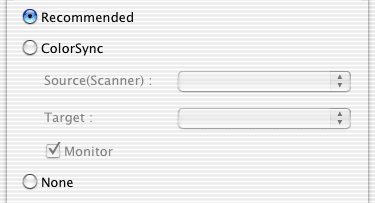
Recommended / Canon ColorGear (ColorSync) / None
Select a color correction method from the Recommended; Canon ColorGear (Windows)/ColorSync (Macintosh); and None options.


Explanation of Settings
| Recommended |
This option displays colors vividly on computer monitors. It is recommended for most purposes. |
Canon ColorGear
ColorSync |
This option uses the Canon ColorGear/ColorSync color management system. It makes colors consistent between the scanned item, the monitor and a color printer. |
- The Canon ColorGear/ColorSync is only enabled when the Color mode is set to Color or Color (48 bit).
- The Color correction buttons (seen below) cannot be used when the Canon ColorGear/ColorSync option is selected since color correction is automated with this option. (The Color tab will cease to display).
|
| None |
No color correction is performed by ScanGear CS with this option. |
- The Auto tone function cannot be used when the None option is selected.
|
*This category is set to Recommended by default when ScanGear CS is first installed.
About Canon ColorGear (Windows) / ColorSync (Macintosh)
You can set the source (scanner), target and monitor profiles when the Canon ColorGear/ColorSync option is selected.
| Source (Scanner) |
Sets the scanner profile. |
| Target |
Sets the RGB color space profile such as sRGB, Adobe RGB, monitor profile, printer profile, etc. |
| Monitor |
- If a check mark is placed beside this category, the preview image is converted to the monitor's RGB color space and displayed. The final scan is converted to the color space specified in the output profile.
- If the check mark is removed from this category, the preview image and final scan are converted to the color space specified in the output profile.
*Place a check mark here to scan if you are using an application program that supports a color management system.
|
Color management systems will operate correctly when the settings are properly set in ScanGear CS, the operating system (monitor settings), the application program* and the printer driver.
*The application program must support color management systems. Adobe Photoshop (Ver. 5.0 or more), Adobe Photoshop Elements and Adobe Illustrator (Ver. 9.0 or more) are among the programs that do. The ArcSoft PhotoStudio program supplied with this scanner do not. To correct the color with a color management system, please use a program that supports it.
Always perform the auto tone

A check mark in this option causes Auto Tone adjustment to be activated for each scan.
*When ScanGear CS is first installed, this option is selected by default.
