Faxing a Document from a Computer
Please Choose an item below:
The procedure for faxing a document created in application software is as follows.
note:
- Faxing methods may differ depending on the application you are using. For details, see the instruction manuals provided with the application software.
- Up to 256 fax transmission recipients can be stored in the device. If the number of recipients exceeds 256 after a fax job has been sent to the device, the last job to be input will be erased. Be careful when registering more than 256 recipients in groups or when sending a fax continuously to multiple groups.
- The display may differ according to the operating system and system environment as well as the type and version of the fax driver.
- Sending documents from a computer and scanning documents over the network cannot be processed at the same time. If this happens, these documents are handled differently depending on the following:
- If you send PC documents when the machine is scanning documents, the machine scans documents first, then starts sending the PC documents when scanning is complete.
- If you scan documents when the machine is sending PC documents, scanning is canceled. Wait for the PC documents to be sent out, then perform the scanning operation again.
1. Open the document you want to fax from the application.
2. Select [Print] from the [File] menu.
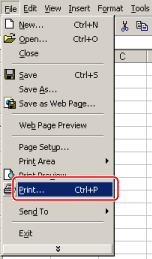
The [Print] dialog box is displayed.
note:
The procedure for displaying the [Print] dialog box may differ depending on the application you are using.
3. Select your fax from [Name], then click [Properties].
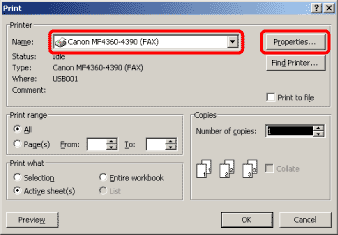
The fax driver screen is displayed.
note:
- The fax name displayed in the fax driver screen is changed by settings in the [Printers and Faxes] folder (for Windows 2000: The [Printers] folder).
- The procedure for displaying the fax driver screen may differ depending on the applications you are using.
4. Configure the required settings in the fax driver screen, then click [OK].
The [Print] dialog box is displayed.
5. Click [OK].
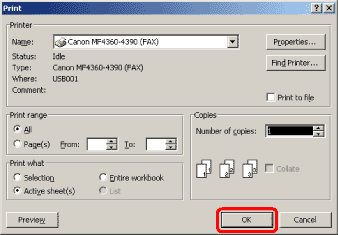
The [Fax Sending Settings] dialog box is displayed.
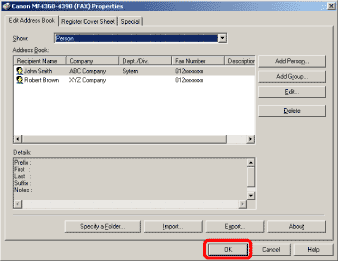
6. Specify recipient name and fax number in the [Sending Settings] sheet -> click [Add to Recipient List].
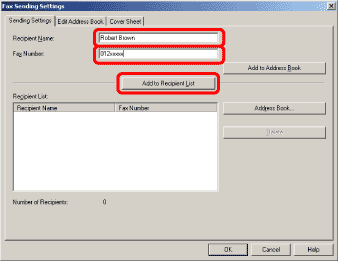
note:
- The number of recipients to which you can send simultaneously depends on the conditions of cover sheet attachment. For details, click [Help] in the bottom right-hand corner of the fax driver window to view the online help.
- You can select a recipient from the address book by clicking [Address Book].
- For Windows 2000/XP/Server 2003/Vista/Server 2008, you can use or edit the address book only if you are permitted access to the folder where the address book file is saved (by default, Power Users and higher have access to the folder). If you are not permitted access to the folder, log on as a user who has access to the folder, or click [Specify a Folder] in the [Edit Address Book] sheet, and save the address book file in a folder, such as the [My Documents] folder, where you have written permission.
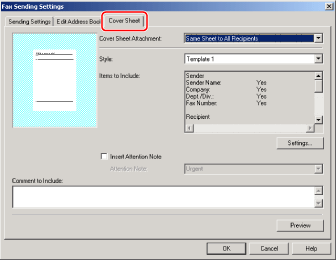
7. If you want to attach a cover sheet, select [Cover Sheet] sheet -> specify a format for the cover sheet.
8. Click [OK].
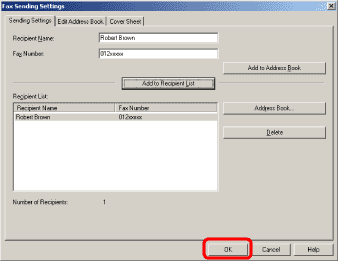
Faxing starts.
Top
To fax a document, follow the procedure below.
note:
- When faxing, you can change the settings you configured beforehand. To change the settings, configure them from the application.
- The display may differ according to the operating system and system environment as well as the type and version of the fax driver.
1. On the [Start] menu, point to [Settings] -> click [Printers].
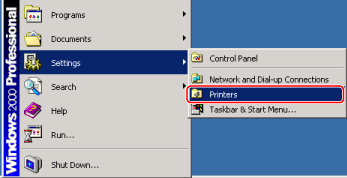
The [Printers] folder is displayed.
note:
- If you are using Windows XP Professional/Server 2003/Server 2008, on the [Start] menu, click [Printers and Faxes].
- If you are using Windows XP Home Edition, on the [Start] menu, click [Control Panel] -> [Printers and Other Hardware] -> [Printers and Faxes].
- If you are using Windows Vista, on the
 (Start) menu, click [Control Panel] -> [Printers].
2. In the [Printers and Faxes] folder (for Windows 2000: The [Printers] folder), right-click the icon of the fax whose settings you want to configure -> click [Printing Preferences] from the displayed menu.
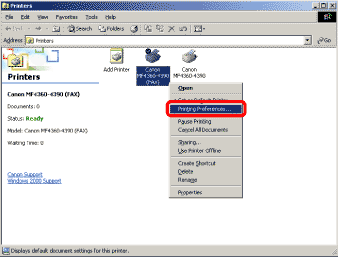
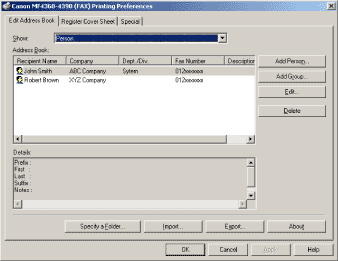
The fax driver screen is displayed.
The fax driver screen includes the following sheets.
- [Edit Address Book] sheet
- [Register Cover Sheet] sheet
- Special] sheet
note:
To access the [Printing Preferences] dialog box from the [Printers and Faxes] folder (for Windows 2000: The [Printers] folder), you need to be assigned full control permission for the printer. Full control access is available for users who are registered as Administrators or Power Users in the Windows system settings.
3. Configure the required settings in the displayed fax driver screen.
For details about the fax driver settings, click [Help] in the bottom right-hand corner of the fax driver window to view the online help.
4. Click [OK].
Top
To view the online help, follow the procedure below.
note:
The display may differ according to the operating system and system environment as well as the type and version of the fax driver.
1. Display the fax driver screen.
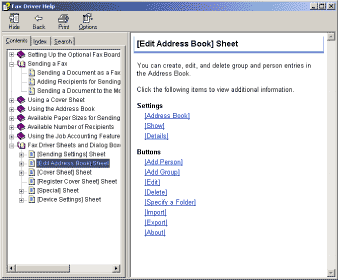
2. Click [Help].
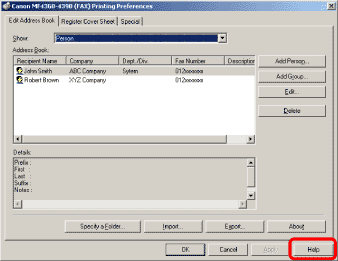
The online help is displayed.
Top
