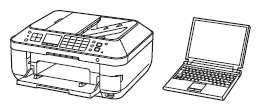
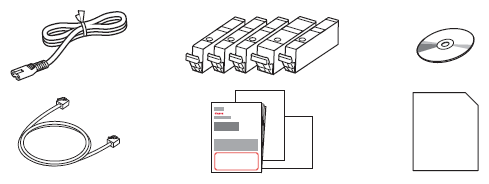
To perform setup, place the machine near the access point* and computer. (* Required for wireless LAN) Check the included items. REFERENCE Network connection: Prepare the Ethernet cable or network devices such as a router or an access point as necessary. USB connection: A USB cable (not included) is required.
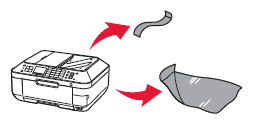
Remove the protective sheets and tape. 1. Preparation IMPORTANT - Do not allow objects to fall inside the machine. These could cause malfunction.
- The Paper Output Tray opens automatically as printing starts. Keep the front of the tray clear of any obstacles.
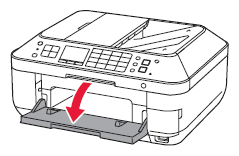
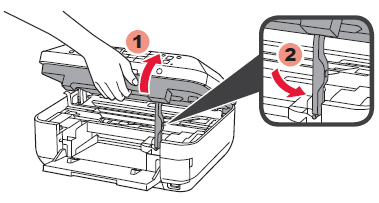
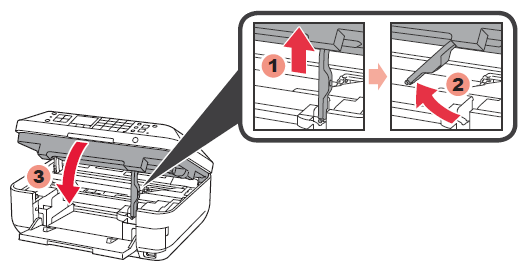
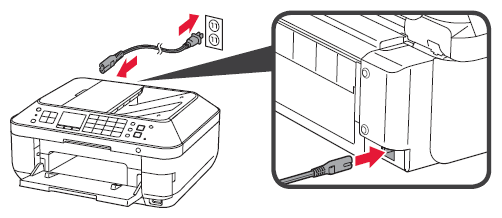
1. Open the Paper Output Tray. 2. Lift the Scanning Unit / Cover, then fix it with the Scanning Unit Support.  Document Cover must be closed to lift Scanning Unit / Cover! 3. Remove the orange tape and protective material. 4. Close the Scanning Unit / Cover. 5. Connect the power cord. REFERENCE Do not connect the USB or Ethernet cable yet.
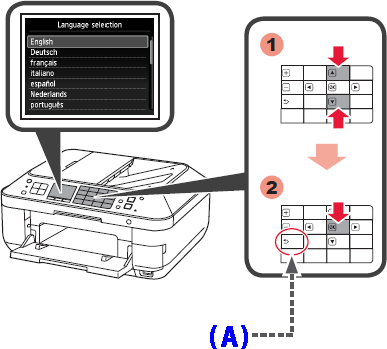
6. Press the ON button. 7. Select your language, then press the OK button. (A) Back button REFERENCE To change the language setting, press the Back button.
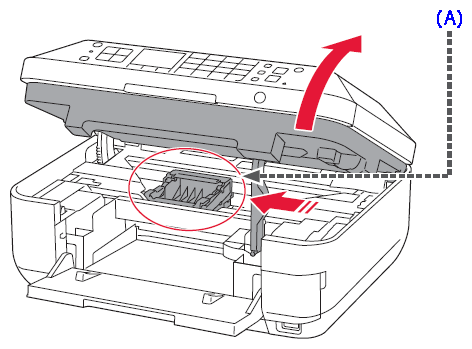
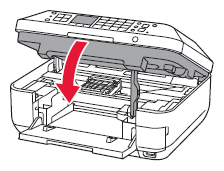
8. When this screen is displayed, press the OK button. 2. Install the Ink Tanks 1. Open the Scanning Unit / Cover. (A) This is where the ink tanks are to be installed. ?????????Do not touch it until it stops. 2. 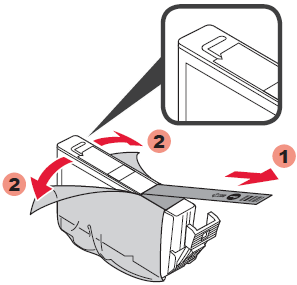 ????????? Remove the protective wrap. IMPORTANT - Remove the orange tape completely.
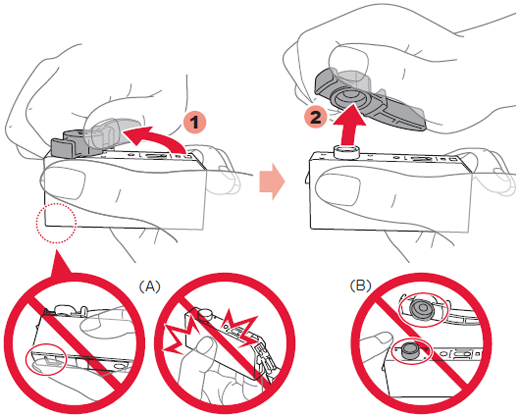
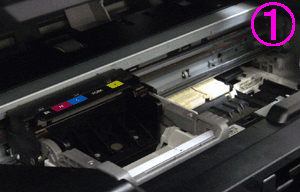
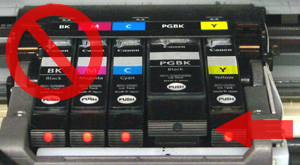
3. Twist and remove the orange cap. (A) Do not press the sides when the L-shaped groove is blocked. (B) Do not touch! 4. Insert and push down the ink tank into the matching color slot. Check that the ink lamp is lit, then install the next ink tank. 5. Check that all lamps are lit. 6. Close the Scanning Unit / Cover. Wait for about 3 to 4 minutes until this screen disappears, then proceed. IMPORTANT If an error message appears, check that the ink tank is installed correctly.
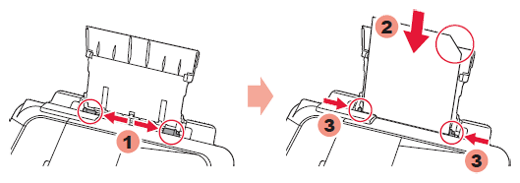
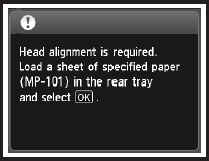
3. Align the Print Head Perform the Print Head Alignment. 1. Open and extend the Paper Support, then tilt it back in place. 2. Slide the Paper Guide to ends. Load the supplied MP-101 paper, then adjust the Paper Guide to fit the paper width. 3. When this screen is displayed, press the OK button. 4. In about 5 to 6 minutes, the blueblack pattern is printed. Print Head Alignment is complete. REFERENCE If an error message appears, press the OK button, then proceed to 4.
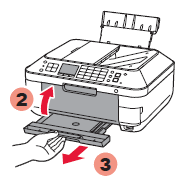
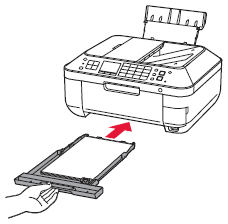
4. Load Paper 1. When this screen is displayed, close the Paper Output Tray. Then, pull out the Cassette. 2. Slide the Paper Guide to the sides, then adjust the front guide to the paper size. 3. Place paper on the right side and adjust the left guide to fit the paper size used. 4. Slide the Cassette back in until it clicks into place. 5. Press the OK button. REFERENCE - For information about paper, refer to [ Media Types You Can Use ] .
- The LCD turns off if the machine is not operated for about 5 minutes. To restore the display, press any button (except the ON button) on the Operation Panel.
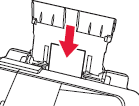
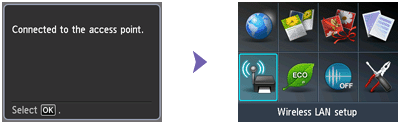
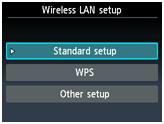
Load photo paper in the Rear Tray only. When using photo paper, machine settings for media type and size should be adjusted. 5. Setting Up the Wireless LAN To connect to wireless LAN, select Start setup on the screen, then follow the onscreen instruction. In the following conditions: - If you want to use wired connection or USB connection - If you have difficulty with the procedure Select Cancel for now. REFERENCE Even after you select "Cancel for now," you can perform the network setup following the screen on the computer.
- In order to connect with the access point supporting WPS
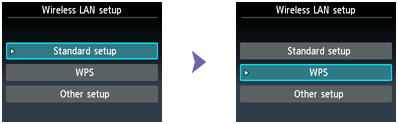
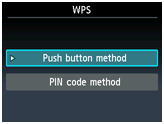
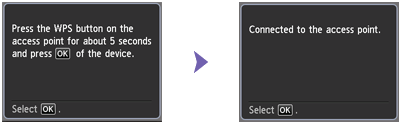
When the screen left above is displayed, go to the (1). When the screen right above is displayed, go to the (4). (1) Press and hold the WPS button on the access point (for about 5 seconds). For details on pressing the WPS button, refer to the access point manual. (2) Press the OK button on the printer within 2 minutes. The (blue) Wi-Fi lamp on the printer flashes while searching for or connecting to the access point. (3) When the left screen appears, press the OK button. This is the end of the procedure for the wireless LAN setup using WPS. (4) Select WPS, and Press the OK button. (5) Select Push button method, and Press the OK button. (6) Press the OK button. (7) Press and hold the WPS button on the access point (for about 5 seconds). For details on pressing the WPS button, refer to the access point manual. (8) Press the OK button on the printer within 2 minutes. The (blue) Wi-Fi lamp on the printer flashes while searching for or connecting to the access point. (9) When the left screen appears, press the OK button. This is the end of the procedure for the wireless LAN setup using WPS. - In order to connect the access point manually
(1) Select Standard setup, and Press the OK button. (2) Select your access point, then press the OK button. (3) One of the screens above will be displayed on the printer. (4) Press the OK button. (5) Enter the network password (WEP key or passphrase) of your access point or router into the printer. (6) Press the left Function button.  REFERENCE You can enter the characters when the keyboard is displayed on the printer. Follow the procedure below. (1) When an on-screen keyboard shown above is displayed, press the center Function button (A) to switch to a keyboard that supports characters you want to use. Three types of keyboard (upper case alphabetical, lower case alphabetical and numeric/symbolic) are available. Each press of the center Function button switches the keyboard type. (2) Use the  buttons (B) to select a character from the on-screen keyboard, then press the OK button to enter it. Entered characters appear in the upper section (C) of the on-screen keyboard. (3) Repeat 1 and 2 to enter more characters. * To insert a space, select Space on the on-screen keyboard and press the OK button. * To insert characters, select the section (C) of the screen using the  or  button, move the cursor to the character on the right of the target position using the  or  button, then enter characters. * To delete a character, select the section (C) of the screen using the or button, move the cursor to the target character using the or button, then press the right Function button.
(7) Make sure that the network password is correct. (8) Press the left Function button. (9) When the left screen appears, press the OK button. This is the end of the procedure for the manual wireless LAN setup.
|