When printing, you can set the specific ink cartridge to use. This is handy because if one of the ink cartridges is empty, you can change the setting to the ink cartridge that still has ink.
Good to know
- All ink cartridges need to be installed, even if it is empty or you are not going to use it, for the printer to print.
- Canon recommends that you use the ink cartridges installed in the printer that you don't remove them until the ink runs out.
Follow the instructions below to set the ink cartridge to Black Only or to Both Black and Color.
Set the ink cartridge from your printer application
You can access the ink cartridge settings from the application you normally use to perform print jobs.
 Depending on the application software, command names or menu names may vary and there may be more steps. For details, refer to the software user's manual.
-
Select the command you normally use to print. In general, select Print from the File menu to open the Print dialog box.
-
Select your printer model name, then Preferences (or Properties). The printer driver setup window appears.
-
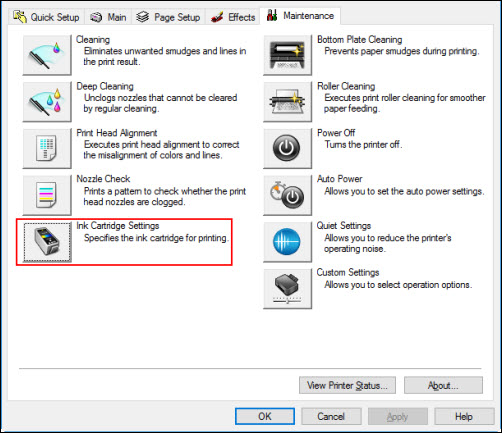
On the Maintenance tab, select the Ink Cartridge Settings icon.
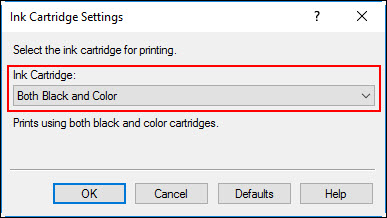
- In the Ink Cartridge Settings window, click on the Ink Cartridge drop-down to check the setting, then select OK.
The default is Both Black and Color.
-
To change the setting, select an option from the drop-down, then OK.
-
Select OK (or the applicable button) to print.
Set the ink cartridge from your computer's Printing Preferences menu
You can also access set the ink cartridge your computer's printing preferences menu.
-
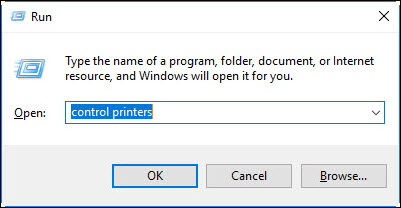
Press and hold the Windows key and type R to open the Run box. In this box, type control printers and click OK.
Right-click on the icon for your printer and select Preferences or Printing Preferences, depending on your version of Windows.
- From the Maintenance tab, Select the Ink Cartridge Settings icon, then OK.
The layout you see depends on the printer and version of Windows you use.
- In the Ink Cartridge Settings window, click on the Ink Cartridge drop-down to check the setting.
The default is Both Black and Color.
-
To change the setting, select an option from the drop-down, then select OK.
-
Select OK (or the applicable button) to print.
