|
|
Use Booklet Printing (Windows) - MG5120
| Article ID: ART108614 |
| |
Date published: 05/11/2015 |
| |
Date last updated: 08/16/2015 |
Description
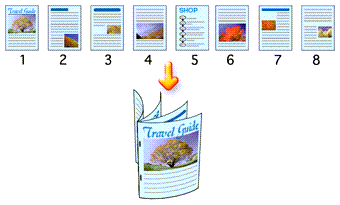
Booklet printing function allows you to print data for a booklet. Data is printed on both sides of the paper. This type of printing ensures that pages can be collated properly, in page number order, when the printed sheets are folded and stapled at the center.
Solution
Booklet Printing
The booklet printing function allows you to print data for a booklet. Data is printed on sides of the paper. This type of printing ensures that pages can be collated properly, in page number order, when the printed sheets are folded and stapled at the center.
-
Access the printing preferences by opening the printer properties:
For Windows 7
- Click the 'Start' button from the bottom left of the Windows screen, and then click on 'Devices and Printers'.
- Click your right mouse button on the listing for your printer, and then select 'Printing Preferences' from the menu that appears.
For Windows Vista
- Click / Select the 'Start' from the bottom left of the Windows screen, 'Control Panel', 'Hardware and Sound', and then click on 'Printers'. Note: If you are in 'Classic' view, click 'Printers' directly from the 'Control Panel'.
- Click your right mouse button on the listing for your printer, and then select 'Preferences' from the menu that appears.
For Windows XP Home Edition
- Click / Select the 'Start' button from the bottom left of the Windows screen, 'Control Panel,' 'Printers and Other Hardware,' and 'Printers and Faxes.'
- Click your right mouse button on the listing for your printer, and then select 'Preferences' from the menu that appears.
For Windows XP Professional Edition
- Click 'Start' from the bottom left of the Windows screen, and 'Printers and Faxes.'
- Click your right mouse button on the listing for your printer, and then select 'Preferences' from the menu that appears.
- Set booklet printing
Select Booklet Printing from the Page Layout list on the Page Setup tab.
The current settings are displayed in the Settings Preview on the left side of the window.
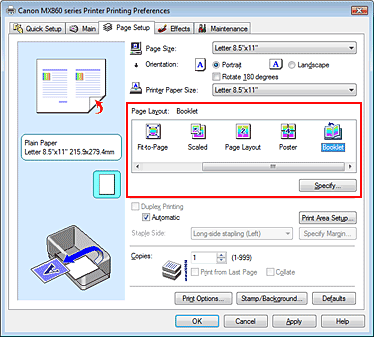
- Select the print paper size.
Select the size of the paper loaded in the machine from the Printer Paper Size list.
-
Set the margin for stapling and the margin width.
Click 'Specify', specify the following settings in the Booklet Printing dialog box, and then click 'OK'.
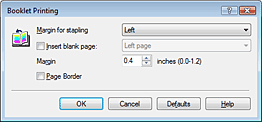
- Margin for stapling
Select which side the stapling margin should be on when the booklet is completed.
- Insert blank page
To leave one side of a sheet blank, check Insert blank page check box, and select the page to be left blank.
- Margin
Enter the margin width. The specified width from the center of the sheet becomes the margin for one page.
- Page Border
To print a page border around each document page, check the Page Border check box.
- Complete the setup.
Click 'OK' on the Page Setup tab.
When you execute print, the document will be printed on one side of a sheet of paper. When the printing of one side is complete, set the paper correctly by following the message and click OK.
When the printing of the other side is complete, fold the paper at the center of the margin and make a booklet.
Important:
- Booklet cannot be selected when a media type other than Plain Paper, Hagaki A or Hagaki is selected for Media Type.
- When Booklet Printing is selected, Duplex Printing, Staple Side, Print from Last Page, and Collate appear grayed out and are unavailable.
Note: The stamp and background are not printed on blank sheets inserted with the Insert blank page function of Booklet Printing.
|
